Pound First, Pull at 160°F for Juicy Air Fryer Chicken Breast
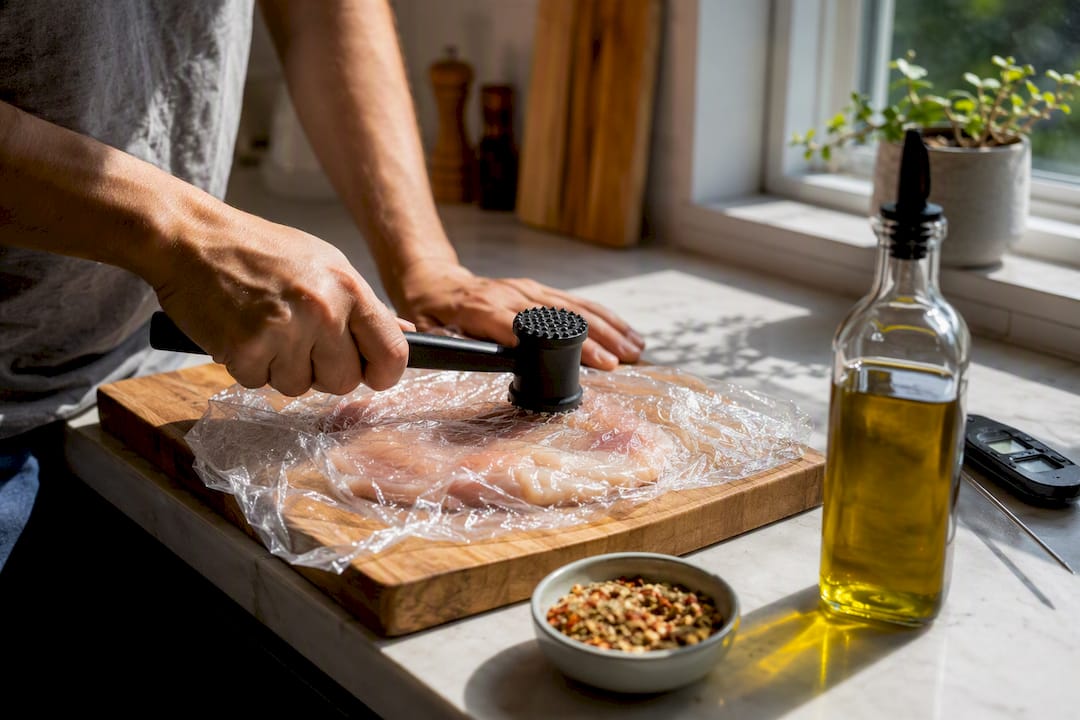
Cook chicken breast at a moderately high temperature for roughly 10 to 12 minutes, flipping once, and pound it to an even thickness before it goes in the basket. That single prep step, plus pulling it at 160°F and letting it rest, is what separates juicy chicken from the dry, rubbery kind. Full recipe card and timing chart below.
TL;DR:
- Pounding the chicken to an even thickness before cooking prevents uneven overcooking and ensures juiciness.
- Checking internal temperature and removing the chicken at 155 to 160°F guarantees moist, safe results without drying out the meat.
- Cooking at 380°F for 10 to 12 minutes, depending on thickness, with a flip mid-way, provides optimal browning and doneness.
- Using a quick baking soda soak or dry-brine enhances moisture retention and flavor penetration for better results.
- Avoid overcrowding the basket and always let cooked chicken rest for five minutes to maintain juiciness and even temperature.
Table of Contents
- Air Fryer Chicken Breast Recipe Card
- How to Air Fry Chicken Breast for Consistent, Juicy Results
- How Long to Air Fry Chicken Breast by Size and Thickness
- Can You Air Fry Frozen Chicken Breast?
- Marinades, Coatings, and Ways to Use Cooked Chicken
- Storing and Reheating Air Fryer Chicken Breast
- Why Your Chicken Comes Out Dry (And How to Fix It)
- How Hearthlyrecipes Tests Its Air Fryer Chicken Method
- A Weeknight Cook’s Honest Take on This Method
- Find More Tested Chicken Recipes at Hearthlyrecipes
- Sources
- FAQ
Air Fryer Chicken Breast Recipe Card
This is the version Hearthlyrecipes keeps coming back to: minimal ingredients, no marinating required, ready in under 30 minutes.
Servings: 4 Prep time: 10 minutes Cook time: 10 to 12 minutes Total time: about 25 minutes
- 4 boneless, skinless chicken breasts (6 to 8 oz each), pounded to even thickness
- 1 to 2 tablespoons olive oil or avocado oil
- 1 teaspoon garlic powder
- 1 teaspoon smoked paprika
- 1 teaspoon kosher salt
- ½ teaspoon black pepper
- Instant-read thermometer, tongs, and a meat mallet (or heavy skillet)
Preheat the air fryer to 380°F. Rub the chicken with oil and seasoning, arrange in a single layer, and cook 6 minutes. Flip and cook another 4 to 6 minutes, checking temperature at the thickest point. If you’re using thin cutlets instead of whole breasts, reduce the total time proportionally and start checking for doneness earlier.
How to Air Fry Chicken Breast for Consistent, Juicy Results
Getting a juicy chicken breast out of an air fryer isn’t about luck. It comes down to three things: even thickness, the right internal temperature, and a rest period you don’t skip.
1. Even out the thickness. Place each breast between two sheets of plastic wrap and pound the thick end down to match the thin end, aiming for an even, moderate thickness throughout. This is the single most reliable fix for the classic “dry outside, raw middle” problem, since pounding chicken to an even thickness prevents thin edges from overcooking while the center catches up. If you’d rather skip the mallet, slice the breast horizontally into two thinner cutlets instead.
2. Consider a brine. You have two real options here, and they solve different problems. A quick baking-soda soak, about 15 minutes in a mix of water and a half teaspoon of baking soda per pound of chicken, lightly breaks down surface proteins so the meat holds onto moisture. Simply Recipes documents this velveting technique as a fast way to tenderize before seasoning, and it fits into a weeknight timeline without extra planning. The longer route is a dry brine: salt (sometimes with a pinch of baking powder) applied ahead of time and left in the fridge. Serious Eats tested dry-brining for 4 to 24 hours and found it improves both flavor penetration and browning, though it obviously requires more lead time. If you’re cooking tonight, skip straight to seasoning. If you’re meal-prepping for the week, dry-brine the batch the night before.
3. Season and oil. Pat the chicken dry (this matters more than people think, since a wet surface steams instead of crisps), then coat lightly in oil and your spice blend of choice.
4. Arrange in a single layer. Give each piece space in the basket. Crowding blocks airflow and leaves you with pale, steamed-looking chicken instead of a golden crust.
5. Cook in two stages. Run the first 6 minutes at 380°F, flip with tongs, and finish for another 4 to 6 minutes depending on thickness.
6. Check with a thermometer, not a clock. Insert an instant-read thermometer into the thickest part of the breast. Pulling the chicken around 155 to 160°F and letting it rest allows carryover heat to finish the job, landing at the food-safe 165°F without turning the outside into shoe leather.
7. Rest for 5 minutes. This isn’t optional if you want juicy results. Cutting into chicken straight out of the basket lets all that moisture run onto the cutting board instead of staying in the meat.
Pro Tip: Keep two thermometers in rotation if you cook chicken often, one for checking and one staying clean for plating. It sounds fussy until you’ve cross-contaminated a cutting board mid-dinner.
Using an instant-read thermometer is genuinely the difference between guessing and knowing. A chicken breast that looks done on the outside can still be 145°F in the center, and one that looks slightly underdone can already be at temp. Your eyes will lie to you. The thermometer won’t.
How Long to Air Fry Chicken Breast by Size and Thickness
Cook time depends far more on thickness than on weight, which is exactly why two “6-ounce breasts” from the same package can need different times if one is lopsided.
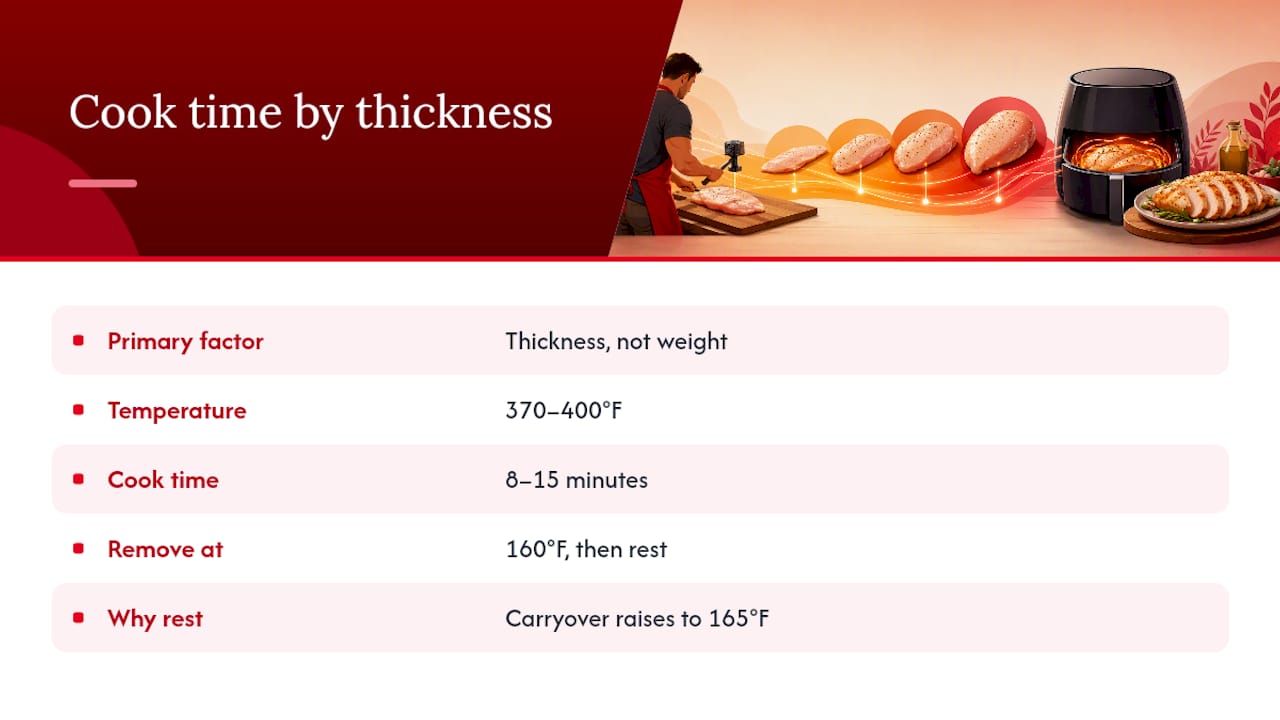
Serious Eats’ testing puts most boneless breasts in the 370°F to 400°F range with total times of 8 to 15 minutes, which lines up with what you’ll see across most home air fryer models. The higher end of that temperature range cooks faster and browns more aggressively; the lower end is more forgiving if your basket runs hot or your breasts are on the thicker side.
Weight is a rough guide at best. A dense, evenly-shaped 7-ounce breast might cook faster than a stretched-out, uneven 6-ounce one. Thickness is what your air fryer actually responds to, since heat has to travel from the surface to the center regardless of how much the piece weighs. Always remove chicken at 160°F rather than waiting for 165°F on the display. Carryover cooking during the rest closes that last 5 degree gap on its own.
Can You Air Fry Frozen Chicken Breast?
Yes, and it’s a legitimate weeknight fallback, not just a desperation move. The tradeoffs are real, though: you lose the option to brine or pound, and the texture ends up slightly less tender than a properly prepped fresh breast.
- Preheat the air fryer, then cook frozen breasts at 360°F for 18 to 22 minutes, flipping once halfway through.
- Skip seasoning at the start since it won’t stick to a frozen, icy surface. Spray with oil and season about 8 minutes in, once the exterior has thawed and softened.
- Well Plated’s frozen-chicken guidance recommends checking with a thermometer well before the time range ends, since freezer thickness varies more than you’d expect.
- If the thickest part reads under 155°F when the timer goes off, flip it back in for 2 to 3 minute intervals, checking each time, rather than guessing at a lump sum of extra minutes.
- Expect a slightly drier result than fresh chicken. Frozen breasts skip the moisture-locking benefit of pounding or brining, so a quick pan sauce or marinade afterward helps compensate.
If you know tonight is going to be a frozen-chicken night, pull one breast to thaw in the fridge the night before instead. It buys back the option to pound and brine, and the difference in final texture is noticeable.
Marinades, Coatings, and Ways to Use Cooked Chicken
Once you’ve got the base method down, the real value is in how many directions you can take it. This is the kind of protein that works for five different dinners without repeating itself.
- Lemon herb: Toss cooked chicken in lemon juice, olive oil, and chopped parsley right after resting, while it’s still warm enough to absorb the flavor.
- Buffalo style: Toss cooked breast in hot sauce and a pat of butter for a quick wing-adjacent flavor without the deep fryer.
- Garlic parmesan: Finish with melted butter, minced garlic, and grated parmesan for a coating that clings without breading.
- Cajun crust: Season heavily with a Cajun spice blend before cooking for a peppery, blackened-style exterior.
- Breaded and crispy: Dip in egg, coat in panko, and air fry at 400°F for a crunchy version that skips deep frying entirely.
For finishing sauces, add them after the rest, not during cooking, so acidic or sugary marinades don’t burn in the basket. Sliced chicken goes straight into grain bowls, tossed into a Caesar salad, or rolled into wraps like the Air Fryer Hot Chicken Wraps recipe. For meal prep, portion sliced chicken into containers with a starch and a vegetable, and keep any sauce separate until you’re ready to eat so the texture holds up.
Storing and Reheating Air Fryer Chicken Breast
Cooked chicken keeps well if you handle the cooling and packaging correctly, which matters more for texture than most people realize.
- Refrigerate in an airtight container for up to 4 days, cooling the chicken to room temperature first so condensation doesn’t turn it soggy.
- Freeze sliced or whole breasts for up to 3 months, wrapped tightly or in a freezer bag with the air pressed out.
- Reheat in the air fryer at 350°F for 3 to 4 minutes, which restores some crispness without drying out the interior.
- Alternatively, reheat in a 300°F oven covered loosely with foil for about 10 minutes, which is gentler than the microwave.
- Resting and reheating guidance from Simply Recipes notes that chicken held too long in the fridge can dry out further once reheated, so eat leftovers within the first few days for the best texture.
- Cold, sliced chicken works well straight from the fridge in salads. No reheating required, and it actually holds moisture better than reheated chicken since it skips the second heating cycle entirely.
Why Your Chicken Comes Out Dry (And How to Fix It)
Most air fryer chicken failures trace back to one of four causes, and all four are fixable once you know what to look for.
- Overcooked and dry: If it’s already done, slice it thin against the grain and toss with a sauce to add back moisture, or repurpose it into a soup or casserole where it can reabsorb liquid.
- Overcrowded basket: Chicken pieces touching each other block airflow, which is why the batch comes out pale and steamed instead of browned. Cook in batches if your basket is small.
- Undercooked in the center: If the thermometer reads low mid-cook, flip the piece and add 2 to 3 more minutes rather than cranking the temperature, which risks burning the outside before the inside catches up.
- Guessing instead of checking: Visual cues are unreliable. A breast that looks golden and firm can still read under 150°F at the core.
Pro Tip: If you’ve already sliced into an overcooked breast and it’s dry throughout, don’t throw it out. Chop it, warm it briefly in a skillet with a splash of chicken broth, and use it in a wrap or over rice. The broth rehydrates the surface enough to make it palatable again.
For undercooked chicken, always remove it at 155 to 160°F rather than pushing to 165°F in the basket. That last stretch of cooking happens during the rest, and skipping the thermometer check is the single most common reason home cooks end up with either raw centers or overcooked exteriors.
How Hearthlyrecipes Tests Its Air Fryer Chicken Method
This recipe went through multiple rounds of testing across different air fryer basket sizes and wattages before it became the version published here, since cook times shift meaningfully between a compact 3-quart basket and a larger 6-quart model.
Susan Scortberg, who writes the perspective below, has spent years developing weeknight recipes built around speed and reliability rather than restaurant-style technique. The approach at Hearthlyrecipes leans on repeat test runs, internal-temperature checks at multiple points during cooking, and adjustments based on reader feedback when a time range runs short or long on common air fryer models.
- Every batch was checked with an instant-read thermometer at the thickest point, not just at the estimated finish time.
- Timing was cross-checked against multiple basket sizes to avoid publishing a single number that only works for one machine.
- Reader ratings and comments on related recipes, including Air Fryer Chicken Drumsticks and the site’s “Melt-in-Your-Mouth” chicken recipe, informed adjustments to seasoning ratios and rest times.
- Related techniques get applied across the site’s air fryer catalog, so a method that works here carries over to other cuts and recipes.
A Weeknight Cook’s Honest Take on This Method
The one hack that changes everything here is pounding the chicken once, at the start of the week, for every breast you plan to cook in the next few days. It takes maybe four extra minutes total, and it means every single cook after that is faster and more predictable, since you’re not guessing at timing for an oddly-shaped piece.
On a weeknight, that’s the whole game: pound, season, cook, done in 25 minutes. For meal prep, dry-brine the batch Sunday night, then cook it Monday for noticeably better flavor and browning without any extra hands-on time.
One caveat worth naming honestly: if you’re working with a small-basket air fryer, don’t try to fit four breasts in at once just to save time. Crowding costs you the crisp exterior that makes this method worth doing over just baking the chicken. Cook in two batches. It’s five extra minutes, and the result is worth it.
— Susan Scortberg
Find More Tested Chicken Recipes at Hearthlyrecipes
Once you’ve got the timing down for a basic air fryer chicken breast, the real payoff is everything you can build from it, and Hearthlyrecipes runs a full library of tested variations to pull from.
If you’re shopping for consistent cuts to keep this method reliable week to week, boneless chicken breast from Pat’s Prime Cuts & Deli gives you evenly sized pieces that pound and cook more predictably than random grocery-bin picks. And once chicken becomes your go-to weeknight protein, Hearthlyrecipes’ chicken recipes collection has dozens of tested variations, from drumsticks to wraps to skillet dinners, each one built with the same thermometer-first, no-guesswork approach used here. Browse the full recipe vault for over 43,000 tested recipes across every cooking method, and start with whichever chicken dish looks good for tonight.
Sources
- Air Fryer Chicken Breast Recipe (Extra Juicy, 35 Minutes) — Simply Recipes
- Air-Fryer Chicken Breasts Recipe — Serious Eats
- Air Fryer Chicken Breast — Well Plated
- Air Fryer Chicken Breast — Budget Bytes
FAQ
How long do you cook chicken breast in an air fryer?
A ¾ inch thick breast takes about 10 to 12 minutes at 380°F, flipping once halfway through. Thinner cutlets cook in 6 to 8 minutes, while thicker breasts near 1 inch can take 13 to 16 minutes.
How do you keep chicken breast moist in an air fryer?
Pound the breast to an even thickness, remove it from the basket at 155 to 160°F instead of waiting for 165°F, and let it rest 5 minutes before cutting. A quick baking-soda soak or dry-brine beforehand adds another layer of insurance.
What are common mistakes when air frying chicken?
The biggest ones are overcrowding the basket, skipping the thermometer and relying on the clock, and cutting into the chicken immediately instead of resting it. Uneven thickness is a close fourth, since it guarantees one part overcooks while another finishes.
Can you put raw chicken directly in an air fryer?
Yes, raw chicken breast goes straight into the preheated basket with no pre-cooking required. Just make sure it’s arranged in a single layer with space between pieces so hot air can circulate and cook it evenly.