
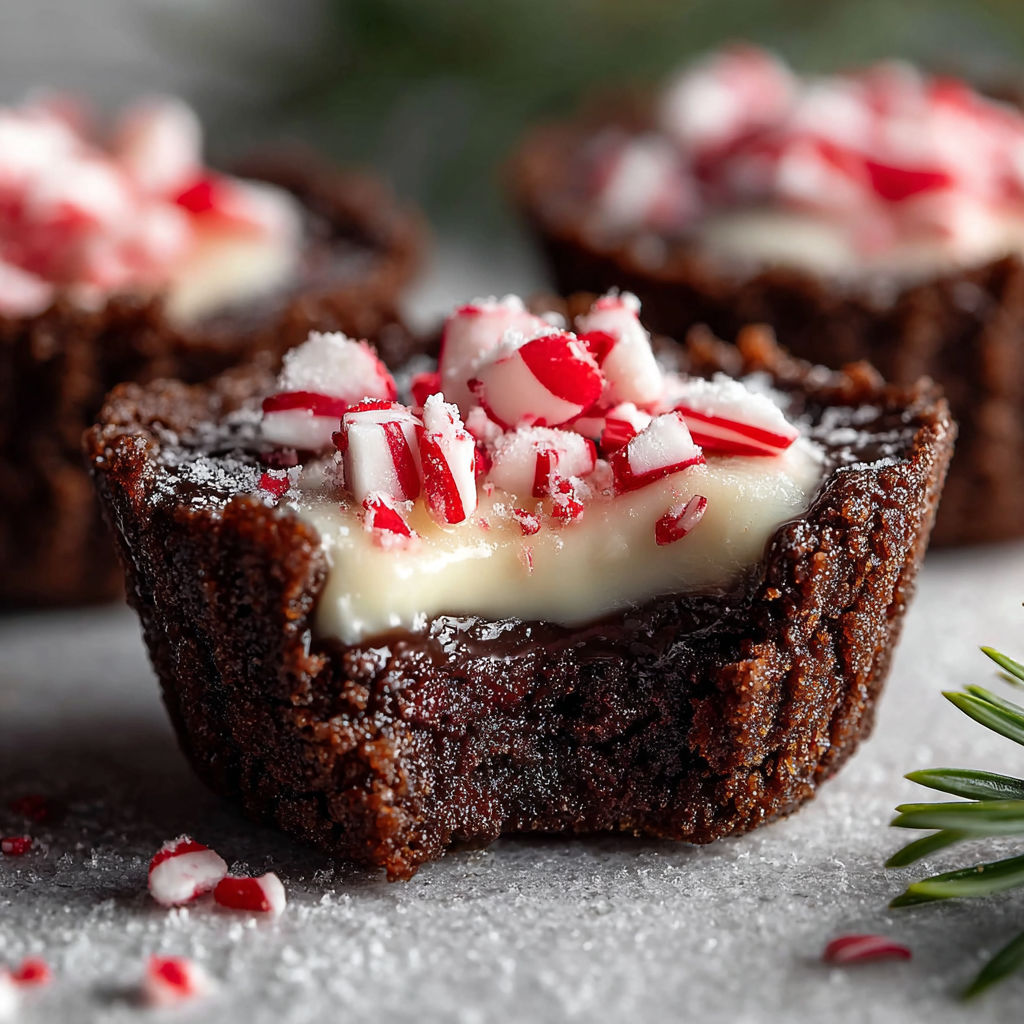
Peppermint Chocolate Cookie Cups
There's something undeniably magical about the first bite of these Peppermint Chocolate Cookie Cups-crisp edges give way to a fudgy, cocoa-rich center, then melt into a cool, peppermint-kissed cream filling. Home cooks adore them for holiday cookie swaps, cozy winter nights, or even as a show-stopping dessert for Valentine's Day. The combination of black cocoa and Dutch-process cocoa delivers a deep, velvety chocolate flavor that's irresistibly luxurious, while the mint swirl adds a refreshing twist that feels both festive and timeless. Whether you're impressing guests or treating yourself, these cups are pure comfort in edible form.
What Makes This Recipe Special
- Dual cocoa blend: Uses both black cocoa and Dutch-process cocoa for a layered chocolate experience-black cocoa for darkness and intensity, Dutch-process for smoothness.
- Press-and-fill technique: A simple jar or round container pressed into warm cookies creates the perfect cup shape and ensures the filling nestles deep inside.
- Two-stage chilling: First, cups cool in the pan to set their structure; second, the filled cups chill overnight for a clean slice and firm texture.
- Light-as-air filling: Whipped heavy cream folded into peppermint cream cheese creates a cloud-like texture that contrasts beautifully with the dense cookie base.
Ingredients
2 cupsplain all-purpose flour
1/4 cupsifted Dutch-process cocoa powder
1/4 cupblack cocoa powder
1 teaspoonbaking soda
1/2 teaspoonsalt
1 cupsoftened unsalted butter
1/2 cupwhite granulated sugar
1 cuppacked light brown sugar
2 largeroom-temp eggs
1 teaspoonvanilla flavor
1 cupheavy cream, cold
8 ouncesfull-fat cream cheese
1 teaspoonpeppermint flavoring
1/2 cupgranulated sugar
Nutrition
430 caloriesCalories
Per serving · Values are estimates
Instructions
1
Set oven to 350°F. Spray two cupcake pans well so nothing sticks.
2
Whisk flour, black cocoa, Dutch-process cocoa, baking soda, and salt in a medium bowl. Put aside.
3
Use a big bowl and beat butter with both sugars on medium-high for a couple minutes until fluffy.
4
Turn mixer down to low. Beat in eggs one by one, then add vanilla and mix it up.
5
Slowly mix in the flour mix until it just comes together. Don’t overdo it to keep it tender.
6
Put the batter evenly in cupcake tins. Bake 10 to 13 minutes till edges look set but centers stay soft.
7
Right after baking, press a small jar or container down in the middle of each to make a spot for filling.
8
Let them sit in the pans for 10 minutes. Twist gently to loosen, cool 5 more minutes, then put on a wire rack till fully cool.
9
Whip cold heavy cream in a chilled bowl with a mixer until it holds stiff peaks.
10
In a different bowl, mix cream cheese, sugar, and peppermint until smooth and creamy.
11
Carefully fold the whipped cream into the cream cheese mix until it’s all smooth and blended.
Essential Tips
Chill the bowl
Before whipping the cream, chill your mixing bowl and beaters in the freezer for 10 minutes. Cold tools help the cream whip faster and hold its peaks longer, preventing a soupy filling.
Use room-temp butter
Ensure your butter is fully softened but not greasy-it should yield slightly when pressed. This creates a lighter, fluffier cookie with even crumb and prevents dense spots.
Bake to soft centers
Watch the edges-they should set, but the center should still look slightly underdone. Overbaking dries out the cookie, making it harder to mold and less tender.
Press gently
After removing from the oven, press the jar straight down into the center of each cupcake without twisting. Twisting can tear the edges and ruin the clean cup shape.
Cool fully before filling
Letting the cookies cool completely prevents the warm centers from melting the filling prematurely, which can cause the cups to collapse or the filling to slide out.
Smart Swaps & Variations
Dark Chocolate Glaze Drizzle
For an elegant finish, melt 4 oz dark chocolate and drizzle over the filled cups before chilling. Adds a glossy sheen and extra depth.
Espresso Boost
Add 1/2 tsp instant espresso powder to the dry ingredients for a mocha twist that enhances the chocolate without tasting like coffee.
Vegan Option
Swap butter for vegan butter, eggs for flax eggs (2 tbsp ground flax + 6 tbsp water), and cream cheese for full-fat coconut cream. Texture will be slightly denser but still delicious.
What to Serve With This
- Warm peppermint hot chocolate with whipped cream and crushed candy canes
- Vanilla bean ice cream or mint chocolate chip gelato
- A glass of ruby port or a peppermint mocha latte for an adult treat
- As part of a holiday cookie platter with gingerbread and shortbread
Storage & Reheating
Storage
Store filled cups in an airtight container in the refrigerator for up to 5 days. Unfilled cookie cups can be kept at room temperature in a sealed container for 3 days or frozen for up to 1 month.
Reheating
To serve warm, microwave for 8-10 seconds-just enough to soften the filling without melting it. Alternatively, let sit at room temperature for 15 minutes; the cookie will soften slightly while the filling stays cool and creamy.
Expert Chef Tips
- Use a springform pan edge to press the cups: Trace the base of a 2-inch round cutter onto parchment, place in the cupcake mold, then fill with batter and bake. After baking, lift the parchment ring to remove the cookie intact-no crumbling.
- Fold the whipped cream in two additions: First fold in half to lighten the cream cheese mixture, then gently fold in the rest to preserve volume and prevent deflation of the filling.
- Add a pinch of salt to the whipped cream: Just a 1/8 tsp enhances the peppermint flavor and balances sweetness, giving the filling a more complex taste.
Equipment You’ll Need
- Electric mixer (stand or hand)
- Medium mixing bowls (2)
- Cupcake pans (2)
- 2-inch round jar or container (for pressing)
- Wire cooling rack
Nutritional Benefits
- Each cup contains about 430 calories, with 24g of fat (mostly from butter and cream) and 2g of protein.
- High in saturated fat due to butter, cream, and cream cheese-enjoy in moderation as an occasional treat.
- Contains 24g of total carbohydrates, with 12g of sugar per cup, primarily from granulated and brown sugars.
- Provides calcium from cream cheese and heavy cream, supporting bone health in an otherwise indulgent dessert.
Reviews
No written reviews yet — be the first to cook this and share how it turned out!
Leave a Review
Frequently Asked Questions
Can I make the cookie cups ahead of time?
Absolutely! Bake and cool the cups completely, then store them in an airtight container at room temperature for up to 3 days. Fill and chill only when ready to serve to maintain texture and freshness.
What's the best way to get clean slices when serving?
Chill the filled cups for at least 4 hours-overnight is ideal. Use a thin, sharp knife dipped in hot water and wiped dry between cuts to ensure clean edges and a neat presentation.
Can I use natural cocoa instead of black cocoa?
Yes, but the flavor and color will differ. Black cocoa is ultra-dark and adds a slightly smoky depth. Replace it with an equal amount of natural cocoa, but expect a lighter chocolate shade and less intense flavor.
Why did my filling slide out of the cups?
This happens if the cookies are overbaked, the centers are too soft when pressed, or the cups weren't fully cooled before filling. Press gently into warm (not hot) cookies after baking, then allow full cooling before filling.
Can I make these without peppermint extract?
You can substitute with 1/2 tsp peppermint oil or 1/4 cup finely crushed candy canes mixed into the filling. Avoid using red food coloring unless you want a bright hue-peppermint flavor doesn't need it.
What's the best way to press the cups?
Use a clean, dry 2-inch round jar or container. Press straight down firmly but gently into the center right after baking, then lift straight up. Avoid twisting to prevent tearing.
Can I freeze the filled cups?
Yes! Freeze filled cups on a tray for 1 hour, then transfer to a freezer bag for up to 1 month. Thaw in the fridge for 2-3 hours before serving to preserve texture.
Why use both black and Dutch-process cocoa?
Black cocoa adds deep, almost Oreo-like color and a slight roast note, while Dutch-process cocoa brings smoothness and mild alkalinity. Together, they create a richer, more complex chocolate base than either alone.
More Sweet Comfort

🔒 From the Vault — 43,000+ premium recipes




Cook This Next