christmas red velvet cheesecake
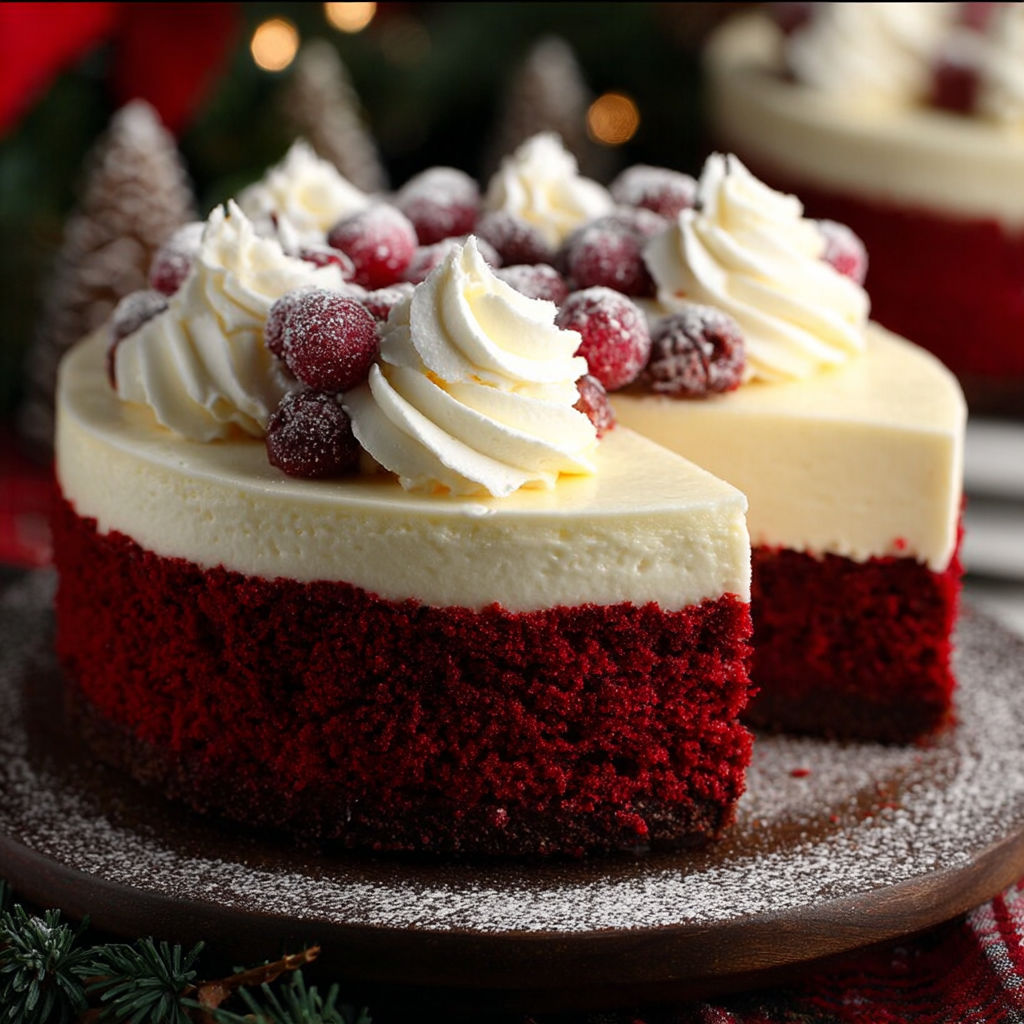
There's something magical about serving a Christmas red velvet cheesecake that instantly makes your holiday table feel extra special. The deep red cake layers contrast beautifully with the snowy white cheesecake filling, creating a showstopper dessert that guests will remember for years. The combination of rich cocoa notes and tangy cream cheese filling strikes the perfect balance between festive and indulgent. Whether it's your Christmas dinner centerpiece or a make-ahead dessert for holiday parties, this recipe delivers both beauty and deliciousness.
What Makes This Recipe Special
- The dual-layer design features vibrant red velvet cake wrapped around a luscious white chocolate cheesecake filling, creating a stunning visual contrast perfect for Christmas celebrations.
- Using both white vinegar and buttermilk in the cake batter ensures the perfect crumb and subtle tang that makes red velvet so irresistible.
- The white chocolate cream cheese filling is enriched with sour cream, giving it an ultra-smooth texture and slight tang that cuts through the sweetness.
- This recipe includes a clever baking technique where the cheesecake layer is chilled before assembling, preventing the cake layers from becoming soggy.
Ingredients
2 1/2 cupsregular flour
2 tablespoonscocoa powder (unsweetened)
1 teaspoonbaking powder
1 teaspoonbaking soda
1/2 teaspoonsalt
1 3/4 cupswhite sugar
3/4 cupveggie oil
1 cupbuttermilk
2 largeeggs
1 to2 tablespoons red food dye
1 teaspoonvanilla extract
1 teaspoonwhite vinegar
16 ouncessoftened cream cheese
1/2 cupwhite sugar
1/2 cupsour cream
2 largeeggs
1 teaspoonvanilla extract
8 ouncessoftened cream cheese
1/2 cupunsalted butter, softened
3 cupsconfectioners' sugar
1 teaspoonvanilla extract
Nutrition
430 caloriesCalories
Per serving · Values are estimates
Instructions
1
Heat your oven to 325°F. Mix the softened cream cheese and white sugar in a bowl until it's creamy. Add in the sour cream, eggs, and vanilla, and stir until everything's well mixed. Pour this mix into a cake pan and bake for about 40-45 minutes until it feels firm. Let it cool down fully, then put it in the fridge to get nice and cold.
2
Turn oven up to 350°F. Combine flour, cocoa, baking powder, baking soda, and salt in a big bowl. In another bowl, mix sugar, veggie oil, buttermilk, eggs, red food dye, vanilla, and vinegar. Slowly add your dry stuff to your wet stuff, stirring just enough to mix them together. Split the batter between your cake pans and bake for 25-30 minutes. Check if they're done by sticking a toothpick in—it should come out clean. Let the cakes cool completely on racks.
3
Beat the cream cheese and butter in your mixer until they're super smooth. Slowly add the confectioners' sugar while mixing on low. Stir in the vanilla and keep mixing until your frosting gets light and fluffy.
4
Put one red velvet layer on your serving plate. Take the cold cheesecake layer and place it right on top. Add the second red velvet layer on the very top. Now cover the whole thing with your cream cheese frosting, making the sides and top nice and smooth.
Essential Tips
Chill the layers
After baking each cake layer, let it cool completely before chilling in the fridge for 30 minutes. This prevents the cake from crumbling when you assemble the cheesecake and helps maintain clean slices.
Use room temperature ingredients
Ensure your cream cheese, eggs, and sour cream are at room temperature before mixing. Cold ingredients will create lumps in your cheesecake filling and may cause uneven baking in your cake layers.
Measure food dye carefully
Add red food dye gradually, starting with 1 tablespoon. For a deeper red, add up to 2 tablespoons, but be mindful that too much dye can alter the flavor subtly. Use gel food coloring for more vibrant color with less liquid.
Prevent cracks in cheesecake
When baking the cheesecake layer, place a water bath in the oven by setting the springform pan in a larger pan filled with hot water halfway up the sides. This creates gentle, even heat that prevents cracks.
Smooth the top layer
After adding the second cake layer on top of the cheesecake, gently press it down to ensure it's level. Use a small offset spatula to smooth the edges where the cake meets the filling for a professional finish.
Smart Swaps & Variations
Peppermint Chocolate Twist
Add 1/2 teaspoon peppermint extract to the cheesecake filling and top with crushed candy canes before chilling for a festive peppermint chocolate version.
Gluten-Free Option
Replace regular flour with an equal amount of gluten-free 1:1 baking flour and use gluten-free vanilla extract to maintain the recipe's integrity.
White Chocolate Swirl
Before baking the cheesecake layer, pour 1/2 cup melted white chocolate over the batter and gently swirl with a knife for a marbled effect.
Cranberry Topping
Top with fresh cranberry sauce or cranberry-orange compote for a tart contrast that complements the sweet cheesecake filling.
What to Serve With This
- Serve with a dollop of whipped cream and fresh raspberries for a pop of color and a light tartness to balance the richness.
- Pair with a steaming cup of spiced chai tea or hot cocoa for a cozy holiday dessert experience.
- Accompany with a scoop of vanilla bean ice cream and a drizzle of warm caramel sauce for an extra indulgent treat.
- Present as part of a holiday dessert board with chocolate truffles, gingerbread cookies, and assorted holiday chocolates.
Storage & Reheating
Storage
Store the assembled cheesecake in an airtight container in the refrigerator for up to 5 days. The cake layers and cheesecake filling should be kept chilled to maintain freshness and texture.
Reheating
To serve, bring the cheesecake to room temperature for about 30 minutes before slicing for the best texture. Avoid microwaving, as it can make the cake layers gummy and the cheesecake filling rubbery.
Expert Chef Tips
- For an extra-fluffy red velvet cake, whip the egg whites separately until stiff peaks form, then gently fold them into the batter at the end. This creates a lighter texture that stands up to the dense cheesecake layer.
- Use a springform pan with a removable bottom for easy assembly, but line the bottom with parchment paper to prevent the cheesecake from sticking and to ensure clean removal.
- Chill the entire assembled cheesecake for at least 4 hours, but overnight is ideal. This resting time allows the flavors to meld and the cheesecake to set properly, resulting in cleaner slices.
Equipment You’ll Need
- 9-inch springform pan with removable bottom
- Electric mixer (stand or hand mixer)
- Fine-mesh sieve for dusting powdered sugar
- Offset spatula for smooth layers
- Parchment paper for lining pans
Nutritional Benefits
- Each serving provides approximately 430 calories, with 22g of fat (14g saturated) primarily from cream cheese and vegetable oil, which contributes to the rich, decadent texture.
- The recipe contains about 45g of carbohydrates per serving, with 25g of sugar from both the cake and cheesecake layers. For a lower-sugar version, reduce the sugar by 1/4 cup in both components.
- Red velvet cake provides a small amount of cocoa flavonoids, which have antioxidant properties, while the cream cheese contributes calcium and protein.
- This dessert is high in saturated fat, so enjoy in moderation. Pair with fresh fruit to add fiber and vitamins to balance the meal.
Reviews
No written reviews yet — be the first to cook this and share how it turned out!
Leave a Review
Frequently Asked Questions
Can I make this cheesecake ahead of time?
Absolutely! Assemble the cheesecake completely and refrigerate for up to 3 days ahead. The flavors actually develop and improve over time. If making further ahead, freeze the assembled cheesecake for up to 2 weeks, then thaw in the fridge overnight before serving.
How do I prevent the red velvet cake layers from becoming dry?
The key is not overbaking. Bake the layers until a toothpick inserted comes out clean, but check at 20 minutes as ovens vary. Also, brush the warm layers lightly with simple syrup (equal parts sugar and water, heated until dissolved) to add moisture before assembling.
What's the best way to color the cake layers evenly?
Use gel food coloring for vibrant color without altering the batter consistency. Mix the dye into the wet ingredients thoroughly before combining with dry ingredients. For even color, divide the batter evenly between two bowls and dye each portion separately if needed.
Can I substitute the white vinegar in the cake?
Yes, you can use apple cider vinegar as a 1:1 substitute. However, avoid substitutions like lemon juice as they can affect both the color and flavor of the red velvet. The vinegar's subtle tang is essential for authentic red velvet flavor.
How do I get clean slices when serving?
Use a sharp, thin knife dipped in hot water and wiped dry between cuts. For even cleaner slices, dip the knife in warm water between each cut rather than wiping, letting the heat do the work of separating the layers.
Why is my cheesecake layer cracked?
Cracks typically occur from overmixing the batter or baking at too high a temperature. Mix just until combined and bake in a water bath to provide gentle, even heat. If cracks do appear, you can cover them with whipped cream or fruit topping.
Can I make this recipe without a springform pan?
While possible, it's not ideal. A springform pan allows for easy removal and assembly. If necessary, use a regular cake pan lined with parchment paper, but the cheesecake may not release as cleanly. Chill thoroughly before attempting to remove.
What's the best way to transport this cheesecake?
Place the assembled cheesecake on a sturdy tray or cake board. If transporting in cold weather, keep it covered and use a warming bag or insulated container. Avoid placing it in direct sunlight or heat, which can cause the cream cheese to soften too much.
More Christmas
🔒 From the Vault — 43,000+ premium recipes
Cook This Next