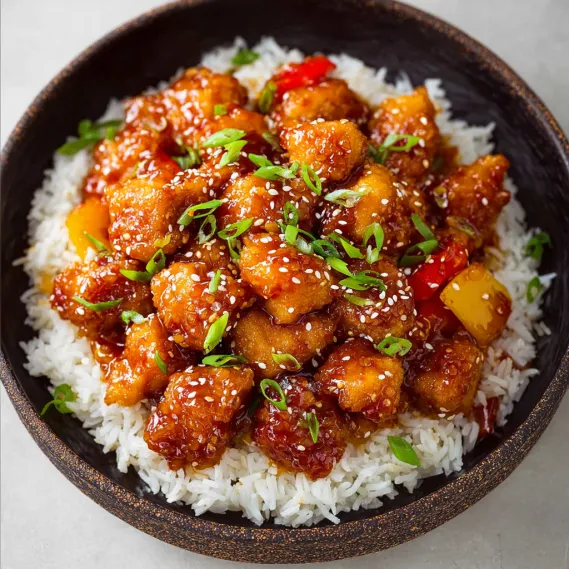
Easy Sweet and Sour Chicken
There's something magical about cracking open a jar of homemade sweet and sour sauce-it transforms ordinary chicken into a weeknight hero. This dish dances between sticky-sweet pineapple notes and a bright, apple cider tang, making it impossible to resist even for picky eaters. It's a breeze to double for potlucks or meal prep, and the leftovers reheat like a dream. Plus, the sauce tastes far better than anything from a takeout menu, with no sketchy additives in sight.
What Makes This Recipe Special
- The sauce builds depth in just two minutes on the stovetop, thanks to a clever combo of apple cider vinegar, ketchup, and both sugars for a balanced flavor profile.
- Coating the chicken in cornstarch before frying ensures a crisp, golden crust that locks in juices and soaks up the sauce beautifully.
- A quick cornstarch slurry at the end of sauce-making guarantees a glossy, thick glaze without any risk of splitting or curdling.
- Using boneless skinless chicken thighs adds richness and keeps the dish budget-friendly without sacrificing tenderness.
Ingredients
¾ cupgranulated sugar
½ cupapple cider vinegar
¼ cupketchup
2 tablespoonslow-sodium soy sauce
1 tablespoonsesame oil
1 tablespoonpacked light brown sugar
3 clovesgarlic, pressed or finely minced
2 tablespoonscold water
1 tablespooncornstarch
1.25 poundsboneless skinless chicken breasts, cut into 1-inch pieces (substitute: boneless skinless chicken thighs)
3 tablespoonscornstarch
Salt and pepper, to taste
3 to4 tablespoons olive oil, plus more as necessary
2 greenonions, sliced into thin rounds (optional, for garnish)
1 tablespoonsesame seeds (optional, for garnish)
Nutrition
514 caloriesCalories
Per serving · Values are estimates
Instructions
1
In a medium saucepan, combine all sauce ingredients except for water and cornstarch, then whisk together. Bring to a boil over medium-high heat.
2
In a small bowl, mix the water and cornstarch until smooth. Gradually add this mixture to the saucepan. Reduce heat to low and simmer the sauce for 5 minutes, whisking intermittently while preparing the chicken.
3
Place the chicken in a large zip-top bag, add cornstarch, salt, and pepper. Seal the bag and shake to ensure the chicken is evenly coated.
4
Heat 3 to 4 tablespoons of olive oil in a large skillet over medium-high heat. Add the coated chicken and cook for 5 to 7 minutes until fully cooked, stirring and flipping intermittently. Add additional oil as needed if the skillet becomes dry.
5
Reduce the heat to low, stir the prepared sauce into the skillet, and mix to coat the chicken evenly. Simmer for an additional 1 to 2 minutes.
6
Optionally garnish with sliced green onions and sesame seeds. Serve immediately.
Essential Tips
Thin the sauce
If the sauce is too thick after simmering, whisk in a splash of warm water or apple cider vinegar to loosen it. Avoid thinning with stock-it can dilute the flavor.
High heat only
Always cook the chicken in a skillet over medium-high to medium heat to achieve a crispy crust. Lower heat will steam the chicken and make it soggy.
Stir constantly
Once the sauce hits the skillet, keep the chicken moving to coat evenly. Stopping mid-stir can cause the sauce to thicken unevenly and cling to the pan.
Cornstarch trick
Use cold water when mixing the cornstarch slurry to prevent premature thickening. Warm water can start the gelatinization process before adding to the sauce.
Garnish last
Add green onions and sesame seeds right before serving to preserve their vibrant color and fresh crunch-sprinkling them earlier makes them wilt.
Smart Swaps & Variations
Pineapple twist
Add 1 cup of fresh pineapple chunks or crushed canned pineapple to the sauce while simmering for a juicy, fruity upgrade.
Spicy kick
Stir in ½ teaspoon of chili flakes or 1 tablespoon of sriracha into the sauce for a subtle heat that cuts through the sweetness.
Veggie boost
Toss in 1 bell pepper (sliced) and 1 cup of broccoli florets with the chicken halfway through cooking to add color and crunch.
Gluten-free swap
Replace soy sauce with tamari or coconut aminos, and use arrowroot powder instead of cornstarch for thickening.
What to Serve With This
- Steamed jasmine rice or cauliflower rice for soaking up every last drop of sauce.
- Crispy sesame seed spring rolls or egg rolls for a full takeout-style feast.
- A chilled glass of ginger beer or a crisp Sauvignon Blanc to balance the sweetness.
- Quick-pickled cucumbers or a simple cucumber salad to cut through the richness.
Storage & Reheating
Storage
Store leftover sweet and sour chicken in an airtight container in the fridge for up to 3 days. The sauce will thicken as it cools, so loosen with a splash of water before reheating.
Reheating
Gently reheat in a skillet over low heat with a splash of water, stirring constantly until warmed through. Microwaving can make the sauce separate, so avoid it if possible.
Expert Chef Tips
- For extra sauce volume without diluting flavor, simmer the sauce for an extra 2 minutes with a ½ cup of low-sodium chicken broth before adding the cornstarch slurry.
- Use a neutral oil like avocado or grapeseed instead of olive oil for a higher smoke point and cleaner flavor when frying the chicken.
- If making ahead, undercook the chicken slightly (pull it off the heat when it's still 160°F internally) to prevent it from drying out during storage and reheating.
Equipment You’ll Need
- Large skillet or wok with high sides for frying the chicken.
- Medium saucepan for making the sauce.
- Large zip-top bag for tossing the chicken in cornstarch.
- Whisk for combining the sauce ingredients smoothly.
Nutritional Benefits
- A single serving (about 1 cup of chicken and sauce) provides roughly 45g of protein, making it a satisfying, muscle-friendly meal.
- The sauce is lower in sodium than many takeout versions due to the use of low-sodium soy sauce and no added salt in the sauce itself.
- Apple cider vinegar may support blood sugar control and digestion, adding a functional benefit to this indulgent dish.
- Using boneless skinless chicken thighs instead of breasts reduces cost while increasing the dish's healthy fats and iron content.
Reviews
No written reviews yet — be the first to cook this and share how it turned out!
Leave a Review
Frequently Asked Questions
Can I use chicken tenders instead of breasts?
Yes! Chicken tenders work perfectly and cook even faster-just halve the cooking time to 3-4 minutes per side. Be sure to pat them dry first to help the cornstarch adhere.
Why did my sauce split or curdle?
This usually happens if the sauce is exposed to sudden temperature changes or if too much liquid is added at once. To fix, remove from heat immediately and whisk vigorously to emulsify. Adding a pinch of xanthan gum can also help stabilize the sauce next time.
Can I make this in advance?
Absolutely! Prep the sauce and chicken separately up to a day ahead, then store them in the fridge. Reheat the sauce gently before adding it to the chicken in the skillet to avoid overcooking.
What's the best substitute for apple cider vinegar?
White wine vinegar or rice vinegar are the closest alternatives, offering a mild acidity without overpowering the dish. Avoid balsamic vinegar-it's too sweet and dark for this recipe.
How can I make this dish lower in sugar?
Reduce the granulated sugar to ½ cup and omit the brown sugar entirely. Balance with an extra ¼ cup of ketchup or add 1 tablespoon of honey for sweetness without spiking the sugar content too much.
My sauce is too thin. How do I thicken it quickly?
Mix 1 teaspoon of cornstarch with 1 teaspoon of cold water, then stir it into the sauce and simmer for 1-2 minutes until thickened. Avoid adding dry cornstarch directly-it can clump.
Can I bake the chicken instead of frying?
Yes! Toss the cornstarch-coated chicken with 1 tablespoon of oil, spread on a parchment-lined baking sheet, and bake at 400°F for 18-20 minutes, flipping halfway. Finish with the sauce in a skillet for best texture.
What's the secret to juicy chicken?
Pat the chicken dry before coating it in cornstarch-this removes excess moisture and helps the cornstarch create a crispy crust. Also, don't overcrowd the skillet; cook in batches if needed.
More Dinner Victories
🔒 From the Vault — 43,000+ premium recipes

Cook This Next