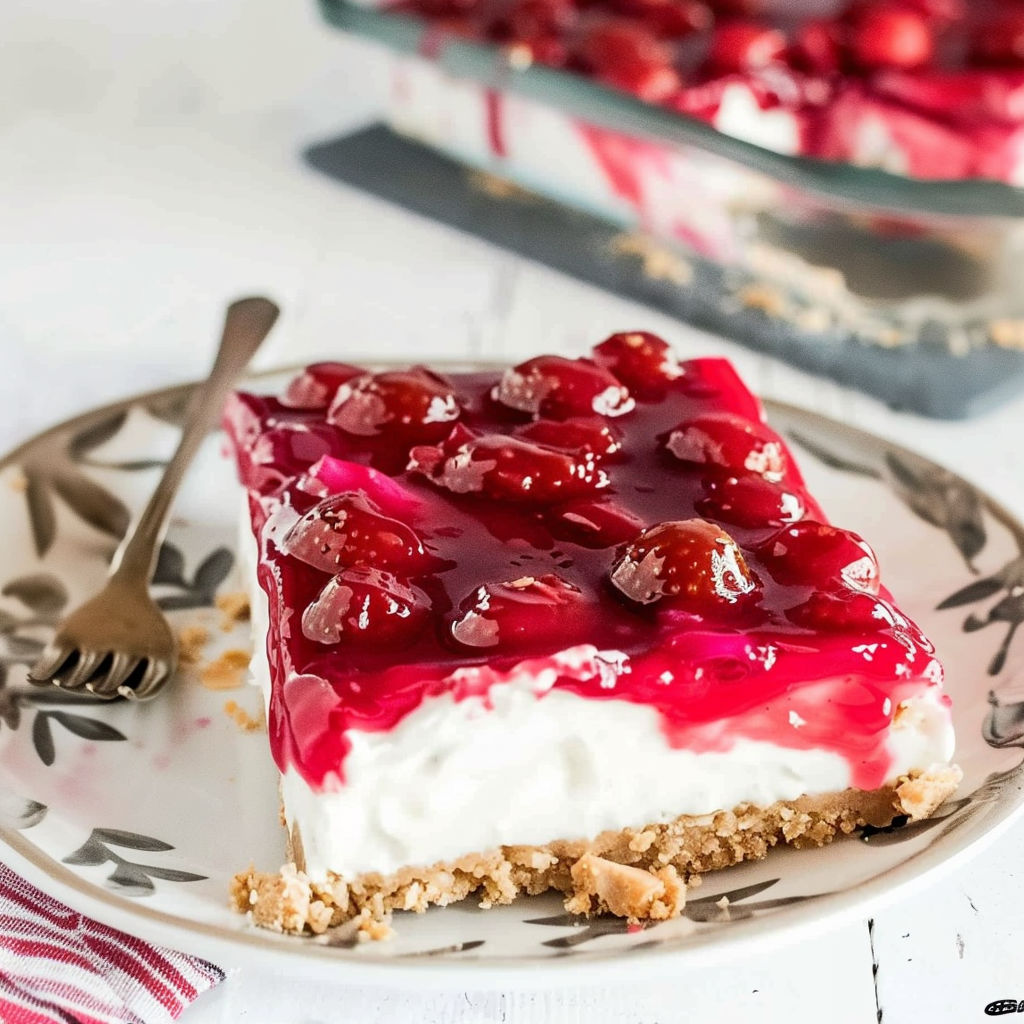
No Bake Cherry Cheesecake Bars
There's something magical about a dessert that tastes like summer in every bite-no oven required! These No Bake Cherry Cheesecake Bars are the ultimate make-ahead treat, perfect for picnics, potlucks, or simply satisfying a spontaneous sweet tooth. With a buttery graham cracker crust, luscious cream cheese filling, and a vibrant cherry topping, they're irresistibly creamy, fruity, and handheld, making them a crowd-pleaser that disappears faster than you can say 'seconds, please.' Whether you're hosting a Fourth of July gathering or need a stress-free dessert for a busy weeknight, these bars deliver effortless elegance with zero baking stress.
What Makes This Recipe Special
- Chilled texture perfection: The filling is enriched with whipped heavy cream for a cloud-like, silky consistency that melts in your mouth.
- Balanced sweetness: The tartness of the cherry pie filling cuts through the richness of the cream cheese, creating a harmonious flavor profile.
- Make-ahead mastery: These bars taste even better after 24 hours in the fridge, as the crust softens slightly and the flavors meld beautifully.
- Portion control made easy: Pre-cut into neat squares, they're ideal for sharing (or not!) without the fuss of slicing at the table.
Ingredients
2 cupsgraham cracker crumbs
6 tablespoonsunsalted butter, melted
16 ouncescream cheese, softened
1/2 cupgranulated sugar
1/2 cupheavy cream
21 ouncescherry pie filling
Nutrition
753 caloriesCalories
Per serving · Values are estimates
Instructions
1
Line an 8-inch by 8-inch square baking dish with parchment paper, ensuring overhang on the sides for easy removal.
2
In a medium mixing bowl, combine graham cracker crumbs with melted butter. Stir thoroughly until all crumbs are moistened, then press firmly and evenly into the prepared dish to form a compact crust.
3
In a large bowl, beat the softened cream cheese with granulated sugar on medium-high speed until the mixture is light and fluffy.
4
In a separate clean bowl, whip heavy cream beginning on low speed and gradually increasing to high, beating until medium peaks form.
5
Gently fold the whipped cream into the cream cheese mixture. Mix on high speed until fully incorporated and silky.
6
Spread the filling over the graham cracker crust using a spatula, smoothing the top into an even layer.
7
Distribute cherry pie filling evenly across the surface of the cheesecake and carefully spread to cover the filling completely.
8
Cover the dish with plastic wrap and refrigerate for a minimum of 4 hours, or overnight, to allow bars to set fully.
9
Uncover and lift bars from the dish using parchment. Cut into 9 equal squares and serve chilled. Store leftovers covered in the refrigerator.
Essential Tips
Chill the cream cheese
For a smoother, lump-free filling, ensure your cream cheese is fully softened at room temperature before beating-this can take up to 2 hours. Cold cream cheese won't whip properly and may leave your filling grainy.
Whip cream to medium peaks
Over-whipping the heavy cream can turn it grainy or buttery. Aim for soft to medium peaks that hold their shape when the whisk is lifted-this ensures the filling stays light and airy.
Press the crust firmly
Use the bottom of a glass or measuring cup to compact the graham crumb mixture evenly into the pan. This prevents the crust from crumbling when you cut the bars and adds structural integrity to the dessert.
Layer filling evenly
Spread the cream cheese mixture in a thin, uniform layer over the crust to prevent uneven setting. A slightly off-center pour can cause the filling to pool in one area, leading to bars that aren't uniformly creamy.
Let bars set overnight
While 4 hours is the minimum, chilling overnight allows the crust to soften just enough and the flavors to deepen. This extra time is especially noticeable in the texture and taste of the final product.
Smart Swaps & Variations
Chocolate-Dipped Rows
Once the bars are set, dip half of each square into melted dark chocolate and place on parchment paper to harden. This adds a sophisticated touch and a bittersweet contrast to the sweet cherry filling.
Berry Swap
Replace the cherry pie filling with blueberry or strawberry pie filling for a tangy twist. For a fresh berry version, fold 1 cup of fresh cherries (pitted and halved) into the cream cheese layer before chilling.
Crust Upgrade
For a nutty depth, replace half the graham crumbs with finely ground pecans or walnuts. The nuts add a subtle crunch and complement the cherry flavor beautifully.
Lightened Version
Swap the heavy cream for full-fat Greek yogurt and use a sugar substitute (like erythritol) in the filling to reduce calories while keeping the dessert rich and creamy.
What to Serve With This
- Warm vanilla bean ice cream or a scoop of lemon sorbet to contrast the richness of the bars.
- A dusting of powdered sugar and fresh mint leaves for a restaurant-worthy presentation.
- A glass of chilled sparkling wine or a fruity rosé to complement the cherry and cream cheese notes.
- Coffee or espresso for a sophisticated dessert course that balances the sweetness.
Storage & Reheating
Storage
Store the bars covered in plastic wrap or in an airtight container in the refrigerator for up to 5 days. The texture remains best when kept chilled, so avoid leaving them at room temperature for more than 2 hours.
Reheating
These bars are best enjoyed cold, as reheating can cause the cream cheese filling to soften and lose its silky texture. If you must warm them slightly, place a square on a microwave-safe plate and heat for 10-15 seconds to soften the cream cheese slightly.
Expert Chef Tips
- Use a springform pan for easier removal: If you don't mind a slightly taller bar, bake the crust in a 9-inch springform pan lined with parchment. This makes slicing and serving neater, especially for larger gatherings.
- Add a citrus note to balance the sweetness: Zest 1 lemon or lime into the cream cheese filling before folding in the whipped cream. The bright acidity enhances the cherry flavor without overpowering it.
- Press the cherry filling gently: After spreading the cherry pie filling, use a spoon to lightly smooth the surface, but avoid compacting it. This prevents the cherries from bleeding excessively into the cream cheese layer and keeps the bars visually appealing.
Equipment You’ll Need
- 8-inch by 8-inch square baking dish or pan
- Medium mixing bowls (2)
- Hand mixer or stand mixer with whisk attachment
- Spatula or offset spatula
- Plastic wrap
Nutritional Benefits
- High in calcium and vitamin D from the cream cheese, which supports bone health.
- Provides a good dose of protein from the cream cheese and graham crackers, helping to balance the sugar content.
- Contains heart-healthy fats from the heavy cream and butter, but moderation is key due to the high calorie and saturated fat content.
- The cherry pie filling adds antioxidants and fiber, though the sugar content is high-opt for a reduced-sugar version if watching sugar intake.
Reviews
No written reviews yet — be the first to cook this and share how it turned out!
Leave a Review
Frequently Asked Questions
Can I use low-fat cream cheese or whipped topping?
Low-fat cream cheese will make the filling denser and less creamy, while whipped topping (like Cool Whip) can lead to a grainy texture. For the best results, stick with full-fat cream cheese and real heavy cream to maintain the bars' signature silky consistency.
What if I don't have cherry pie filling?
You can make your own by simmering 2 cups of pitted cherries with 1/2 cup sugar, 1 tbsp lemon juice, and 1 tbsp cornstarch until thickened. Alternatively, use strawberry or blueberry pie filling for a different but equally delicious flavor.
Can I freeze these bars?
Yes, you can freeze the bars for up to 2 months. Wrap individual squares tightly in plastic wrap and then place them in a freezer bag. Thaw overnight in the refrigerator before serving to preserve the texture.
Why is my crust soggy after refrigeration?
Sogginess usually happens if the crust isn't compacted enough or if the cream cheese filling isn't spread evenly. Press the crust firmly into the pan and ensure there's a thin, even layer of filling over the entire surface to act as a moisture barrier.
How do I cut the bars neatly without them falling apart?
Use a sharp knife dipped in hot water to cut the bars. Wipe the knife clean between cuts and press down firmly but gently to avoid crushing the filling. For extra clean edges, chill the bars for an additional 30 minutes before slicing.
Can I use a different crust, like Oreo or pretzels?
Absolutely! Crush 24 Oreo cookies (about 2 cups) for a chocolate crust or 1 1/2 cups of pretzel crumbs mixed with 1/2 cup melted butter for a salty twist. Both options pair wonderfully with the cherry filling.
What's the best way to layer the filling and cherries?
Spread the cream cheese filling evenly over the crust, then spoon the cherry pie filling on top. Use a spatula to gently spread the cherries in an even layer, being careful not to press too hard and mix them into the cream cheese.
Can I make these bars gluten-free?
Yes, use gluten-free graham crackers or a gluten-free cookie (like gluten-free vanilla wafers) for the crust. Ensure all other ingredients, such as the pie filling, are certified gluten-free to avoid cross-contamination.
More Sweet Comfort
🔒 From the Vault — 43,000+ premium recipes

Cook This Next