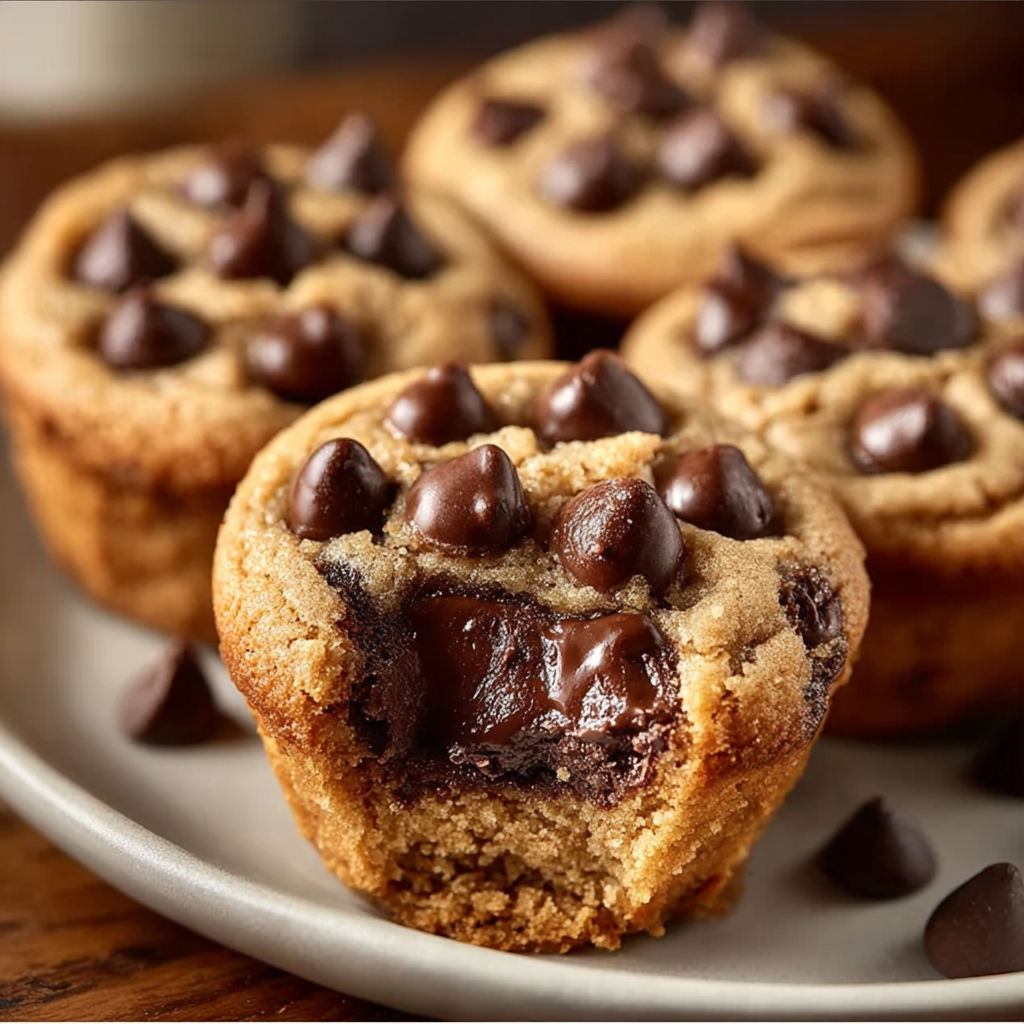
Reese's Chocolate Chip Cookie Bites
There's something magical about biting into a warm, gooey cookie only to discover a hidden treasure of creamy peanut butter goodness inside. These Reese's Chocolate Chip Cookie Bites are the ultimate handheld indulgence, perfect for parties, movie nights, or when you need a quick chocolate fix. The contrast of crisp edges and molten centers with the surprise of Reese's cups makes them irresistibly fun to share-or not. Home cooks adore them for their simplicity and crowd-pleasing appeal, turning store-bought dough into a showstopper with minimal effort.
What Makes This Recipe Special
- Uses refrigerated dough balls for effortless portioning and even baking-no scooping or chilling required
- Bite-sized format makes them ideal for parties, potlucks, or single-serving treats
- Peanut Butter Cups are pressed into warm dough, allowing them to melt slightly for a seamless blend of textures
- Customizable with different chocolate doughs (e.g., double chocolate) or alternative peanut butter cups for variety
Ingredients
12 refrigeratedchocolate chip cookie dough balls (1-2 tablespoons each)
12 bite-sized Reese's Peanut Butter Cups
Nutrition
250 caloriesCalories
Per serving · Values are estimates
Instructions
1
Lightly grease a mini muffin pan to prevent sticking.
2
Place one cookie dough ball into each cavity of the mini muffin pan.
3
Bake in a preheated oven at temperature indicated on the cookie dough packaging for 10 to 12 minutes, or until just set.
4
Immediately press one Reese's Peanut Butter Cup into the center of each baked cookie while warm.
5
Allow cookie bites to cool for a few minutes in the pan before removing and serving.
Essential Tips
Use room-temp dough
If your dough balls are rock-hard straight from the fridge, let them sit at room temperature for 10-15 minutes before baking. This ensures even baking and prevents the edges from becoming overdone while the center stays raw.
Press firmly, but quick
When inserting the Reese's cups, press down firmly but don't overwork the dough. The goal is to create a slight well for the cup to nestle into without squishing the dough outward, which can cause uneven baking.
Watch the clock
Bake the dough just until the edges are set but the centers are still soft (about 10-12 minutes). Overbaking will make the bites dry and less gooey, which defeats the purpose of the molten peanut butter surprise.
Cool slightly before removing
Let the cookie bites cool in the pan for 2-3 minutes after baking. This helps them firm up enough to handle being transferred without falling apart, but not so long that the Reese's cup sticks to the pan.
Double up for extra decadence
For a triple-chocolate experience, slice a mini Reese's Peanut Butter Cup in half and press one half into the dough before baking, then top with the other half after removing from the oven. The contrast of textures is next-level.
Smart Swaps & Variations
Dark Chocolate Twist
Swap the chocolate chip dough for refrigerated dark chocolate cookie dough and use white chocolate Reese's cups for a sophisticated, less sweet version.
Gluten-Free Option
Use gluten-free refrigerated cookie dough and gluten-free Reese's cups to create a version that's safe for gluten-sensitive guests.
Mini Reese's Surprise
For a truly indulgent bite, use mini Reese's Peanut Butter Cups and press two into each cookie bite instead of one.
Salted Caramel Upgrade
Add a small piece of salted caramel candy or a drizzle of caramel sauce into the center before pressing in the Reese's cup for a salty-sweet mashup.
What to Serve With This
- A glass of cold milk for dipping or sipping alongside
- Vanilla ice cream or whipped cream for a decadent dessert bowl
- Fresh berries (like raspberries or sliced strawberries) to cut through the richness
- A sprinkle of flaky sea salt on top for an elevated sweet-salty finish
Storage & Reheating
Storage
Store cookie bites in an airtight container at room temperature for up to 3 days. For longer storage, freeze them in a single layer before transferring to a freezer bag for up to 1 month.
Reheating
To restore warmth and gooeyness, microwave for 5-10 seconds or warm in a 300°F (150°C) oven for 3-5 minutes. Avoid over-reheating, as the Reese's cup will melt into a puddle and lose its structure.
Expert Chef Tips
- Chill the Reese's cups for 10 minutes before pressing them into the dough to prevent them from sticking to your fingers and deforming.
- For extra crisp edges, brush the mini muffin pan cavities with a light layer of egg wash before adding the dough balls-this creates a delicate, edible shell.
- If the dough balls are too large for your mini muffin pan, gently flatten them into discs before baking to ensure even cooking and a better Reese's cup fit.
Equipment You’ll Need
- Mini muffin pan (or regular muffin pan with mini liners)
- Silicone spatula or spoon for pressing in Reese's cups
- Cooling rack (optional, for even cooling)
- Toothpick (optional, for testing doneness)
Nutritional Benefits
- Each bite packs a satisfying mix of protein and healthy fats from the peanut butter cups, balancing the sugar from the cookie dough.
- Reese's Peanut Butter Cups contribute small amounts of calcium and iron, though this dish remains a treat rather than a nutrient-dense option.
- A single cookie bite (using standard ingredients) contains about 250 calories, 13g of fat, 30g of carbohydrates, and 3g of protein.
- For a lighter version, use reduced-fat peanut butter cups and dough balls to cut down on saturated fat and calories.
Reviews
No written reviews yet — be the first to cook this and share how it turned out!
Leave a Review
Frequently Asked Questions
Can I make these with homemade cookie dough instead of store-bought?
Absolutely! Use your favorite chocolate chip cookie dough recipe and portion it into 1-2 tablespoon balls. Chill the dough for 30 minutes before baking to prevent spreading, and adjust the bake time to 12-15 minutes for homemade dough.
Why do my Reese's cups slide to the side instead of staying centered?
This happens if the dough is too warm when you press in the cup or if you don't press firmly enough. Let the dough cool slightly after baking, then press the cup straight down with even pressure to create a snug well.
Can I prepare these ahead of time?
Yes! Bake the cookie dough balls up to a day ahead and store them in an airtight container. Press in the Reese's cups just before serving to maintain the gooey texture. Alternatively, freeze the baked dough balls and bake straight from frozen, adding 1-2 extra minutes.
What's the best way to thaw frozen cookie bites?
Transfer frozen cookie bites to the fridge the night before serving to thaw slowly. For a quick thaw, microwave them for 10-15 seconds or bake at 300°F (150°C) for 5-7 minutes until warmed through.
Can I use other candy in place of Reese's cups?
Yes! Try peanut butter-filled chocolate truffles, Nutella cups, or even a small spoonful of caramel or cookie dough in the center. Avoid candies that melt too quickly, like gummy bears, as they won't hold their shape.
Why are my cookie bites dry instead of gooey?
Overbaking is the most likely culprit. Bake the dough balls just until the edges are set but the centers are still soft. Also, ensure you're using high-quality refrigerated dough-some brands bake drier than others.
Can I make these without a mini muffin pan?
Yes! Use a regular muffin tin lined with mini muffin liners, or bake the dough balls on a parchment-lined baking sheet. The bake time may vary slightly, so check for doneness at 10 minutes.
Are these kid-friendly?
Absolutely! Kids love the fun surprise of finding the Reese's cup inside. For younger children, consider cutting the cookie bites in half to make them easier to handle. Be mindful of choking hazards with very young kids.
More Sweet Comfort





🔒 From the Vault — 43,000+ premium recipes


Cook This Next