Strawberry Cheesecake Dump Cake
Home cooks adore this Strawberry Cheesecake Dump Cake for its effortless elegance and nostalgic comfort. Perfect for potlucks, birthday celebrations, or a simple weeknight dessert, it delivers big flavor with minimal effort. The harmonious layers of juicy strawberries, tangy cream cheese, and buttery cake create a dessert so irresistible, it feels like a hug on a plate. Whether you're serving a crowd or treating yourself, this recipe promises satisfaction without the fuss.
What Makes This Recipe Special
- No mixer required: The recipe relies on hand mixing the cream cheese filling, making it accessible even without special equipment.
- Dump-and-bake simplicity: Every ingredient is layered without measurements or intricate prep, ideal for beginners or busy cooks.
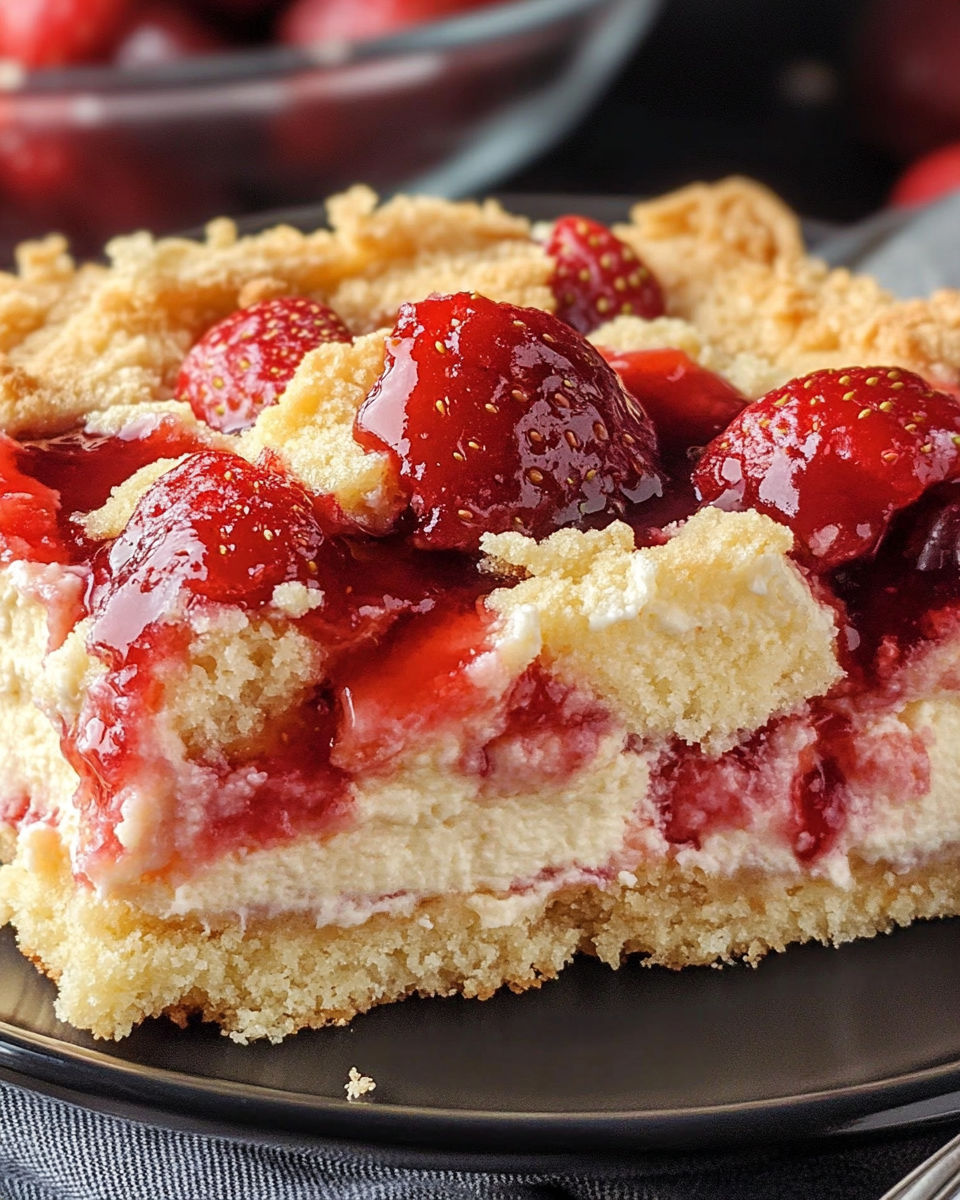
- Natural swirls for visual appeal: The cream cheese is added in spoonfuls, creating rustic, marbled patterns that look artisanal.
- Three textures in one bite: The soft cake base, creamy cheesecake middle, and jammy strawberry topping create a delightful contrast.
Ingredients
1 can(21 oz) strawberry pie filling
1 package(8 oz) cream cheese, softened
1/2 cupgranulated sugar
1 teaspoonvanilla extract
1 box(15.25 oz) yellow cake mix
1/2 cupunsalted butter, melted
Nutrition
430 caloriesCalories
Per serving · Values are estimates
Instructions
1
Preheat oven to 350°F (177°C). Lightly coat a 9x13-inch baking dish with non-stick spray.
2
Spread strawberry pie filling evenly over the base of the prepared baking dish.
3
In a large bowl, blend softened cream cheese, granulated sugar, and vanilla extract until smooth and creamy.
4
Distribute spoonfuls of the cream cheese mixture on top of the strawberry layer. Do not spread—allow it to create natural swirls.
5
Sprinkle yellow cake mix evenly over the cream cheese and strawberry layers.
6
Pour melted butter evenly over the entire surface, ensuring as much of the dry mix is covered as possible.
7
Bake uncovered for 45 to 50 minutes, or until the top is golden and the edges are bubbling.
Essential Tips
Room temp cream cheese
Ensure your cream cheese is softened but not melted for a smooth, lump-free filling. If it's too cold, it won't blend well; if too warm, the texture may separate.
Don't overmix the cake layer
After pouring the melted butter over the cake mix, resist the urge to stir. The dry mix should absorb the butter naturally, creating a tender crumb when baked.
Check for doneness early
Start checking the cake at 40 minutes. The edges should be bubbling, and the center should jiggle slightly. Overbaking dries out the dessert.
Use a glass dish for even baking
A 9x13-inch glass baking dish promotes even heat distribution, preventing hot spots that could burn the edges while the center sets.
Let it rest before slicing
Allow the cake to cool for at least 15 minutes after baking. This helps the layers set, making it easier to cut clean slices without the filling oozing out.
Smart Swaps & Variations
Blueberry or cherry swap
Replace the strawberry pie filling with blueberry or cherry for a tart twist. Add 1 tablespoon of lemon juice to brighten the flavor if using cherries.
Gluten-free version
Use a gluten-free yellow cake mix and ensure the pie filling is certified gluten-free to accommodate dietary needs without sacrificing texture.
Extra protein boost
Fold 1/2 cup of Greek yogurt into the cream cheese mixture for a tangier, protein-rich layer that pairs beautifully with the sweetness.
Spiced variation
Add 1 teaspoon of cinnamon and 1/4 teaspoon of nutmeg to the cake mix before layering for a warm, autumn-inspired twist.
What to Serve With This
- Vanilla ice cream: A scoop melts into the warm cake, creating a luxurious contrast of temperatures and textures.
- Whipped cream and fresh mint: Lightly sweetened whipped cream adds a cloud-like topper, while mint cuts through the richness.
- Caramel drizzle: Warm caramel sauce drizzled over each serving enhances the strawberry and cream cheese flavors.
- Hot coffee or chai tea: The bitterness balances the sweetness, making this dessert a perfect after-dinner treat.
Storage & Reheating
Storage
Store leftovers covered at room temperature for up to 2 days or refrigerate for up to 4 days. The cake will firm up in the fridge, making it easier to slice, but it's best enjoyed fresh.
Reheating
Warm individual slices in the microwave for 20-30 seconds or place the whole cake in a 300°F (150°C) oven for 10 minutes. Avoid high heat, which can dry out the cake or melt the cream cheese layer.
Expert Chef Tips
- Use a silicone spatula for the cream cheese layer: It scrapes the bowl thoroughly, ensuring no wasted filling and a consistent texture.
- Press the cake mix gently into the cream cheese layer: Lightly pressing the cake mix into the cream cheese helps it adhere better during baking, preventing separation.
- Bake on the middle rack: Positioning the dish in the center of the oven ensures even browning and prevents the edges from overcooking before the center sets.
Equipment You’ll Need
- 9x13-inch baking dish (glass preferred)
- Large mixing bowl
- Silicone spatula
- Measuring cups and spoons
- Oven thermometer (optional but recommended for accuracy)
Nutritional Benefits
- Moderate calories: At 430 calories per serving, this dessert is indulgent but not excessively calorie-dense compared to traditional cheesecake.
- Some protein: The cream cheese and cake mix provide about 5 grams of protein per serving, contributing to satiety.
- Natural fruit sugars: Strawberries add fiber and vitamins like vitamin C, balancing the refined sugars in the cake mix and filling.
- Rich in calcium: Cream cheese is a good source of calcium, supporting bone health in each serving.
Reviews
No written reviews yet — be the first to cook this and share how it turned out!
Leave a Review
Frequently Asked Questions
Can I use fresh strawberries instead of pie filling?
Yes, but you'll need to cook them first. Simmer 2 cups of chopped strawberries with 2 tablespoons of sugar and 1 tablespoon of lemon juice until thickened, about 10 minutes. Cool completely before layering to avoid a soggy cake.
Why is my cake mix layer soggy?
This often happens if the cream cheese layer isn't fully set before adding the cake mix or if the pie filling is too watery. Ensure the cream cheese is well-blended and chilled slightly before layering, and drain any excess liquid from the pie filling.
Can I make this ahead of time?
Absolutely! Assemble the cake up to a day in advance and refrigerate it uncovered. Bake it straight from the fridge, adding 5-10 minutes to the baking time. This allows the flavors to meld and deepen.
What's the best way to cut clean slices?
Use a plastic knife or a thin, sharp knife dipped in hot water. Wipe the knife clean between cuts to prevent the filling from sticking. For even slices, press the knife straight down without sawing.
Can I substitute the cream cheese with something else?
You can use Neufchatel cheese for a lighter texture or mascarpone for extra richness. Avoid ricotta or cottage cheese, as they have too much moisture and won't blend smoothly.
Why does the top of my cake look pale?
The melted butter and cake mix can create a dense top that doesn't brown evenly. If this happens, broil the cake for 1-2 minutes at the end of baking to achieve a golden crust, watching closely to avoid burning.
Can I make this in a cast-iron skillet?
Yes! Use a 10-inch cast-iron skillet and reduce the baking time to 35-40 minutes. The skillet will create a crispier edge and a slightly caramelized bottom layer.
What's the best way to layer the ingredients for even distribution?
Spread the strawberry pie filling in an even layer first. Drop the cream cheese mixture in large spoonfuls across the dish, then use the back of the spoon to gently swirl it slightly if needed. Sprinkle the cake mix evenly over the top.
More Sweet Comfort

🔒 From the Vault — 43,000+ premium recipes




Cook This Next