
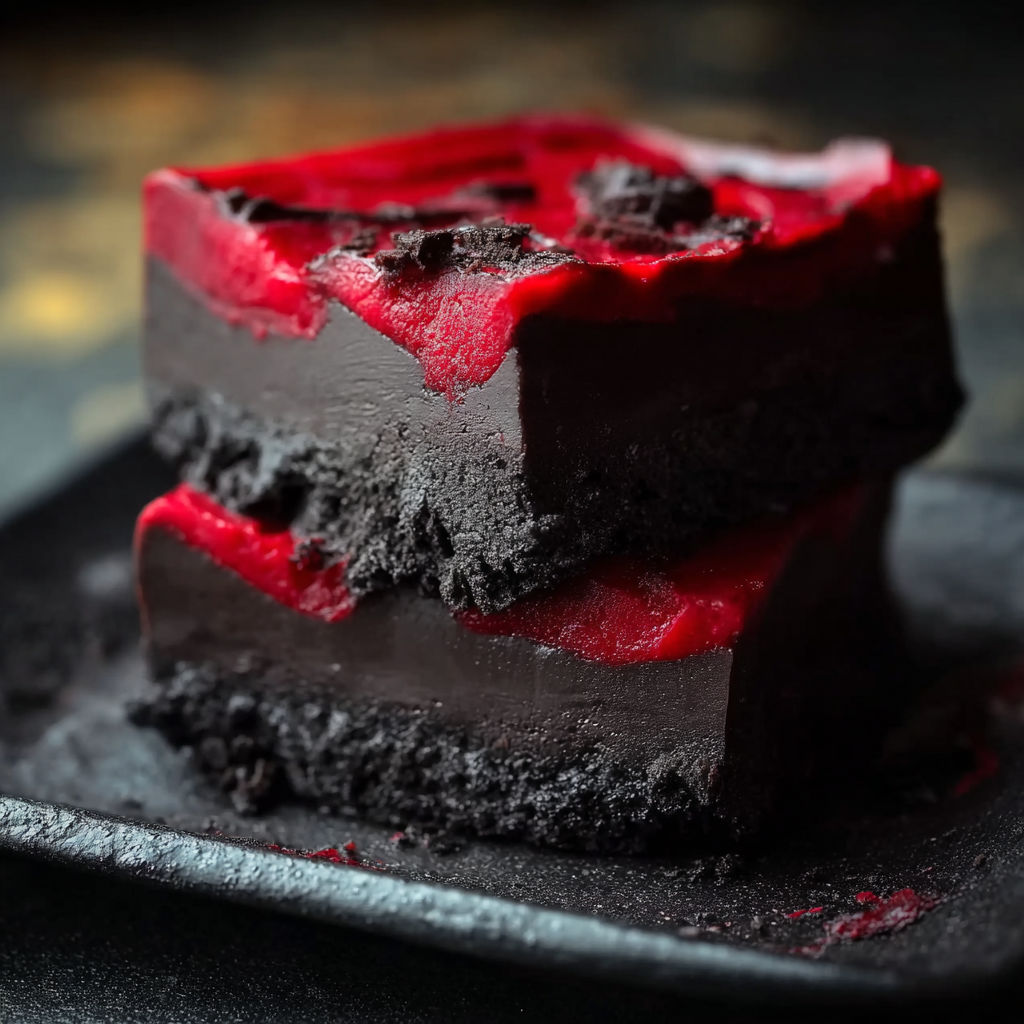
Vampire Fudge Spooky Halloween
Home cooks adore this Vampire Fudge for its hauntingly beautiful swirls of dark cocoa and vibrant red velvet, making it the star of any Halloween spread. It's incredibly simple to prepare yet delivers an unforgettable presentation that wows both kids and adults alike. Whether you're throwing a spooky party or just want to indulge in a festive treat, this fudge is the perfect balance of creamy, rich, and eerie. The contrast of the deep onyx and bold scarlet colors creates a visual feast that's as delightful to look at as it is to taste.
What Makes This Recipe Special
- The use of dark and scarlet candy melts creates a striking, marbled effect that's both visually stunning and flavorful, mimicking the look of vampire blood and shadows.
- Cream cheese frosting is melted and mixed into the candy melts, adding a velvety smoothness and subtle tang that balances the sweetness of the fudge.
- This recipe cleverly avoids food coloring by using naturally colored candy melts, making it easier to achieve vibrant hues without artificial additives.
- The fudge sets in just 4 hours, making it a last-minute Halloween treat that's ready in time for trick-or-treaters or party guests.
Ingredients
1 cupdark candy melts
1 cupscarlet candy melts
16 ouncescream cheese frosting (1 tub)
Nonstick cooking spray
Parchment paper
Optional: 1 teaspoon warm milk, if mixture needs thinning
Nutrition
330 caloriesCalories
Per serving · Values are estimates
Instructions
1
Lightly spray an 8 x 8 inch cake pan with nonstick cooking spray. Put parchment paper inside with edges hanging over both sides making a cross shape for easy fudge removal.
2
Add dark candy melts to a microwave-safe bowl. Microwave on high for 2 minutes, giving it a good stir every 30 seconds until totally melted and smooth. Put aside.
3
Use another microwave-safe bowl for the scarlet candy melts. Heat on high for 2 minutes, stirring every half minute until smooth. Don't mix the colors together.
4
Put cream cheese frosting in microwave without its lid for 45 seconds until it's runny. Stir well so you can pour it easily.
5
Split the warmed frosting equally between both bowls. Mix each color fast until they're smooth and even. If the mix seems too thick, add 1 teaspoon of warm milk.
6
Pour big spoonfuls of dark and red mixtures into your pan, taking turns to create a marble look. Keep adding layers until you've used everything up.
7
Tap the pan firmly against your counter to even out the top and get rid of air bubbles. Pop it in the fridge for at least 4 hours until it's completely firm.
8
Grab the parchment paper edges to lift the fudge out. Place it on a cutting board and cut into 25 or 36 squares depending on your preference. Keep in an airtight container in your fridge.
Essential Tips
Prevent air bubbles
After pouring the fudge into the pan, tap it firmly against the counter a few times to release any trapped air bubbles. This ensures a smooth, even surface for cutting into perfect squares.
Thin frosting carefully
If the cream cheese frosting is too thick after microwaving, add warm milk sparingly-just ½ teaspoon at a time. Over-thinning can make the fudge too runny and difficult to marbel properly.
Use room-temperature ingredients
Let the candy melts and frosting sit at room temperature for 10-15 minutes before melting to help them blend more evenly and reduce the risk of overheating.
Work quickly when mixing
Once the frosting is added to the candy melts, mix the colors together swiftly but gently. This prevents the colors from bleeding too much and keeps the marbled effect distinct.
Chill thoroughly
Resist the urge to cut the fudge too soon! Letting it chill for the full 4 hours ensures it holds its shape and texture, making for cleaner, sharper slices.
Smart Swaps & Variations
Pumpkin Spice Swirl
Replace the scarlet candy melts with orange candy melts and add ½ teaspoon of pumpkin pie spice to the frosting for a fall-inspired twist.
White Chocolate Ghosts
Use white candy melts for the base and add a few drops of black food coloring to create ghostly swirls instead of vampire-themed ones.
Nutty Crunch
Fold ½ cup of chopped pecans or walnuts into the fudge mixture before pouring it into the pan for a textured, autumnal crunch.
What to Serve With This
- Serve these fudge squares on a black platter lined with red velvet or orange parchment paper for a dramatic Halloween presentation.
- Pair with a steaming cup of spiced chai or hot apple cider to enhance the seasonal flavors and warm up trick-or-treaters.
- Offer alongside a bowl of candy corn or caramel apples for a full candy buffet that guests can graze on all evening.
- Use as a centerpiece at a Halloween party by arranging the fudge squares in the shape of a bat or pumpkin on a decorative tray.
Storage & Reheating
Storage
Store the Vampire Fudge in an airtight container at room temperature for up to 5 days. Keep it in a cool, dry place away from direct sunlight to prevent melting or discoloration.
Reheating
To revive slightly hardened fudge, place individual squares in the microwave for 5-10 seconds. Alternatively, warm them in a double boiler for 30 seconds to restore their soft, creamy texture.
Expert Chef Tips
- For a glossier finish, temper the candy melts by heating them to 160°F (71°C), then cooling to 80°F (27°C) before reheating to 145°F (63°C). This prevents a dull, streaky appearance.
- Use a silicone spatula to fold the frosting into the candy melts-its flexibility ensures you scrape every bit of the creamy mixture without wasting a drop.
- For extra depth of flavor, infuse the cream cheese frosting with ¼ teaspoon of vanilla extract or a pinch of espresso powder before mixing it into the candy melts.
Equipment You’ll Need
- 8 x 8 inch square cake pan
- Microwave-safe bowls (2)
- Silicone spatula
- Sharp knife or fudge cutter
- Parchment paper
Nutritional Benefits
- Each serving (based on 36 squares) contains approximately 330 calories, with 20g of sugar-primarily from the candy melts and frosting.
- This fudge is high in saturated fat due to the cream cheese frosting and candy melts, so enjoy it in moderation as an occasional treat.
- The recipe contains no artificial food coloring, relying instead on naturally colored candy melts for its vibrant hues.
- While not a health food, the portion-controlled squares make it easier to indulge without overconsumption.
Reviews
No written reviews yet — be the first to cook this and share how it turned out!
Leave a Review
Frequently Asked Questions
Can I use white chocolate instead of candy melts?
Yes, but white chocolate can scorch easily. Melt it in 30-second intervals and stir constantly to prevent burning. Note that the color contrast won't be as dramatic without the vibrant candy melts.
Why is my fudge too soft after chilling?
This happens if the candy melts were overheated or if too much frosting was added. Ensure the candy melts are fully melted but not boiling, and measure the frosting precisely. A firmer fudge sets better in the fridge.
Can I make this fudge ahead of time?
Absolutely! Prepare the fudge up to 3 days in advance and store it in the fridge. The flavors will actually deepen over time, making it even more delicious when served.
How do I prevent the colors from bleeding too much?
Work quickly when mixing the frosting into the candy melts, and avoid over-stirring. The less you mix, the more distinct the marbled effect will remain. Chilling the fudge promptly also helps set the colors faster.
Can I make this recipe nut-free?
Yes! Simply omit any nuts in the variations and ensure all candy melts and frosting are nut-free. Check labels for cross-contamination warnings if allergies are a concern.
What's the best way to cut the fudge evenly?
Use a hot, sharp knife dipped in hot water and wiped dry between cuts. This prevents the fudge from sticking and ensures clean, straight edges for professional-looking squares.
Can I use homemade frosting instead of store-bought?
Yes, but homemade frosting is thicker. Thin it with warm milk or cream until it reaches a pourable consistency similar to the store-bought version to avoid a lumpy texture.
Why does my fudge have a grainy texture?
Graininess occurs if the candy melts are overheated or if they cool too quickly. Melt them gently in 30-second bursts and fold in the frosting while the mixture is still warm to maintain a smooth texture.
More Halloween Treats

🔒 From the Vault — 43,000+ premium recipes

Cook This Next