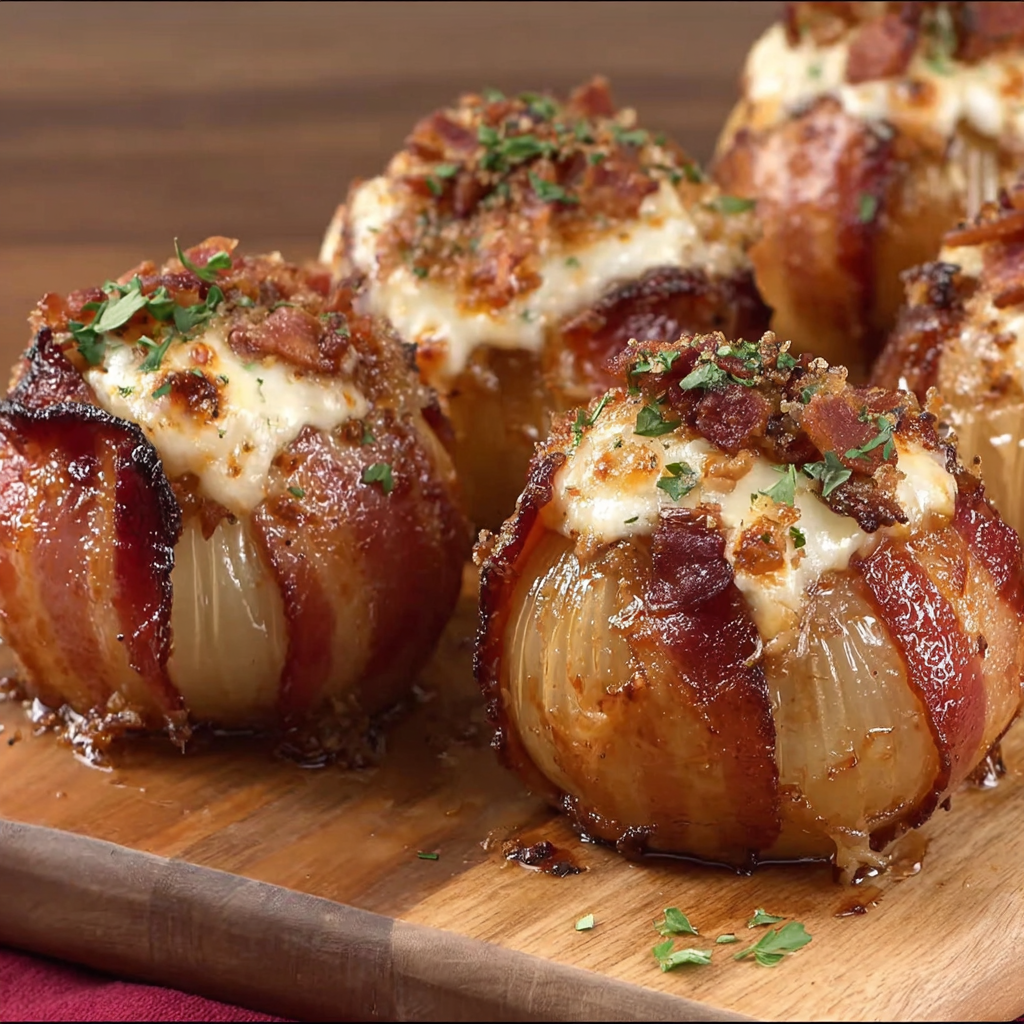
Bacon Cheddar Onion Bombs
There's something magical about biting into a crispy bacon-wrapped onion bomb, where the sweet caramelized layers of onion give way to juicy, cheesy beef and savory bacon. Home cooks love these for game days, potlucks, or even as a show-stopping appetizer at dinner parties. The irresistible combination of smoky BBQ glaze and melty cheddar makes them impossible to resist, and the onion's natural sweetness balances the rich flavors perfectly.
What Makes This Recipe Special
- The caramelized onion layers act as both a vessel and a flavor enhancer, infusing the beef mixture with subtle sweetness and texture contrast.
- Turkey bacon adds a leaner alternative to traditional pork bacon while still delivering that signature smoky, crispy finish.
- The BBQ glaze isn't just a topping-it's brushed liberally before and after baking, creating a sticky, caramelized crust that locks in moisture.
- Each onion bomb is individually wrapped in bacon, making them easy to serve and eat with your hands, perfect for gatherings.
Ingredients
4 largeyellow onions
1 lbground beef
1 cupshredded cheddar cheese
1/2 cupplain breadcrumbs
1 egg
1 tspgarlic powder
1 tsponion powder
1/2 tspblack pepper
1/2 tspsalt
12 slicesturkey bacon
1/2 cupBBQ sauce
Toothpicks or skewers
Nutrition
380 caloriesCalories
Per serving · Values are estimates
Instructions
1
Peel and slice onions in half, then separate into large outer layers. You’ll need 8 pairs of similar-sized halves to form the bombs.
2
In a bowl, combine ground beef, shredded cheddar cheese, breadcrumbs, egg, garlic powder, onion powder, salt, and pepper. Mix well.
3
Form meatballs from the mixture, about the size of a golf ball. Place one meatball between two matching onion halves and press together to form a ball.
4
Wrap each onion bomb with 2 to 3 slices of turkey bacon, securing with toothpicks if needed.
5
Brush with BBQ sauce generously on all sides.
6
Preheat oven to 375°F. Place onion bombs on a baking sheet lined with foil or parchment paper. Bake for 40–45 minutes, or until bacon is crispy and beef is fully cooked.
7
Broil for the last 3–5 minutes for extra crispiness if desired.
8
Let cool slightly before serving. Remove toothpicks and enjoy.
Essential Tips
Choose uniform onions
Select onions that are similar in size and shape to ensure even cooking and easy assembly. The outer layers should be thick enough to hold the filling without tearing.
Don't skip caramelizing
Take the time to caramelize the onion layers before assembling the bombs. This deepens their flavor and prevents them from tasting raw after baking.
Press meatballs firmly
When forming the meatballs, pack the mixture tightly to prevent it from falling apart during baking. A well-formed ball will hold its shape and cook evenly.
Secure bacon well
Use toothpicks or skewers to hold the bacon in place, especially if the onion layers are thin. This prevents the bacon from unraveling during baking.
Brush, then broil
Brush the bombs generously with BBQ sauce before baking and again halfway through. Finish with a quick broil to achieve a glossy, sticky glaze.
Smart Swaps & Variations
Spicy Kick
Add 1/2 teaspoon of cayenne pepper or 1 tablespoon of chopped jalapeños to the beef mixture for a spicy twist.
Swiss Cheese
Replace cheddar with Swiss cheese for a milder, nuttier flavor that pairs well with the BBQ glaze.
Pork Bacon
Use regular pork bacon instead of turkey bacon for a richer, more traditional bacon flavor.
Gluten-Free
Swap breadcrumbs for almond flour or gluten-free oats to make the recipe gluten-free without sacrificing texture.
Vegetarian
Replace ground beef with a mix of cooked lentils, mushrooms, and walnuts for a hearty vegetarian version.
What to Serve With This
- Serve with a side of creamy coleslaw to cut through the richness of the bacon and cheese.
- Pair with cold beer or bourbon-based cocktails to complement the smoky BBQ flavors.
- Arrange on a platter with pickled jalapeños and sliced pickles for a tangy contrast.
- Perfect for game day, tailgating, or as a hearty appetizer at a holiday gathering.
Storage & Reheating
Storage
Store leftover onion bombs in an airtight container in the refrigerator for up to 3 days. Reheat within 2 days for the best texture and flavor.
Reheating
Reheat in a skillet over medium-low heat for 5-7 minutes, or in a 350°F oven for 10-12 minutes. Avoid microwaving, as it can make the bacon soggy.
Expert Chef Tips
- Chill the assembled onion bombs for 15-20 minutes before baking to help the bacon adhere better and prevent it from sliding off during cooking.
- Use a pastry brush to apply the BBQ sauce in thin, even layers. This prevents the sauce from pooling and burning in the oven.
- For extra crispiness, place the baking sheet on the top rack of the oven, where the heat is more direct. Rotate the bombs halfway through baking for even browning.
Equipment You’ll Need
- Large skillet for caramelizing onions
- Mixing bowl for combining beef mixture
- Baking sheet lined with foil or parchment paper
- Pastry brush for applying BBQ sauce
Nutritional Benefits
- Each serving (1 onion bomb) provides approximately 380 calories, making them a satisfying yet portion-controlled indulgence.
- Turkey bacon reduces saturated fat compared to pork bacon, while still delivering the same smoky flavor for a lighter option.
- Cheddar cheese adds calcium and protein, contributing to bone health and muscle maintenance.
- Onions are a good source of vitamin C and antioxidants, which support immune function and reduce inflammation.
Reviews
No written reviews yet — be the first to cook this and share how it turned out!
Leave a Review
Frequently Asked Questions
Can I use pre-cooked bacon for this recipe?
Yes, you can use pre-cooked bacon to save time. Wrap the onion bombs with the pre-cooked bacon and brush with BBQ sauce before baking. This will reduce the total baking time by 5-10 minutes, as the bacon is already crispy.
How do I prevent the onion layers from falling apart during baking?
Ensure the onion layers are thick and sturdy when separating them. Caramelizing the onions before assembly helps firm them up. If they're still fragile, use toothpicks to secure the bacon tightly around the onion layers.
Can I make these ahead of time?
Yes! Assemble the onion bombs up to the point of wrapping in bacon and store them in the refrigerator for up to 24 hours. Wrap them in bacon just before baking to ensure the bacon stays crispy. Alternatively, assemble and bake them, then store leftovers in the fridge for up to 3 days.
What's the best way to caramelize the onions?
Slice the onions thinly and cook them over medium-low heat in a skillet with a bit of olive oil or butter. Stir occasionally for about 20-25 minutes until they're golden brown and sweet. Season with a pinch of salt to help draw out moisture.
Can I freeze these onion bombs?
Yes, you can freeze assembled (but unbaked) onion bombs on a baking sheet until solid, then transfer to a freezer bag. Bake from frozen, adding 5-10 minutes to the cooking time. Alternatively, bake and freeze leftovers for up to 1 month. Reheat in the oven or skillet.
What's the best BBQ sauce to use?
A medium-sweet BBQ sauce works best, as it balances the smokiness of the bacon and the richness of the cheese. Brands like Sweet Baby Ray's or Stubb's are crowd-pleasers. For a tangier twist, mix in a spoonful of mustard or apple cider vinegar.
How do I ensure the beef mixture is flavorful?
Season the beef mixture generously with salt, pepper, garlic powder, and onion powder. Taste a small amount of the mixture before forming the meatballs and adjust the seasoning if needed. You can also add a dash of Worcestershire sauce or smoked paprika for extra depth.
Why are my onion bombs soggy instead of crispy?
Sogginess usually comes from excess moisture in the onions or not enough browning. Make sure to caramelize the onions thoroughly to remove moisture. Also, avoid overcrowding the baking sheet, as this can trap steam and prevent crispiness. Broiling at the end helps crisp up the surface.
More Gathering Stars
🔒 From the Vault — 43,000+ premium recipes
Cook This Next