
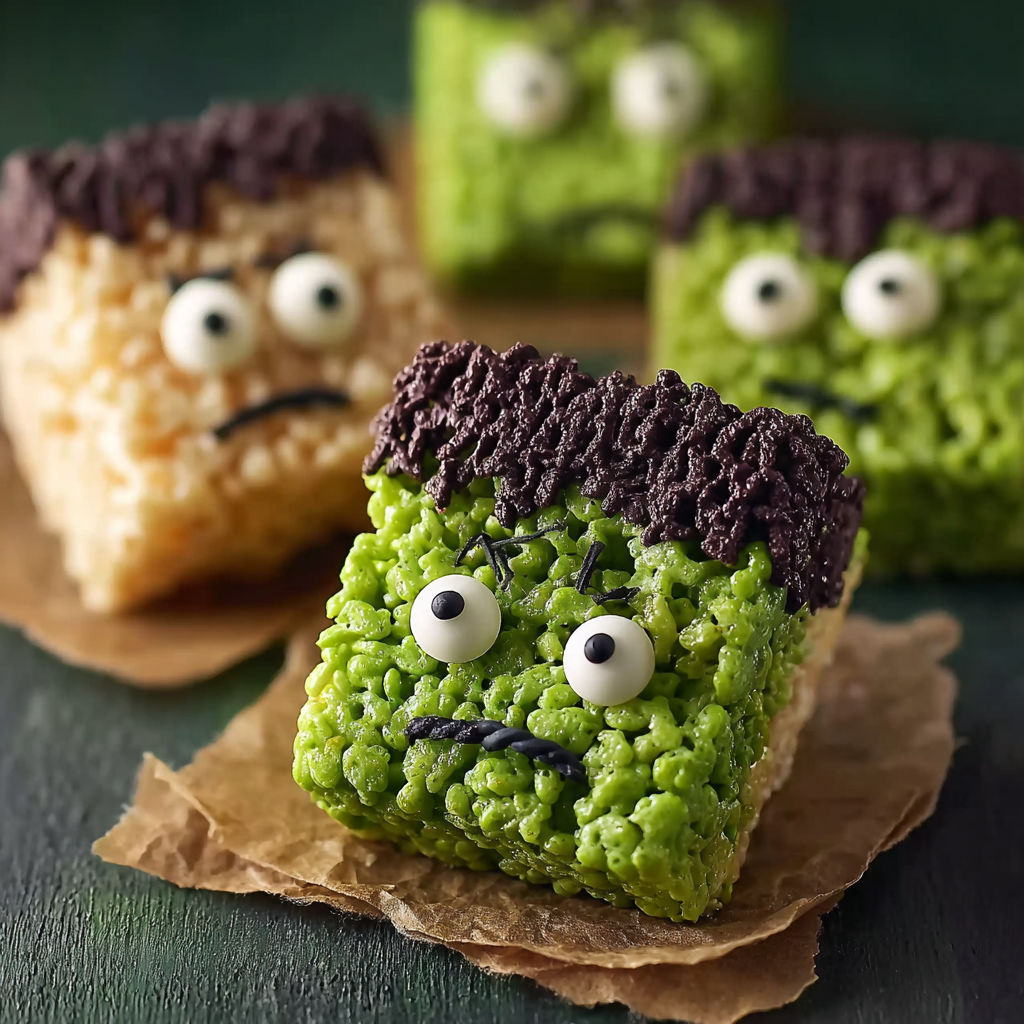
Frankenstein Rice Krispie Treats
There's something deliciously spooky-and irresistibly fun-about Frankenstein Rice Krispie Treats. Home cooks love them because they're quick to make, universally kid-approved, and perfect for Halloween parties, classroom celebrations, or just a playful afternoon snack. What makes these treats irresistible isn't just the familiar comfort of classic Rice Krispie Treats-it's the whimsical green faces staring back at you from every square, turning every bite into a little edible monster. Whether you're crafting a Halloween spread or just want to bring a smile to someone's face, these treats deliver playful delight in every chewy, crunchy bite.
What Makes This Recipe Special
- The vibrant green hue is achieved with just a few drops of food coloring, giving these treats their signature Frankenstein look without overpowering the classic marshmallow flavor.
- Candy eyes are pressed into the warm mixture, so they sink slightly and stay in place once set, creating a 3D effect that makes each treat look like a little monster peeking out from the pan.
- Chocolate chips can be used not only for eyes but also for stitches or scars, allowing for endless customization and creativity in your edible Frankenstein designs.
- Unlike traditional Rice Krispie Treats, this version uses unsalted butter and green coloring to enhance the visual contrast and flavor, making it feel fresh and festive even if you've made Rice Krispie Treats before.
Ingredients
6 cupscrisped rice cereal
1 package(10 ounces) marshmallows
3 tablespoonsunsalted butter
Green food coloring, a few drops
Candy eyes
Chocolate chips
Nutrition
450 caloriesCalories
Per serving · Values are estimates
Instructions
1
In a large saucepan, melt the butter over low heat until fully liquefied.
2
Add the marshmallows to the melted butter and stir continuously until completely melted and smooth.
3
Remove the saucepan from heat and blend in a few drops of green food coloring, mixing until the color is uniform.
4
Gradually fold the crisped rice cereal into the marshmallow mixture, stirring gently to ensure even coating.
5
Transfer the mixture into a greased 9x13-inch baking dish. Use a spatula to press and smooth the surface evenly.
6
While the mixture is still warm, arrange candy eyes on top to form faces and use chocolate chips for additional features as desired.
Essential Tips
Press cereal firmly
When folding in the crisped rice cereal, press it gently but firmly into the marshmallow mixture. This ensures the treats hold together well and have a satisfying crunch without falling apart when sliced.
Use a greased spatula
Grease your spatula and hands with a little butter or nonstick spray before pressing the mixture into the pan. This prevents sticking and makes it easier to smooth the surface for even slices.
Work quickly with candy eyes
Place the candy eyes while the mixture is still warm and pliable. If you wait too long, the marshmallow will set, and the eyes won't adhere properly, ruining the Frankenstein effect.
Chill before slicing
Let the treats set at room temperature for at least 30 minutes before slicing. This prevents crumbling and ensures clean, sharp edges that showcase the green monster faces.
Add texture with sprinkles
For extra Halloween flair, sprinkle colored sugar or edible glitter over the top before the mixture sets. This adds a subtle sparkle and enhances the festive look without overwhelming the flavor.
Smart Swaps & Variations
Vegan Monster Treats
Swap marshmallows for vegan marshmallows and butter for coconut oil to create a plant-based version that's just as gooey and fun.
Spiced Pumpkin Treats
Add ½ teaspoon of pumpkin pie spice to the marshmallow mixture for a subtle fall flavor twist that pairs perfectly with the green color.
Chocolate-Dipped Monsters
Dip half of each cooled treat into melted dark or white chocolate and sprinkle with green sanding sugar for an elevated, gourmet look.
What to Serve With This
- Serve these treats on a cauldron-shaped platter for a Halloween-themed dessert table that will delight kids and adults alike.
- Pair with a steaming mug of hot cocoa or spiced apple cider to balance the sweetness and create a cozy fall treat experience.
- Add a side of fresh fruit, like sliced apples or pears, to cut the sweetness and provide a refreshing contrast to the rich marshmallow flavor.
- For a full Halloween spread, serve alongside chocolate-covered pretzels or candy corn for a mix of textures and flavors that guests will love.
Storage & Reheating
Storage
Store the treats in an airtight container at room temperature for up to 5 days. Keep them in a cool, dry place away from direct sunlight to prevent the marshmallow from becoming sticky or the cereal from losing its crunch.
Reheating
To restore softness, microwave individual squares for 5-10 seconds. For best texture, place them on a parchment-lined tray and warm in a 300°F (150°C) oven for 2-3 minutes, watching closely to avoid over-softening.
Expert Chef Tips
- Use a candy thermometer to monitor the marshmallow mixture-it should reach 240°F (115°C) before removing from heat. This ensures the marshmallows melt fully and evenly without burning, resulting in a smooth, glossy base.
- For a chewier texture, let the mixture cool slightly before adding the cereal. Adding it too soon can cause the butter and marshmallows to separate, leading to a greasier final product.
- If the candy eyes aren't sticking, warm them briefly between your fingers before pressing them into the mixture. The slight warmth helps them adhere better to the marshmallow base.
Equipment You’ll Need
- Large saucepan with a heavy bottom for even melting
- Candy thermometer (optional but recommended for precision)
- 9x13-inch baking dish, greased or lined with parchment paper
- Rubber spatula for stirring and pressing the mixture
Nutritional Benefits
- A single square (about 2x2 inches) contains approximately 150 calories, making it a lighter dessert option compared to many baked goods.
- The crisped rice cereal provides a small amount of iron and B vitamins, while the marshmallows contribute a quick source of energy from sugar.
- These treats are high in carbohydrates due to the marshmallows and cereal, so enjoy them in moderation as part of a balanced diet.
- Using unsalted butter helps control sodium intake, but the overall dish remains a treat best reserved for special occasions rather than everyday snacking.
Reviews
No written reviews yet — be the first to cook this and share how it turned out!
Leave a Review
Frequently Asked Questions
Can I use regular food coloring instead of green?
Yes! If you don't have green food coloring, mix a few drops of blue and yellow together to create a custom green shade. Just test the color on a small amount of the mixture first to ensure you achieve the desired hue.
What's the best way to cut these treats into even squares?
Use a sharp knife dipped in hot water to slice the treats. Wipe the blade clean between cuts to prevent sticking, and press firmly but gently to avoid crushing the cereal. A pizza cutter with a serrated edge also works well for cleaner cuts.
Can I make these treats ahead of time?
Absolutely! Prepare the treats up to 2 days in advance. Store them in an airtight container at room temperature, and add the candy eyes just before serving to keep them fresh and vibrant.
How do I prevent the treats from sticking to the pan?
Grease the baking dish thoroughly with butter or nonstick spray, and press the mixture evenly into the corners. For extra insurance, line the pan with parchment paper before greasing, which makes removal effortless.
What can I use instead of candy eyes?
If you don't have candy eyes, use mini chocolate chips, raisins, or even small dollops of black icing to create eyes. For a more detailed look, pipe black icing around the eyes to mimic stitches or scars.
Why did my treats turn out too sticky?
Sticky treats often result from overcooking the marshmallow mixture or not pressing the cereal firmly enough into the base. Cook the marshmallows just until fully melted, and press the cereal mixture evenly into the pan to avoid a gummy texture.
Can I add other mix-ins like nuts or chocolate chips?
Yes! Fold in ½ cup of mini chocolate chips or chopped nuts for added texture and flavor. However, avoid overmixing, as this can cause the cereal to break and the treats to become dense.
How do I make these treats gluten-free?
To make gluten-free Frankenstein Rice Krispie Treats, ensure your crisped rice cereal is certified gluten-free and use gluten-free marshmallows. Most mainstream brands of marshmallows and cereals are naturally gluten-free, but always check the label to be sure.
More Sweet Comfort


🔒 From the Vault — 43,000+ premium recipes






Cook This Next