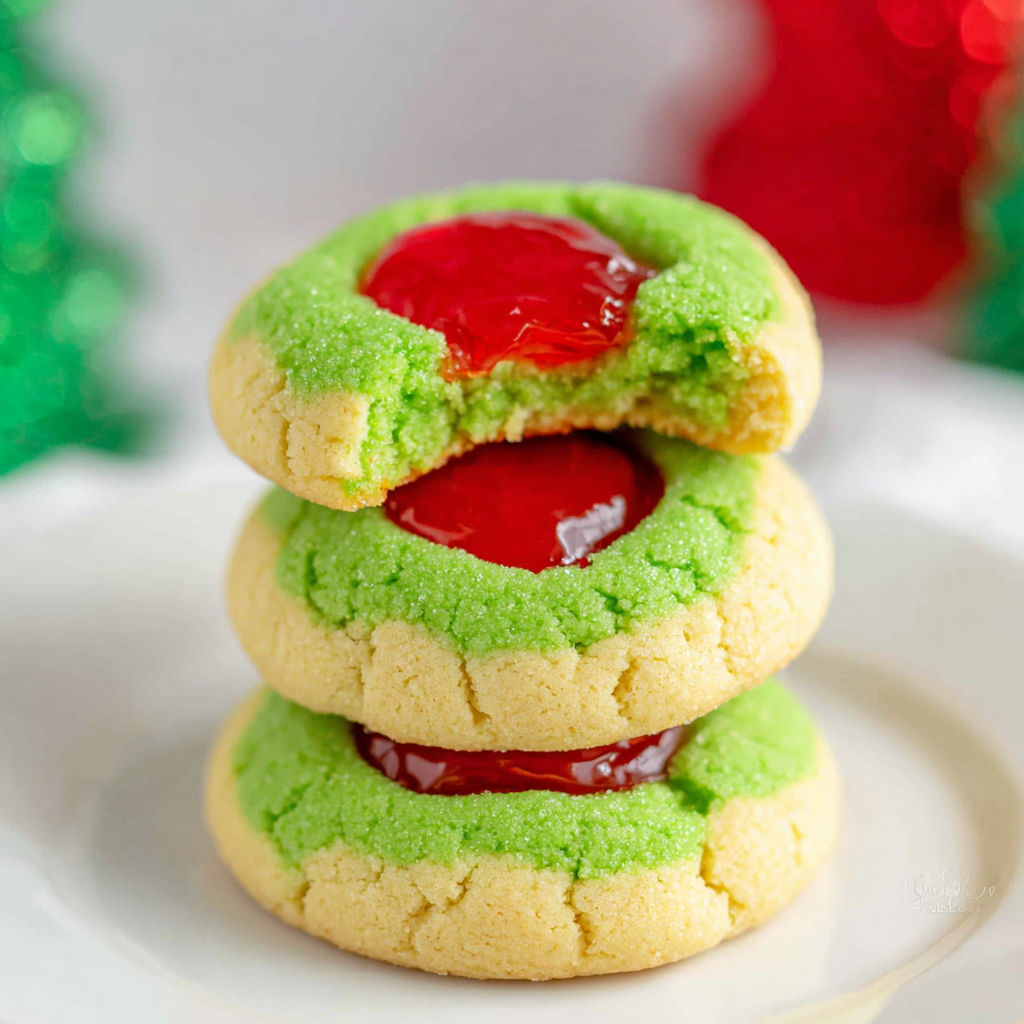
Grinch Style Thumbprint Cookies
Grinch-style thumbprint cookies are the holiday baking project that turns your kitchen into a festive wonderland! With their vibrant green hue and buttery soft texture, these cookies are a hit at Christmas dinners, cookie exchanges, or even as a fun activity with kids. The contrast of the bright green dough with the glossy red filling screams holiday cheer, while the tender crumb makes every bite irresistible. Whether you're a seasoned baker or a first-timer, this recipe brings joy to the table with minimal effort.
What Makes This Recipe Special
- The vibrant green color is achieved with natural food coloring (like spinach powder) for a subtler hue or gel-based dye for a bold, Grinch-worthy look-choose based on your preference.
- The thumbprint wells are pressed *before* baking, which prevents cracking and ensures the filling stays nestled inside without spilling.
- The icing is a three-ingredient glaze (powdered sugar, milk, corn syrup) that sets firm yet still chewy, mimicking classic thumbprint cookie fillings but with a festive twist.
- Heart-shaped sprinkles aren't just for decoration-they echo the Grinch's holiday spirit and add a playful crunch against the soft dough.
Ingredients
1 cupunsalted butter, softened
1/4 cupgranulated sugar
1 largeegg yolk
1/4 teaspoonsalt
2 cupsall-purpose flour
1/2 teaspoonvanilla extract
Green food coloring
1 cuppowdered sugar
2 teaspoonsmilk
2 teaspoonscorn syrup
Heart-shaped sprinkles
Nutrition
430 caloriesCalories
Per serving · Values are estimates
Instructions
1
In a mixing bowl, beat the softened unsalted butter and granulated sugar together until light and creamy.
2
Add the egg yolk and vanilla extract to the butter mixture, beating until fully combined.
3
Gradually sift in the all-purpose flour and salt, mixing until a soft dough forms.
4
Mix in green food coloring until a uniform vibrant green hue is achieved.
5
Roll dough into 1-inch balls and arrange spaced apart on a lined baking sheet. Chill for 30 minutes to set.
6
Press a thumb into the center of each dough ball to create deep wells for the filling.
7
Preheat oven to 350°F. Bake cookies for 25 minutes or until edges are lightly golden. Let cool completely on a wire rack.
8
In a small bowl, blend powdered sugar with milk and corn syrup until smooth and glossy.
9
Spoon or pipe a small amount of icing into each thumbprint and finish by gently pressing a heart sprinkle into the center. Allow icing to set before serving.
Essential Tips
Use softened butter
Ensure your butter is softened to room temperature but not melted, as this creates the perfect creamy base for the dough. Overly soft butter will make the dough too sticky to handle.
Chill the dough
The 30-minute chill is non-negotiable-it firms up the dough so the thumbprints hold their shape during baking. Skip this step, and your cookies will flatten in the oven.
Press deep wells
Use your thumb or a small round measuring spoon to press a deep indentation (about ½-inch deep) into each dough ball. Shallow wells won't hold enough filling.
Bake on parchment
Line your baking sheet with parchment paper to prevent sticking and ensure even baking. The cookies are delicate when warm, so transfer them carefully.
Let icing set fully
Allow the icing to dry for at least 30 minutes before stacking or storing the cookies. If you rush this step, the filling will smudge and the sprinkles won't adhere.
Smart Swaps & Variations
Peppermint twist
Add ½ teaspoon peppermint extract to the dough and swap the heart sprinkles for crushed candy canes for a festive, refreshing flavor.
Vegan option
Use plant-based butter and a flax egg (1 tbsp ground flaxseed + 3 tbsp water) to replace the egg yolk, and almond milk for the icing.
Chocolate-dipped
Dip half of each cooled cookie into melted dark chocolate and sprinkle with crushed nuts or sea salt for a gourmet upgrade.
Spiced Grinch
Add ½ teaspoon cinnamon and ¼ teaspoon ginger to the dough for a warm, spiced flavor that pairs perfectly with the sweet filling.
What to Serve With This
- Hot cocoa or eggnog for a cozy, festive pairing that complements the cookies' buttery sweetness.
- A dollop of whipped cream or vanilla ice cream for an indulgent dessert option.
- Served alongside a cheese board with sharp cheddar and rosemary crackers for a balanced holiday spread.
- Packaged in festive tins or cellophane bags as edible gifts for neighbors or teachers.
Storage & Reheating
Storage
Store cookies in an airtight container at room temperature for up to 5 days. Keep them in a single layer to prevent the icing from smudging.
Reheating
To revive stale cookies, warm them in a 300°F oven for 5 minutes. Avoid microwaving, as it can make the dough gummy and the icing sticky.
Expert Chef Tips
- For an extra-flavorful dough, brown the butter before creaming it with sugar-this adds a nutty depth that pairs beautifully with the sweet filling.
- Use a cookie scoop to portion the dough evenly, ensuring consistent thumbprint sizes and even baking.
- If the icing is too thick, add a drop of milk at a time; if too thin, whisk in a little more powdered sugar to achieve a glossy, pipeable consistency.
Equipment You’ll Need
- Stand mixer or hand mixer for creaming butter and sugar
- Cookie scoop or tablespoon for portioning dough
- Parchment-lined baking sheet for even baking
- Small piping bag or ziplock bag with a corner snipped for filling icing
Nutritional Benefits
- Each serving (1 cookie) contains approximately 430 calories, primarily from the butter and sugar, making them a rich treat best enjoyed in moderation.
- The cookies are high in saturated fat due to the butter, so consider pairing them with lighter options like fruit for balance.
- Using natural food coloring (e.g., spinach powder) can slightly reduce artificial ingredients, though the sugar content remains high.
- For a lighter version, reduce the butter to ½ cup and replace half with Greek yogurt while increasing flour slightly to maintain texture.
Reviews
No written reviews yet — be the first to cook this and share how it turned out!
Leave a Review
Frequently Asked Questions
Can I use natural food coloring instead of gel?
Yes, but natural dyes like spinach powder or matcha will yield a softer green hue. Gel-based food coloring is stronger, so use about half the amount to avoid a neon look. Start with a small amount, mix, and adjust until you reach the desired shade.
Why did my thumbprints crack during baking?
This happens if the dough wasn't chilled long enough or the wells weren't pressed deeply enough. Ensure the dough is firm before baking, and press the wells while the dough is still cold. If cracks occur, gently press them back into shape with your finger after baking.
Can I make the dough ahead of time?
Absolutely! Shape the dough into balls, wrap it tightly in plastic wrap, and refrigerate for up to 3 days. You can also freeze the dough balls for up to 1 month-thaw in the fridge before baking.
What's the best way to fill the thumbprints?
Use a small spoon or a piping bag fitted with a round tip to pipe the icing into the wells. Aim for about ½ teaspoon of icing per cookie to avoid overflow. If using jam instead of icing, warm it slightly to make it easier to spoon.
How do I prevent the sprinkles from falling off?
Press the sprinkles firmly into the icing while it's still wet. If the icing sets too quickly, warm it slightly by holding the container under hot water for 10 seconds before adding sprinkles.
Can I substitute the corn syrup in the icing?
Yes, you can use honey or light agave syrup in equal amounts, but the icing may set slightly differently. Avoid maple syrup, as it can make the icing too thin.
Why are my cookies spreading too much?
This usually means the dough was too warm when baked. Ensure the butter is softened but not melted, and chill the dough for the full 30 minutes. Also, check your oven temperature-an accurate thermometer is key.
Can I make these gluten-free?
Yes, swap the all-purpose flour for a 1:1 gluten-free baking flour blend. Add ½ teaspoon xanthan gum if the blend doesn't include it, and chill the dough for 45 minutes to prevent spreading.
More Christmas



🔒 From the Vault — 43,000+ premium recipes

Cook This Next