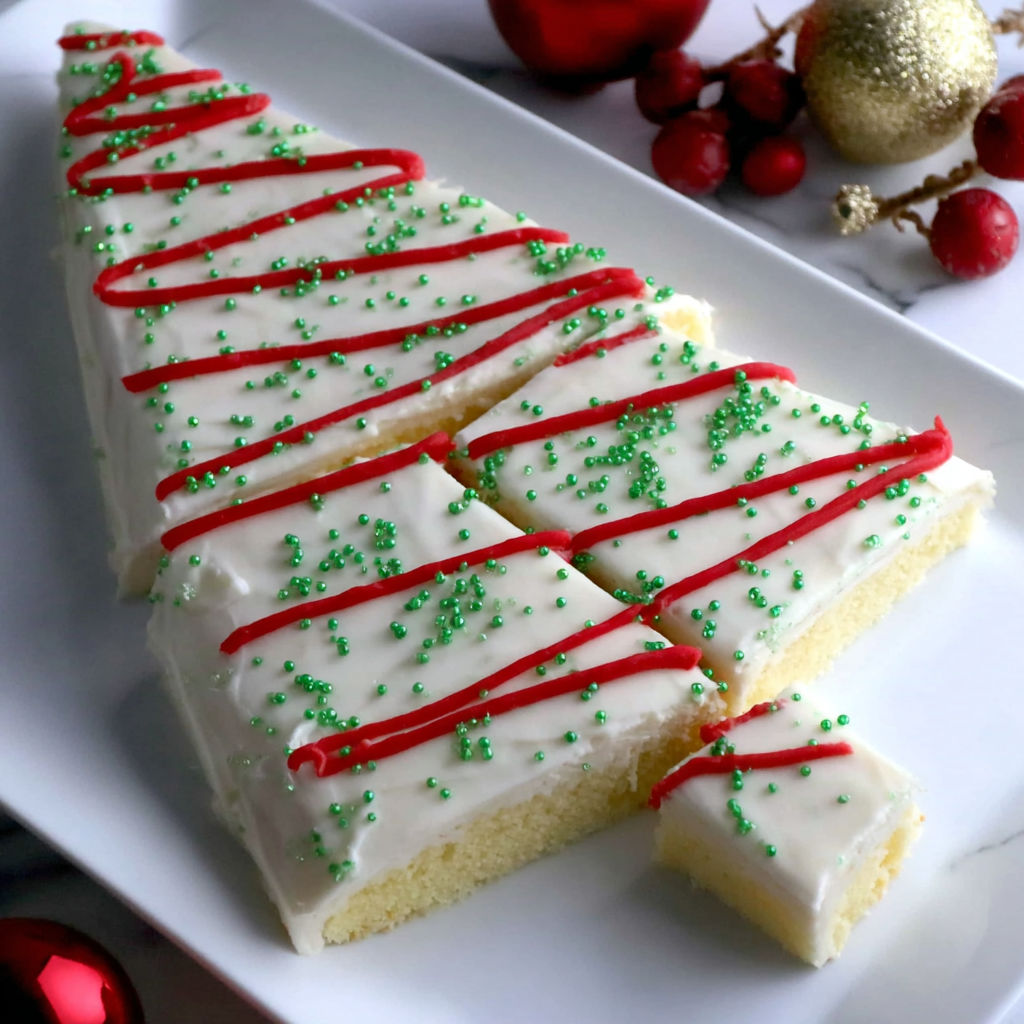
Little Debbie Christmas Tree Cake
This homemade Little Debbie Christmas Tree Cake is a nostalgic holiday showstopper that brings the magic of seasonal treats right into your kitchen. Home cooks adore it for its fluffy vanilla layers, generously frosted exterior, and the playful green-and-red decor that instantly screams Christmas. Whether you're hosting a cookie swap, a family gathering, or just want to impress with a festive dessert, this cake delivers that iconic Little Debbie charm. The buttery cake and velvety buttercream sing together in perfect harmony, making every bite a moment of pure holiday joy.
What Makes This Recipe Special
- The cake uses a classic ratio of butter to sugar for ultra-fluffy texture, then swaps in buttermilk for tang and tenderness-just like the original.
- The buttercream is enriched with heavy cream for a silky, pipeable consistency that stands up beautifully to sprinkles and decoration.
- A crumb coat and chill step ensures a flawless final frosting layer, preventing crumbs and giving a professional finish.
- The red gel food dye and green sprinkles mimic the beloved Little Debbie Christmas Tree Cake look, but you can customize colors for your theme.
Ingredients
1 1/2 cupsall-purpose flour
2 teaspoonsbaking powder
1/2 teaspoonsalt
1 cupunsalted butter, at room temperature
2 cupsgranular sugar
4 largeeggs, at room temperature
4 teaspoonsvanilla extract
1 cupbuttermilk, at room temperature
1 cupunsalted butter, at room temperature
5 cupsconfectioner's sugar
4 to5 tablespoons heavy whipping cream
3 teaspoonsvanilla extract
1/4 teaspoonsalt
2 tablespoonsgreen sugar sprinkles
2 to3 drops red gel food dye
Nutrition
430 caloriesCalories
Per serving · Values are estimates
Instructions
1
Preheat the oven to 350°F. Lightly grease a 9 by 13-inch baking pan and line with parchment paper, leaving enough overhang for easy removal.
2
In a medium bowl, whisk together the all-purpose flour, baking powder, and salt. Set aside.
3
In a large bowl, beat the unsalted butter and sugar with an electric mixer until light and fluffy, about 3–5 minutes.
4
Add eggs one at a time to the butter mixture, beating well after each addition. Mix in the vanilla extract.
5
Gradually add the flour mixture and buttermilk to the wet ingredients, alternating between each, beginning and ending with the flour mixture. Mix until just combined.
6
Pour the batter into the prepared pan and smooth the surface evenly. Bake for 30–45 minutes or until a toothpick inserted in the center comes out clean. Allow the cake to cool completely.
7
In a large bowl or stand mixer fitted with a paddle attachment, beat unsalted butter and confectioner's sugar on low speed, slowly adding heavy cream one tablespoon at a time. Mix until smooth and fluffy. Add vanilla extract and salt, scraping the sides of the bowl to combine thoroughly.
8
Once the cake has cooled, apply a crumb coat of buttercream using a silicone spatula to seal in crumbs. Chill the cake for 30 minutes.
9
Spread a thick, smooth layer of buttercream over the entire surface and sides of the chilled cake. Use a silicone spatula and cake scraper for an even finish, dampening the spatula slightly if needed.
10
Sprinkle green sugar over the buttercream and add drops of red gel food dye for festive decoration. Slice into tree shapes before serving if desired.
Essential Tips
Use room temp ingredients
Bring eggs, butter, and buttermilk to room temperature for 1-2 hours before baking. This prevents curdling and creates a smooth, airy batter that rises evenly, giving you that tender crumb you love.
Weigh your flour
Fluff your flour first, spoon it into your measuring cup, and level off. Weighing 190g instead of using volume cups ensures consistent texture-too much flour makes the cake dense.
Don't overmix the batter
Once you add the flour mixture, mix just until combined. Overmixing develops gluten, resulting in a tough cake. A few streaks of flour are okay-it'll finish mixing in the pan.
Chill after crumb coat
After applying the crumb coat, refrigerate the cake for 30 minutes. This sets the frosting and traps crumbs, making your final layer smooth and crumb-free.
Use a cake comb or bench scraper
For perfectly straight sides, drag a bench scraper or offset spatula firmly against the edge of the cake while turning the pan. This creates clean, professional-looking sides every time.
Smart Swaps & Variations
Chocolate Cake Version
Replace 1/2 cup of all-purpose flour with 1/2 cup cocoa powder. Use milk chocolate buttercream and top with red and green M&Ms or white chocolate shavings.
Gluten-Free
Use a 1:1 gluten-free flour blend with xanthan gum. Replace buttermilk with lactose-free buttermilk or almond milk with 1 tsp vinegar. Texture may be slightly denser.
Dairy-Free
Use dairy-free butter and confectioner's sugar (ensure it's corn-free if needed), and swap heavy cream for coconut cream. Frosting will be slightly softer.
Pumpkin Spice Twist
Add 1/2 cup pumpkin purée and 1 tsp pumpkin pie spice to the batter. Frost with brown buttercream and decorate with orange and brown sprinkles for a fall twist.
What to Serve With This
- Warm spiced cider or mulled wine in festive mugs for a cozy pairing.
- Vanilla ice cream or peppermint gelato to contrast the sweet buttercream.
- Mini candy canes or chocolate-covered espresso beans as edible garnishes.
- Serve at a cookie exchange with other holiday favorites like gingerbread or shortbread.
Storage & Reheating
Storage
Store the decorated cake in an airtight container at room temperature for up to 3 days. Keep it in a cool place away from direct sunlight to prevent the buttercream from softening.
Reheating
To serve warm, microwave individual slices for 10-15 seconds. For best texture, reheat in a 300°F oven for 5 minutes to restore freshness without melting the frosting.
Expert Chef Tips
- Use a digital scale to measure your butter for the cake layers-this ensures perfect aeration and consistent results every time.
- Add 1/4 teaspoon of cream of tartar to the buttercream for a brighter white color and slightly tangier flavor that cuts through the sweetness.
- When applying the final buttercream layer, use a Viva paper towel or Magic Sponge to smooth the surface. Dip it in warm water, wring it out, and gently glide it over the frosting for a glass-like finish.
Equipment You’ll Need
- 9x13-inch metal baking pan
- Electric stand mixer or hand mixer
- Digital kitchen scale
- Silicone spatula and offset spatula
- Bench scraper or cake comb
- Parchment paper
Nutritional Benefits
- One slice (1/12 of cake) provides approximately 430 calories, mostly from carbohydrates due to the sugar and flour in the cake and frosting.
- High in sugar and saturated fat from butter and cream, so enjoy in moderation as part of a balanced holiday treat.
- Contains 6g of protein per serving, primarily from eggs and milk components.
- Buttermilk adds a small amount of calcium and probiotics, supporting gut health despite the high sugar content.
Reviews
No written reviews yet — be the first to cook this and share how it turned out!
Leave a Review
Frequently Asked Questions
Can I make this cake ahead of time?
Yes! Bake the cake layers a day ahead and wrap tightly in plastic wrap. Frost and decorate the next morning. The cake tastes even better after resting overnight-flavors meld and the texture becomes more tender.
What's the best way to cut into tree shapes?
After frosting, use a sharp knife or pizza cutter dipped in hot water to slice into triangles or trees. You can also use a tree-shaped cookie cutter after chilling the frosted cake for 10 minutes.
Can I use store-bought buttercream?
While homemade buttercream is ideal for texture and flavor, you can use high-quality store-bought for convenience. Opt for a vanilla buttercream with a fat content over 40% for best stability with sprinkles.
Why does my cake dome in the center?
Overmixing the batter or using too much leavening agent can cause doming. Ensure your baking powder is fresh, and avoid over-creaming the butter and sugar. A simple fix is to level the top with a serrated knife after cooling.
How do I prevent the sprinkles from bleeding into the frosting?
Press the sprinkles gently into the buttercream so they adhere without sitting on top. Chill the cake for 15 minutes before adding sprinkles to help them stick. Avoid over-handling the frosting.
Can I make this cake without food coloring?
Absolutely. Use natural alternatives like beet powder for red or spirulina for green. The cake will have a softer hue, but the flavor and texture remain the same. Adjust intensity as needed.
What's the best pan for this recipe?
A 9x13-inch metal pan heats evenly and promotes consistent baking. Glass pans can cause over-browning on the edges. Avoid dark pans, as they absorb too much heat and can dry out the cake.
How can I make the frosting more stable for decorating?
Increase the confectioner's sugar to 6 cups and reduce the cream to 3-4 tablespoons for a thicker consistency. Chill the frosting for 10 minutes before piping. Add 1 tsp of meringue powder to enhance stability.
More Christmas
🔒 From the Vault — 43,000+ premium recipes


Cook This Next