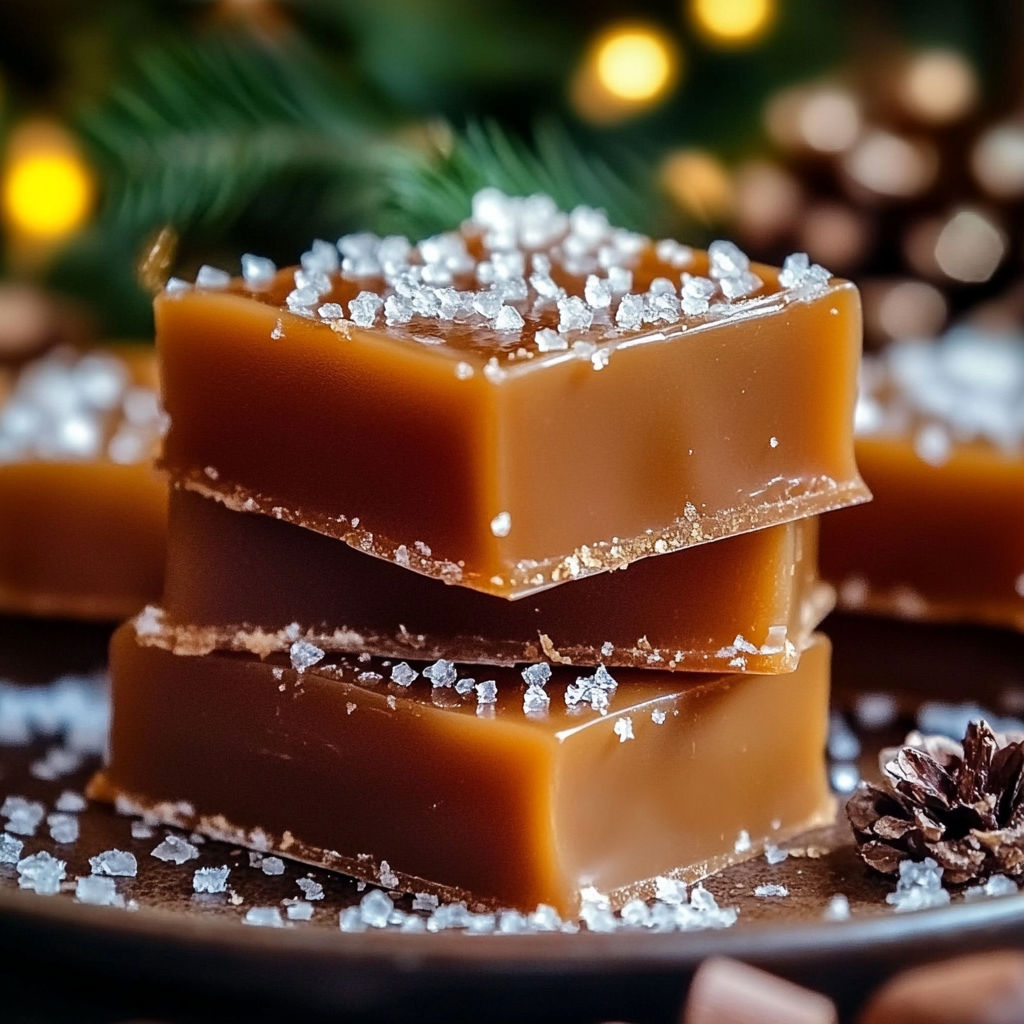
Homemade Caramels Sweetened Butter
There's something magical about homemade caramels-warm, buttery, and impossibly rich, they melt in your mouth with every bite. Home cooks adore this recipe for its simplicity and the way it fills the kitchen with an intoxicating aroma that signals pure comfort. Perfect for holiday gifting, winter cozy nights, or just treating yourself, these caramels are a labor of love that tastes even better when shared. The deep caramel color and chewy texture make them irresistible, a true standout in any dessert lineup.
What Makes This Recipe Special
- The use of dark brown sugar and sweetened condensed milk creates a deeper, more complex caramel flavor compared to standard recipes.
- Cooking to the precise temperature of 238°F-240°F (soft-crack stage) ensures the caramels achieve the perfect chewy texture, not too hard or sticky.
- The parchment-lined pan and thorough buttering prevent sticking, making it easier to lift and cut the caramels without tearing.
- Adding pure vanilla extract at the end preserves its delicate flavor, which can burn if exposed to high heat earlier in the process.
Ingredients
1 cupunsalted butter
2 1/4 cupsdark brown sugar, firmly packed
1 cuplight corn syrup
1 can(14 ounces) sweetened condensed milk
2 teaspoonspure vanilla extract
Nutrition
430 caloriesCalories
Per serving · Values are estimates
Instructions
1
Line a 9x9 inch baking pan with parchment paper and butter thoroughly. Set aside.
2
In a large, heavy-bottomed saucepan, melt unsalted butter over medium-low heat. Add dark brown sugar and stir until fully incorporated. Mix in light corn syrup. Continue cooking until sugar dissolves and the mixture is well blended, about 3 minutes.
3
Stir in sweetened condensed milk and increase heat to medium. Cook mixture, stirring constantly, until it reaches 238°F to 240°F on a candy thermometer, approximately 20 to 30 minutes.
4
Remove pan from heat and gently stir in vanilla extract. Immediately pour the hot mixture into the prepared pan.
5
Allow caramel to cool at room temperature for 3 to 4 hours, or until fully set. Do not cover during cooling.
6
Lift set caramel slab from pan using parchment paper. Cut into desired size pieces with a sharp knife.
7
Individually wrap each caramel in waxed paper to store and serve.
Essential Tips
Use a candy thermometer
For foolproof results, invest in an accurate candy thermometer. Without it, caramels can easily scorch or undercook, leading to grainy or overly hard textures. Clip the thermometer to the side of the pan to keep it steady while stirring.
Stir constantly after milk
Once the condensed milk is added, the mixture thickens quickly and can scorch if left unattended. Stir constantly with a silicone spatula to prevent hot spots and ensure even cooking.
Butter the parchment generously
Even a small unbuttered spot can cause the caramels to stick when cutting or lifting. Use softened butter and spread it into every corner of the pan for easy release.
Score before fully setting
After 2 hours of cooling, lightly score the caramels with a sharp knife to guide your cuts later. This prevents tearing when you do the final trimming after full setting.
Let caramels cool undisturbed
Avoid covering the pan during cooling, as condensation can create a sticky surface. Let the caramels set slowly at room temperature for the best texture and shine.
Smart Swaps & Variations
Salted Caramels
Sprinkle flaky sea salt over the caramels immediately after pouring into the pan for a sweet-savory balance that's become a modern classic.
Espresso or Coffee-Infused
Add 1 teaspoon of instant espresso powder with the brown sugar or a splash of cold brew concentrate for a subtle coffee note that elevates the richness.
Chocolate-Dipped
Once set and cut, dip half of each caramel into melted dark or milk chocolate. Let set on parchment for a decadent twist that's perfect for gifting.
Alcohol-Infused
Stir 2 tablespoons of bourbon or dark rum into the mixture with the vanilla extract for a sophisticated adult treat that pairs beautifully with chocolate.
What to Serve With This
- Pair with a glass of cold milk or a rich dessert wine like tawny port for a luxurious treat.
- Serve alongside a cheese plate featuring aged cheddar, brie, and blue cheese for a sweet-savory contrast.
- Present as part of a holiday dessert board with chocolate truffles, shortbread cookies, and marzipan fruits.
- Enjoy warm with a scoop of vanilla bean ice cream for a classic caramel sundae.
Storage & Reheating
Storage
Store caramels in an airtight container at room temperature for up to 2 weeks. Keep them away from heat and direct sunlight to prevent melting or stickiness.
Reheating
To soften slightly, microwave individual caramels wrapped in parchment for 5-10 seconds at a time. Alternatively, place them in a warm oven (200°F) for 5 minutes to restore their chewiness without losing structure.
Expert Chef Tips
- Use a heavy-bottomed saucepan to distribute heat evenly and prevent hot spots that can scorch the caramels. A stainless steel or enameled cast-iron pan works best.
- For extra glossy caramels, briefly reheat the mixture to 245°F after adding the condensed milk, stirring constantly, then proceed as directed. This step enhances the candy's sheen.
- If the caramel sets too hard, it may have cooked beyond the soft-crack stage. To salvage, microwave briefly in 5-second intervals and stir until workable, then reshape and rewarm the pieces.
Equipment You’ll Need
- Heavy-bottomed 2- to 3-quart saucepan (stainless steel or enameled cast iron)
- Candy thermometer (with a clip for stability)
- 9x9-inch baking pan (preferably metal)
- Rubber spatula or silicone spoon for stirring
Nutritional Benefits
- One serving (1 caramel square) provides approximately 430 calories, primarily from natural sugars in the condensed milk and brown sugar.
- Contains small amounts of calcium and protein from the sweetened condensed milk, contributing to bone health.
- The butter provides conjugated linoleic acid (CLA), a fatty acid with potential anti-inflammatory properties, though this is not a health claim.
- No artificial ingredients or preservatives, making it a cleaner alternative to store-bought caramels, though it remains a high-sugar treat.
Reviews
No written reviews yet — be the first to cook this and share how it turned out!
Leave a Review
Frequently Asked Questions
Can I use light brown sugar instead of dark?
While light brown sugar will work, the caramels will lack depth and chewiness. Dark brown sugar adds moisture and a deeper molasses flavor, which is essential for the signature texture and taste of these caramels. For a compromise, use 1 1/2 cups dark and 3/4 cup light brown sugar.
My caramels turned out grainy. What went wrong?
Graininess usually means the sugar didn't fully dissolve or the mixture wasn't stirred constantly after adding the condensed milk. Ensure the brown sugar is fully incorporated with the butter before heating, and stir constantly once the milk is added to prevent crystallization. A candy thermometer helps avoid undercooking or scorching.
Can I make these caramels ahead of time?
Yes! You can prepare the caramels up to 3 days ahead. Store them in an airtight container at room temperature, then cut and wrap just before serving. For longer storage, freeze them for up to 3 months. Thaw at room temperature before unwrapping.
How do I prevent the caramels from sticking to the knife when cutting?
Dip the knife in hot water and wipe it dry between cuts. This creates a slight barrier that prevents sticking. Alternatively, score the caramels lightly before full setting to guide your cuts and minimize tearing.
Can I use evaporated milk instead of condensed milk?
No, evaporated milk lacks the sugar content needed for proper caramelization. Sweetened condensed milk is essential for the right texture and sweetness. If you must substitute, use a caramel recipe specifically designed for evaporated milk, but expect a different result.
What's the best way to wrap caramels for gifting?
Individually wrap each caramel in waxed paper, twisting the ends to secure. For a polished look, place them in small cellophane bags tied with ribbon. Store in a cool, dry place until ready to gift to maintain freshness.
Why did my caramels turn out too hard?
Overcooking is the most likely culprit. Caramels cooked beyond 245°F (hard-crack stage) will set too firm. Use a candy thermometer and remove them from heat promptly once they reach 238°F-240°F. The mixture will continue to thicken slightly as it cools.
Can I make these caramels without a candy thermometer?
It's risky, but you can try the cold water test. Drop a small amount of hot caramel into cold water. If it forms soft, pliable threads (soft-crack stage), it's ready. If it hardens instantly, it's overcooked. This method requires practice and isn't as precise, so a thermometer is highly recommended.
More Sweet Comfort
🔒 From the Vault — 43,000+ premium recipes
Cook This Next