
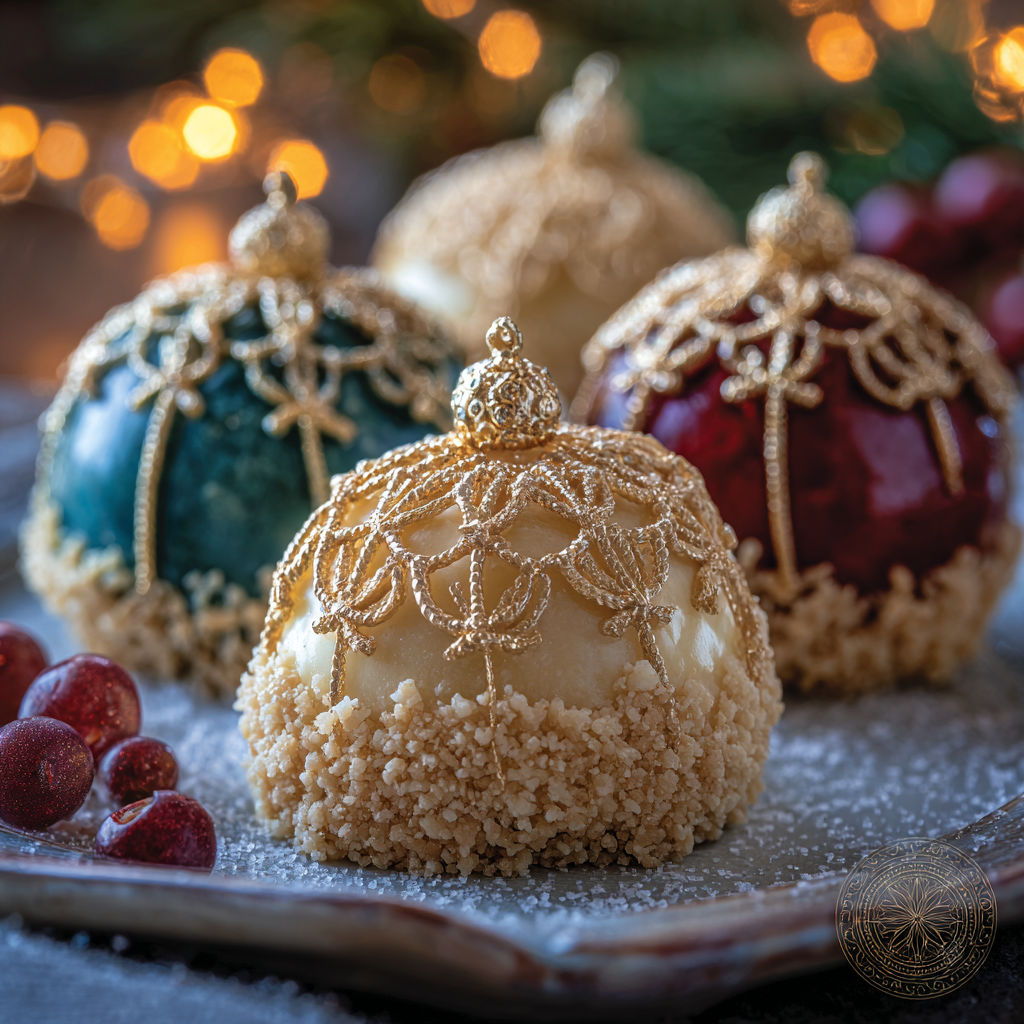
Ornament Mousse Balls Holiday
There's something magical about these Ornament Mousse Balls-they turn dessert into a festive centerpiece that wows guests and kids alike. Perfect for holiday parties, cookie exchanges, or even as a sweet hostess gift, these bite-sized delights balance rich chocolate with playful fillings and a glossy glaze that sparkles under the tree lights. Their elegant simplicity makes them feel gourmet, while the customizable colors and decorations let your creativity shine. Whether you're celebrating Christmas, New Year's, or just a cozy winter night, these mousse balls bring joy to every bite.
What Makes This Recipe Special
- The mousse is layered in two stages: a silky chocolate base followed by a lighter whipped cream top for contrast in texture and flavor.
- A warm glaze-made with gelatin, sugar, and condensed milk-creates a mirror-like finish that's as visually stunning as it is delicious.
- Fillings aren't just tossed in; they're carefully placed in the center of each mousse ball, adding surprise bursts of flavor and texture.
- The ornaments can be decorated with edible gold dust, fondant hooks, or even pretzel stick hangers, making them as fun to make as they are to eat.
Ingredients
1 cupheavy cream, split in half
4 ouncespremium dark chocolate, broken into pieces
1 teaspoonvanilla extract
Tiny bit of salt
6 teaspoonsjam, melted chocolate, or tiny cake chunks
1/2 cupwater
1/2 cupsugar
1/2 cupsweetened condensed milk
1 tablespoonplain gelatin
2 tablespoonscold water
4 ounceswhite chocolate, cut into small pieces
Gel food coloring, whatever colors you like
Edible gold dust (if you want)
Fondant, black licorice strings, or thin pretzels for hanging loops
Powdered sugar for sprinkling (if you want)
Nutrition
340 caloriesCalories
Per serving · Values are estimates
Instructions
1
Put the chopped dark chocolate in a bowl that can take heat. Warm up half the heavy cream in a small pot until tiny bubbles form at the edges. Pour this warm cream on top of the chocolate and wait for a minute. Stir slowly until it's all mixed and smooth, then let it cool down completely.
2
Grab a cold bowl and whip the other half cup of heavy cream with the vanilla and tiny bit of salt until you get stiff peaks. Take about a third of this whipped cream and mix it really well into the cooled chocolate to lighten it up. Then gently fold in what's left of the whipped cream until you can't see any streaks.
3
Scoop the mousse into round silicone molds, filling each about a third full. Drop a teaspoon of your filling right in the middle of each. Add more mousse on top until it reaches the edge and smooth it flat with a spatula. Put the molds on a baking sheet and stick them in the freezer for at least 4 hours or leave them overnight.
4
Mix the gelatin with 2 tablespoons cold water in a small bowl and let it sit. In a pot, mix together 1/2 cup water, 1/2 cup sugar, and 1/2 cup sweetened condensed milk. Heat it up slowly, stirring until all the sugar melts. Take it off the heat, add the softened gelatin and stir until it's gone, then throw in the white chocolate pieces and keep stirring until smooth.
5
Push the glaze through a fine strainer into a bowl that works with a stick blender. Add your food coloring until you're happy with the shade. Blend for half a minute to make sure the color is even and the glaze looks shiny. Let it cool down to around 90°F before you use it.
6
Put parchment paper on a baking sheet and a wire rack on top. Take the frozen mousse balls out of the molds and put them flat-side down on the rack. Pour the glaze over each ball, making sure they're totally covered. Let any extra glaze drip off.
7
Move the glazed balls to serving plates using a flat spatula. Add decorations like gold-brushed fondant, licorice strings, or pretzel stick hooks. Sprinkle with powdered sugar if you want and serve while still cold.
Essential Tips
Chill molds thoroughly
Chill your silicone molds in the freezer for 10 minutes before scooping in the mousse. This helps the mousse set faster and pop out cleanly without sticking. If you skip this step, the mousse can melt slightly when you add the warmer layers.
Whip cream to stiff peaks
When whipping the second half of the heavy cream, aim for stiff peaks to ensure the mousse holds its shape and doesn't deflate. Under-whipped cream can cause the mousse to collapse over time, ruining the ornate layers.
Use high-quality chocolate
Premium dark chocolate (70% cocoa or higher) gives the mousse depth and a rich, slightly bitter contrast to the sweet glaze. Avoid baking chocolate or chocolate chips, which contain stabilizers that can make the mousse grainy.
Strain glaze for a flawless finish
Pass the glaze through a fine-mesh strainer to remove any lumps or undissolved gelatin. This ensures a smooth, glass-like coating that clings beautifully to the mousse balls. Skip this step, and you might end up with tiny bumps or streaks.
Work quickly with gelatin glaze
The glaze thickens as it cools, so if it starts to set before you're ready, gently reheat it in a double boiler or microwave in 5-second bursts. A glaze that's too thick won't coat smoothly and can pull away from the mousse.
Smart Swaps & Variations
Peppermint Chocolate
Add 1/2 teaspoon peppermint extract to the chocolate base and top with crushed candy canes or white chocolate drizzle for a refreshing twist.
Salted Caramel
Fill the mousse centers with homemade salted caramel sauce and sprinkle the glaze with flaky sea salt before it sets.
Fruity Swirl
Layer the mousse with a swirl of raspberry or strawberry jam for a tart contrast. Use 1-2 teaspoons of jam per mousse ball.
Nutty Crunch
Mix toasted chopped hazelnuts or pecans into the chocolate base for added texture, or press them into the sides before the glaze sets.
Vegan Option
Replace heavy cream with full-fat coconut cream (chilled overnight), use agar-agar instead of gelatin, and swap white chocolate for a dairy-free alternative.
What to Serve With This
- Pair with a cup of spiked hot chocolate or mulled wine for a decadent holiday treat.
- Arrange on a platter with other festive desserts like gingerbread cookies or peppermint bark.
- Serve on a tiered cake stand draped with fairy lights for a show-stopping dessert table.
- Include a small hook or ribbon on each ornament for hanging as a whimsical tree decoration.
Storage & Reheating
Storage
Store the glazed mousse balls in an airtight container in the refrigerator for up to 5 days. Keep them away from strong-smelling foods, as the chocolate can absorb odors.
Reheating
Glazed mousse balls are best enjoyed cold or at room temperature. If you need to reheat them, microwave on low power in 5-second intervals, but be aware the glaze may soften slightly.
Expert Chef Tips
- For a cleaner glaze finish, use an offset spatula to spread the glaze thinly over the mousse balls, then tap the rack gently to remove excess glaze before it sets.
- If your mousse balls are too firm to unmold, dip the bottom of the molds briefly in warm water to loosen them. Avoid soaking, as this can dissolve the glaze.
- To achieve a truly glossy glaze, add a tiny pinch of citric acid to the glaze mixture. This balances the sweetness and enhances the shine without altering the flavor.
Equipment You’ll Need
- Silicone molds (ornament shapes, 2-inch diameter)
- Stand mixer or hand mixer with whisk attachment
- Fine-mesh strainer
- Double boiler or heatproof bowl over a pot of simmering water
- Wire cooling rack
- Small offset spatula
Nutritional Benefits
- Each mousse ball provides approximately 340 calories, with the majority coming from healthy fats in the dark chocolate and cream.
- The dark chocolate base contains antioxidants and may support heart health when consumed in moderation.
- The gelatin in the glaze provides collagen, which supports skin and joint health.
- A single mousse ball is portion-controlled, making it easier to enjoy as a treat without overindulging.
Reviews
No written reviews yet — be the first to cook this and share how it turned out!
Leave a Review
Frequently Asked Questions
Can I make these ahead of time?
Yes! Assemble the mousse balls (without decorations) and freeze them for up to 2 weeks. Glaze and decorate them 1-2 hours before serving to ensure the glaze stays shiny and the decorations stay in place.
What's the best way to unmold the mousse balls?
Chill the molds and mousse mixture thoroughly before scooping. Run a warm knife around the edges of each mold, then flip the mold onto a parchment-lined tray and gently tap the bottom to release the ball.
How do I prevent the glaze from pooling at the base?
After glazing, tap the wire rack firmly to remove excess glaze. You can also use a toothpick to nudge any drips back up the sides while the glaze is still wet.
Can I use milk chocolate instead of dark chocolate?
Yes, but note that milk chocolate is sweeter and less stable at room temperature. The mousse may soften faster, so refrigerate the balls until serving and avoid direct sunlight on the glazed surface.
What's the best filling for beginners?
Melted chocolate or jam are the easiest fillings to work with. For melted chocolate, use white or dark chocolate chips heated gently until smooth. For jam, choose a thick preserve like raspberry or apricot to prevent oozing.
Why is my glaze grainy or lumpy?
This usually happens if the gelatin isn't fully dissolved or if you added it to hot liquid without stirring. Always bloom the gelatin in cold water first, then whisk it into the warm sugar mixture until completely smooth.
Can I skip the glaze for a simpler version?
Absolutely! Skip the glaze and roll the mousse balls in crushed nuts, sprinkles, or shredded coconut for a rustic look. The mousse will still taste delicious without the extra step.
How do I attach the fondant hooks or pretzel hangers?
Dip the hook in a tiny bit of melted white chocolate or edible glue, then press it gently into the top of the mousse ball. Let it set for 10 minutes before hanging. Avoid pressing too hard, or the mousse may crack.
More Holiday Parties
🔒 From the Vault — 43,000+ premium recipes




Cook This Next