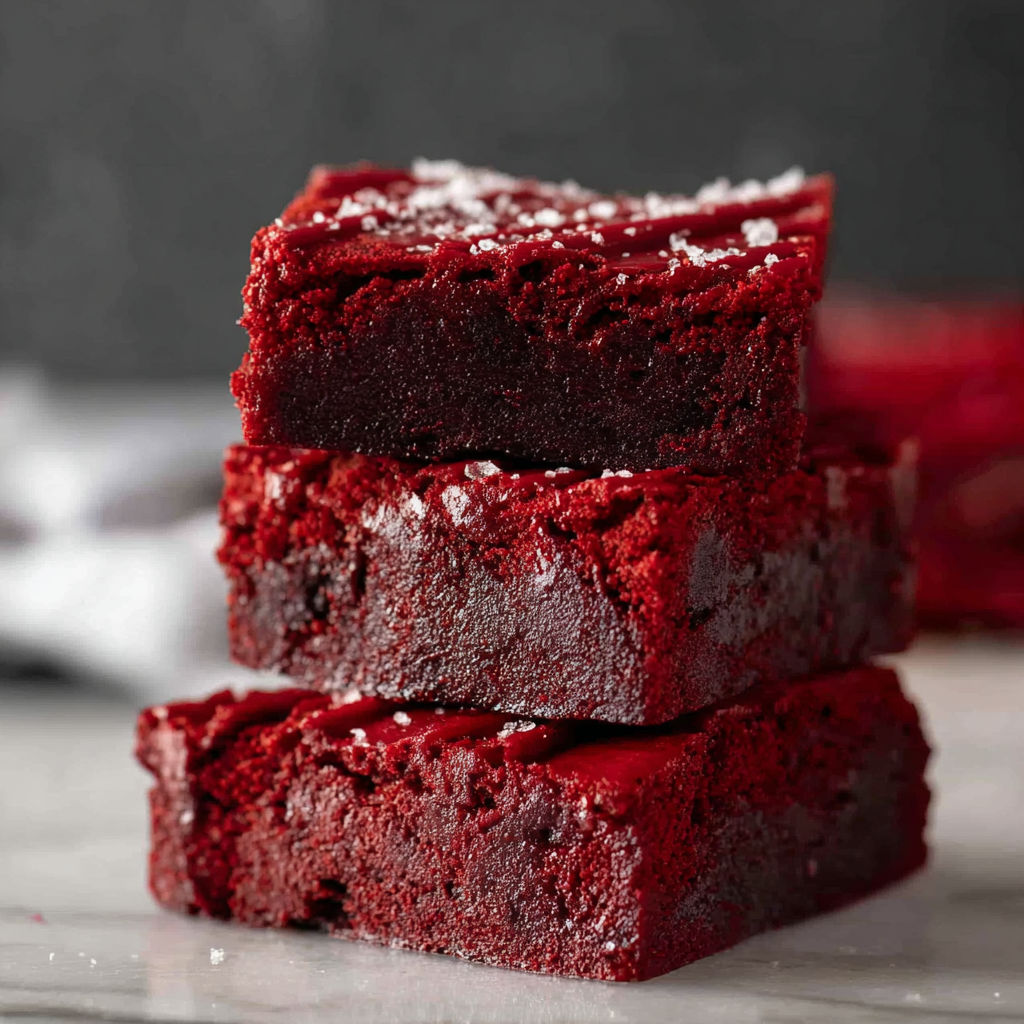
Red velvet brownies treat
There's something magical about red velvet brownies-they're rich, fudgy, and just sweet enough to make any day feel special. Whether you're baking for a holiday potluck, a cozy game night, or just treating yourself after a long week, this recipe delivers deep chocolate flavor with that signature red velvet twist. The secret? A perfect balance of melted chocolate, cocoa, and a hint of vinegar for depth. Once you try these, they'll become your go-to dessert for every occasion.
What Makes This Recipe Special
- The combination of melted semi-sweet chocolate and unsweetened cocoa powder creates a double-chocolate richness that's deeper than standard brownies.
- White vinegar is the secret to tender, moist crumbs-it reacts with the baking ingredients to keep the texture light despite the dense chocolate base.
- A touch of white chocolate chips (optional) adds a creamy contrast to the deep red velvet flavor, making every bite irresistibly decadent.
- The red gel food coloring gives these brownies their iconic hue without altering the flavor, unlike liquid dyes which can make the batter thin.
Ingredients
3/4 cupunsalted butter, melted
2 ouncessemi-sweet chocolate bar, finely chopped
1 1/4 cupsgranulated sugar
2 largeeggs
2 teaspoonsvanilla extract
1 teaspoonwhite vinegar
1/2 tablespoonred gel food coloring
2 tablespoonsunsweetened cocoa powder
1 1/4 cupsall-purpose flour
1/4 teaspoonsalt
1/2 cupwhite chocolate chips, optional
Nutrition
430 caloriesCalories
Per serving · Values are estimates
Instructions
1
Preheat the oven to 350°F and line an 8x8-inch square baking pan with parchment paper.
2
In a large microwave-safe bowl, melt the unsalted butter and chopped semi-sweet chocolate in the microwave using 30-second intervals, stirring until smooth.
3
Whisk in granulated sugar until incorporated, followed by eggs added one at a time, mixing thoroughly after each addition. Stir in vanilla extract, white vinegar, and red gel food coloring.
4
In a separate medium bowl, sift together unsweetened cocoa powder, all-purpose flour, and salt.
5
Gradually fold the dry mixture into the wet mixture using a spatula until just combined. Fold in white chocolate chips if desired.
6
Spread the batter evenly into the prepared pan. Bake for 30 to 45 minutes or until a toothpick inserted into the center comes out with a few moist crumbs.
7
Allow brownies to cool completely in the pan before slicing. Drizzle with additional melted white chocolate if desired.
Essential Tips
Don't overmix the batter
Fold the dry ingredients just until combined to avoid developing gluten, which can make the brownies tough instead of fudgy.
Use room-temperature eggs
Cold eggs can seize the butter-chocolate mixture, causing lumps. Let them sit out for 15 minutes before starting.
Check for doneness early
Start testing at 30 minutes-the brownies should be set around the edges but still slightly jiggly in the center.
Line the pan with parchment
This prevents sticking and makes slicing cleaner, especially important for the rich, gooey texture.
Chill before slicing
Waiting until they're completely cool ensures clean cuts and prevents the brownies from crumbling when you serve them.
Smart Swaps & Variations
Nutty twist
Fold in 1/2 cup of toasted pecans or walnuts for added crunch and a toasty depth that pairs beautifully with the chocolate.
Cream cheese swirl
Spread a thin layer of cream cheese batter (4 oz cream cheese + 2 tbsp sugar + 1 egg) over the brownie batter before baking for a marbled effect.
Spiced version
Add 1/2 tsp of cinnamon and a pinch of cayenne pepper to the dry ingredients for a subtle warmth that complements the chocolate.
What to Serve With This
- A scoop of vanilla bean ice cream for a classic pairing that melts into the warm brownies.
- Warm caramel sauce drizzled over the top for an extra layer of indulgence.
- A dusting of powdered sugar and fresh raspberries for a pop of color and tartness.
- A cup of cold milk or a rich espresso for dipping-perfect for balancing the sweetness.
Storage & Reheating
Storage
Store brownies in an airtight container at room temperature for up to 5 days, or refrigerate for up to a week to preserve freshness.
Reheating
Reheat slices in the microwave for 10-15 seconds to soften the edges slightly, or warm briefly in a 300°F oven to restore the gooey texture without drying them out.
Expert Chef Tips
- For the fudgiest texture, replace 1/4 cup of the granulated sugar with brown sugar-it adds moisture and a deeper caramel note.
- Use a high-quality semi-sweet chocolate bar (70% cocoa) for the best flavor; avoid chocolate chips, which contain stabilizers that can make the brownies cakey.
- Rest the batter for 10 minutes before baking-this allows the flour to hydrate fully, resulting in a more tender crumb.
Equipment You’ll Need
- 8x8-inch square baking pan
- Large microwave-safe bowl or double boiler
- Spatula for folding
- Fine-mesh sieve for sifting dry ingredients
Nutritional Benefits
- Each serving (1/16 of the recipe) provides about 27g of carbohydrates, mainly from the sugar and flour, making these a treat best enjoyed in moderation.
- The recipe contains 24g of fat per serving, primarily from the butter and chocolate, which are sources of saturated fat-balance with lighter meals throughout the day.
- A single brownie contains approximately 10% of the daily recommended intake of iron, thanks to the cocoa powder and chocolate.
- White chocolate chips add calcium but also extra sugar and fat; omitting them reduces the calories by about 30 per serving.
Reviews
No written reviews yet — be the first to cook this and share how it turned out!
Leave a Review
Frequently Asked Questions
Can I use natural cocoa powder instead of Dutch-process?
Yes, but the brownies may be slightly less rich in color and flavor. If using natural cocoa, omit the vinegar or replace it with an equal amount of buttermilk for acidity.
How do I prevent the red food coloring from leaving stains?
Wear gloves while mixing and handle the food coloring sparingly-start with 1/4 tbsp and add more only if needed. Gel coloring is less messy than liquid.
Can I make these ahead and freeze them?
Absolutely! Cool the brownies completely, wrap them tightly in plastic and foil, and freeze for up to 3 months. Thaw at room temperature before serving.
Why did my brownies come out cakey instead of fudgy?
Overmixing the batter or using too much flour can create a cakey texture. Measure your flour by spooning it into the cup and leveling it off-don't scoop directly from the bag.
Can I substitute the vinegar with lemon juice?
Yes, lemon juice works well and adds a bright note, but use it sparingly-start with 1/2 tsp to avoid making the brownies too tangy.
How do I get clean slices without crumbs?
Chill the brownies for at least 2 hours before slicing, and use a sharp knife dipped in hot water for clean cuts. A plastic knife works well for even pressure.
Can I make this recipe in a 9x9-inch pan?
Yes, but reduce the baking time to 25-30 minutes. The brownies will be slightly thinner, so keep an eye on them as they bake.
What's the best way to melt the chocolate and butter?
Use a double boiler or microwave in 30-second bursts, stirring between each interval. Overheating can cause the chocolate to seize or burn.
More Sweet Comfort
🔒 From the Vault — 43,000+ premium recipes
Cook This Next