Blood Orange Cheesecake Citrus
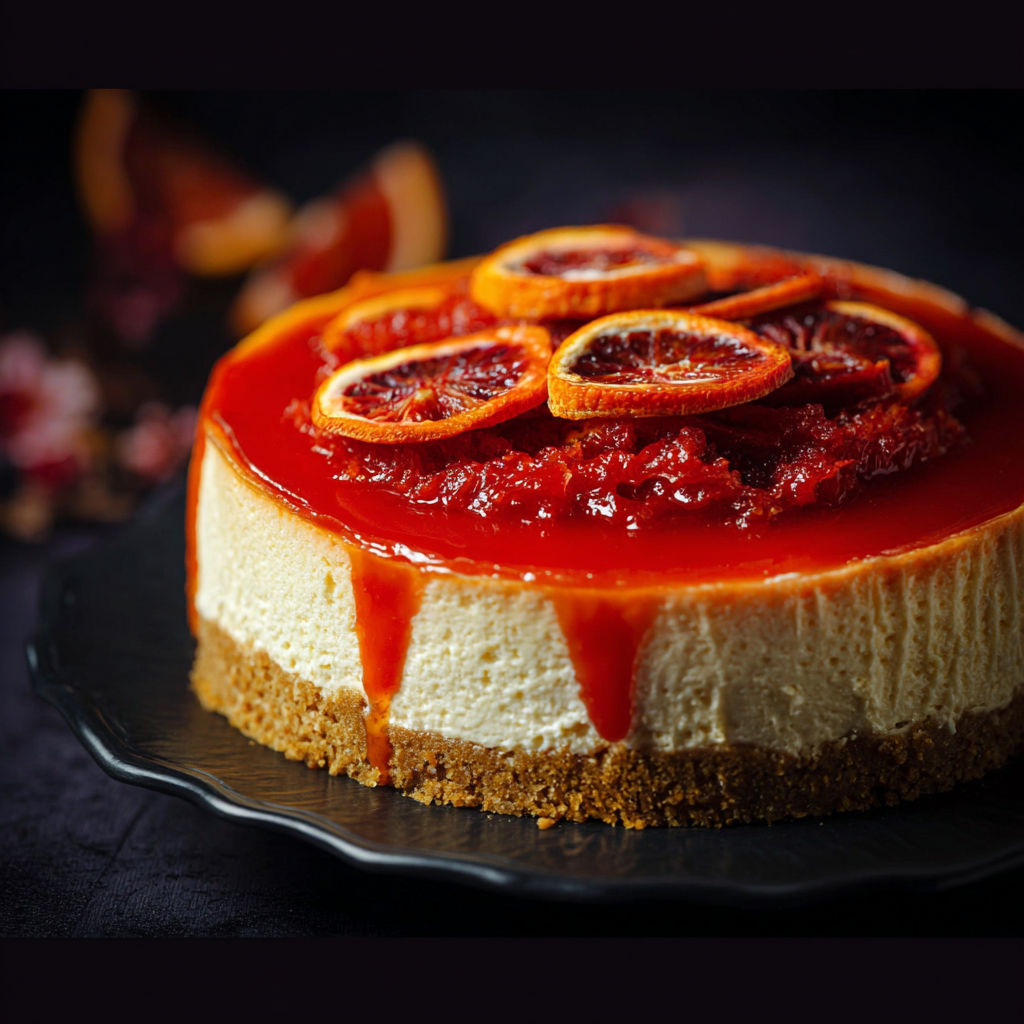
There's something magical about a Blood Orange Cheesecake Citrus-its vibrant color and citrusy zing make it a showstopper at any gathering, from summer barbecues to elegant dinner parties. Home cooks love it because it balances rich, creamy layers with a bright, tangy jelly top, creating a dessert that's as refreshing as it is indulgent. The deep ruby hues of blood orange contrast beautifully with the golden graham cracker base, making it as Instagram-worthy as it is delicious. It's the kind of dessert that feels luxurious but is surprisingly approachable to make at home.
What Makes This Recipe Special
- The blood orange jelly layer is tempered with gelatin and poured over a *chilled* cheesecake base, ensuring it sets into a glossy, wobble-free layer that glistens like a ruby gem.
- The graham cracker crust is crushed finely and mixed with melted butter, then pressed firmly into the pan and baked briefly to deepen the flavor-no soggy bottoms here.
- Fresh blood orange zest is folded directly into the cheesecake batter, infusing every bite with a fragrant citrus aroma that's more intense than regular orange zest.
- The cheesecake is baked in a water bath (bain-marie) at a low 320°F, guaranteeing a silky, crack-free surface that's foolproof even for beginners.
Ingredients
8.8 ouncesgraham crackers
5.3 ouncesunsalted butter, melted
17.6 ouncescream cheese, left at room temperature until soft
0.5 cupsour cream
1 cupfine sugar
3 largeeggs
1 teaspoonvanilla extract
Zest from 1 big blood orange
1 cupfresh-squeezed blood orange juice, strained (roughly 4 big blood oranges)
0.5 cupplus 1 tablespoon fine sugar
2 tablespoonswater
1.5 teaspoonspowdered gelatin
Whipped cream for topping
Dried blood orange slices
Nutrition
430 caloriesCalories
Per serving · Values are estimates
Instructions
1
Grease an 8-inch springform pan and cover bottom and sides with parchment paper, leaving some hanging over for easy removal later. Smash graham crackers into tiny crumbs using a food processor. Mix in melted butter until everything's combined. Press mixture firmly onto the bottom and up the sides of your pan. Pop in the fridge for 30 minutes.
2
Warm your oven to 320°F. Using a large bowl, mix cream cheese, sour cream, and sugar until it's nice and smooth. Drop in eggs one by one, mixing well after each. Stir in vanilla extract, blood orange zest, and your strained juice. Give everything another minute of mixing.
3
Pour your filling into the chilled crust, making sure to leave some space at the top for the jelly layer. Flatten the top with a spoon. Set the pan on a baking tray. Bake for 60 to 70 minutes, until the middle just barely jiggles. Turn off the oven and let the cheesecake cool inside with the door cracked open. Then stick it in the fridge for at least 4 hours.
4
Put blood orange juice and fine sugar in a small pot. Heat on medium, stirring until all sugar melts, then take it off the heat. In another bowl, mix gelatin with water and zap in the microwave for 10 to 20 seconds until it's completely dissolved. Mix the gelatin into the warm juice until smooth, strain if needed. Let cool to room temperature.
5
Slowly pour your cooled jelly over the cold cheesecake, making sure it spreads evenly. Put back in the fridge until the jelly sets firm, about 2 hours.
6
Gently open the springform pan. Slide your cheesecake onto a nice plate. Add whipped cream and dried blood orange slices on top if you want. Cut and serve while still cold.
Essential Tips
Chill the crust first
After pressing the graham cracker crumbs into the springform pan, chill the crust in the freezer for 15 minutes before baking. This helps it hold its shape and prevents shrinking when the hot filling is added.
Room temp cream cheese is non-negotiable
Leave your cream cheese out for at least 2 hours before mixing. Cold cream cheese creates lumps that are nearly impossible to smooth out, leading to a grainy texture.
Strain the jelly mixture
After melting the blood orange juice and sugar, strain the mixture through a fine-mesh sieve to remove pulp or seeds. This ensures the jelly layer is crystal-clear and velvety smooth.
Use a water bath carefully
When baking the cheesecake in the water bath, wrap the springform pan tightly in heavy-duty foil to prevent water from seeping in. Even a small leak can ruin the crust.
Cool the jelly completely before pouring
Pouring warm jelly over the chilled cheesecake will melt the top layer. Let the jelly cool to room temperature first, then refrigerate it for 10 minutes to thicken slightly before adding it to the cheesecake.
Smart Swaps & Variations
Lemon-Lime Twist
Replace the blood orange juice and zest with equal parts fresh lemon and lime juice/zest for a brighter, more tropical flavor. Adjust the sugar slightly to balance the tartness.
Chocolate Crust
Swap the graham crackers for 8.8 oz of chocolate wafer cookies (like Oreos) and add 1 tbsp cocoa powder to the melted butter mixture for a decadent chocolate-orange combo.
Vegan Option
Use vegan cream cheese (like Kite Hill) and dairy-free sour cream. Replace the gelatin with agar-agar or vegan gelatin substitute, and use a flax egg (1 tbsp ground flaxseed + 3 tbsp water) instead of regular eggs.
What to Serve With This
- A dollop of lightly sweetened whipped cream and a sprinkle of candied blood orange peel for an extra citrus punch.
- Pair with a crisp glass of Moscato d'Asti or a sparkling Prosecco to complement the tart-sweet flavors.
- Serve on a chilled white platter with fresh raspberries scattered around for a pop of color and texture contrast.
- For a dinner-party centerpiece, arrange the cheesecake on a bed of crushed ice with edible flowers to enhance its jewel-like appearance.
Storage & Reheating
Storage
Store the cheesecake in the fridge, covered tightly with plastic wrap, for up to 5 days. The jelly layer may soften slightly over time, but the flavor will remain intact.
Reheating
Avoid reheating this cheesecake, as the warmth will cause the jelly to melt and the texture to become gummy. If serving cold, let it sit at room temperature for 15 minutes before slicing to soften slightly.
Expert Chef Tips
- Add a pinch of salt to the blood orange jelly mixture before heating-it enhances the citrus flavor and balances the sweetness, just like in professional pastry kitchens.
- For a cleaner slice, dip your knife in hot water and wipe it dry between cuts. This melts through the jelly layer neatly without dragging crumbs.
- Infuse the whipped cream topping with a teaspoon of blood orange zest and a splash of Grand Marnier for a boozy, aromatic twist that elevates the dessert.
Equipment You’ll Need
- 8-inch springform pan
- Food processor or rolling pin for crushing graham crackers
- Fine-mesh sieve for straining the jelly
- Stand mixer or hand mixer with paddle attachment
Nutritional Benefits
- A single slice (1/12 of the cheesecake) contains approximately 430 calories, with 28g of fat (mostly from the cream cheese and butter) and 35g of carbohydrates, primarily from the graham crackers and sugar.
- Blood oranges are rich in vitamin C and flavonoids, offering antioxidant benefits that may support immune health. One serving provides about 30% of the daily recommended intake of vitamin C.
- The gelatin in the jelly layer provides collagen, which supports joint health, though the amount per slice is minimal. Opt for grass-fed gelatin if you prefer a cleaner ingredient list.
- This dessert is high in saturated fat due to the cream cheese and butter, so it's best enjoyed in moderation. For a lighter version, use reduced-fat cream cheese and swap half the butter in the crust for Greek yogurt.
Reviews
No written reviews yet — be the first to cook this and share how it turned out!
Leave a Review
Frequently Asked Questions
Can I use bottled blood orange juice instead of fresh?
Freshly squeezed juice is ideal for the best flavor and color, but if you must use bottled, opt for 100% juice with no added sugar. Avoid pulp for the clearest jelly layer. The flavor will be less vibrant, so you may need to adjust the sugar to taste.
Why did my cheesecake crack on top?
Cracking usually happens when the cheesecake cools too quickly or is overmixed after adding eggs. To prevent this, avoid opening the oven door during baking, and let the cheesecake cool gradually in the turned-off oven with the door ajar for 1 hour.
Can I make this cheesecake ahead of time?
Absolutely! Assemble the cheesecake up to 2 days ahead and refrigerate without the jelly layer. Prepare the jelly separately and add it just before serving to maintain its texture. This also makes slicing easier.
What's the best way to unmold the cheesecake without damaging it?
Run a thin knife around the edges of the springform pan to loosen the crust, then use the parchment overhang to gently lift the cheesecake onto a plate. If the jelly layer sticks, dip the knife in hot water and slice carefully.
Can I freeze this cheesecake?
Yes, wrap the fully chilled cheesecake tightly in plastic wrap and then in foil. Freeze for up to 3 months. Thaw overnight in the fridge before serving. Note that the jelly may soften slightly after freezing.
How do I know when the jelly layer is set?
The jelly should be firm to the touch and no longer sticky when lightly pressed. This usually takes 2-3 hours in the fridge, but it can set faster if your fridge is very cold. If unsure, give it an extra 30 minutes.
Can I omit the water bath?
While not impossible, skipping the water bath increases the risk of cracks and a dense texture. If you must avoid it, bake at 300°F and place a tray of water on the lower oven rack to add moisture.
How thick should the cheesecake layers be?
The graham cracker crust should be about 1/2-inch thick, and the cheesecake filling should fill the pan to about 3/4 full. This ensures even baking and a stable structure for the jelly layer.
More Sweet Comfort
🔒 From the Vault — 43,000+ premium recipes


Cook This Next