Fully Loaded Classic Chili Cheese Dog
There's something magical about a Fully Loaded Classic Chili Cheese Dog-it's the ultimate comfort food that turns an ordinary weeknight into a celebration. Home cooks love this dish because it combines the rich, smoky depth of homemade chili with the nostalgic comfort of a juicy hot dog, all smothered in melted sharp cheddar. Perfect for game days, potlucks, or those cozy nights when only a big, hearty meal will do, this recipe delivers crave-worthy satisfaction with every bite.
What Makes This Recipe Special
- The chili is built with a blend of chili powder, smoked paprika, and tomato paste for a deep, layered flavor that's far more complex than canned chili.
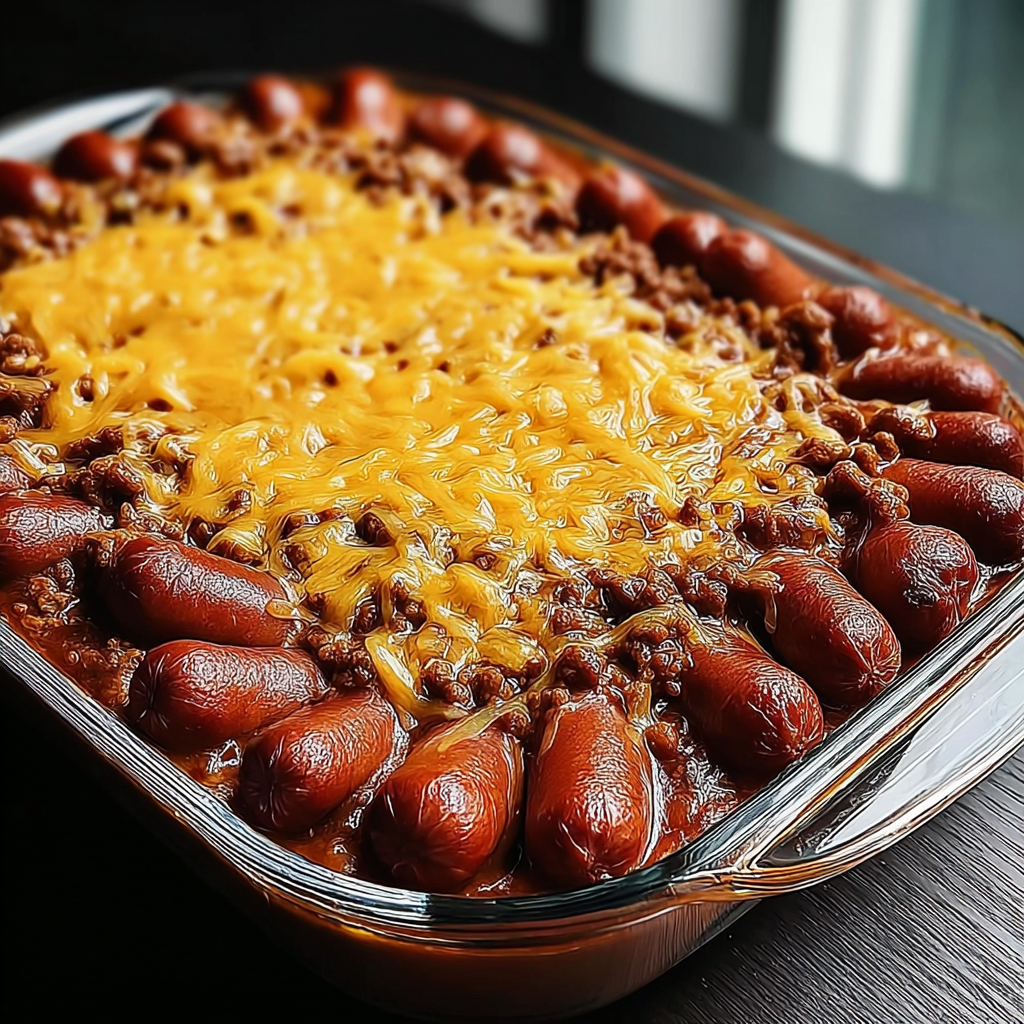
- Hot dogs are baked vertically in the chili, allowing them to absorb the savory sauce while the cheese melts into every crevice.
- Sharp cheddar is used for a bold, tangy contrast that cuts through the richness of the beef and cheese.
- This dish is fully customizable-swap in turkey dogs, plant-based chili, or even pork for a personalized twist.
Ingredients
1 1/2 poundsground beef
1 (15 ounce) can kidney beans, rinsed and drained
1 (8 ounce) can tomato sauce
2 tablespoonstomato paste
2 tablespoonschili powder
1 teaspoongarlic powder
1 teaspoononion powder
1/2 teaspoonsmoked paprika
Salt and black pepper, to taste
12 beefor turkey hot dogs
3 1/2 cupsshredded sharp cheddar cheese
Nutrition
580 caloriesCalories
Per serving · Values are estimates
Instructions
1
Preheat oven to 375°F (190°C) and lightly grease a 9×13-inch baking dish.
2
In a large skillet over medium-high heat, brown ground beef, breaking it up with a spoon. Drain excess fat.
3
Add tomato sauce, tomato paste, kidney beans, chili powder, garlic powder, onion powder, smoked paprika, salt, and black pepper to the beef. Stir to combine and simmer for 10 to 15 minutes until thickened.
4
Evenly spread the chili mixture into the prepared baking dish.
5
Arrange hot dogs vertically into the chili base, spacing them evenly across the dish.
6
Sprinkle shredded sharp cheddar cheese evenly over the chili and hot dogs, allowing hot dog tips to remain visible.
7
Bake for 20 to 25 minutes, until cheese is melted and lightly golden and hot dogs are blistered.
8
Remove from oven and allow to cool for 5 minutes before slicing and serving.
Essential Tips
Chili consistency
If your chili is too thick after simmering, thin it with a splash of water or beef broth before spreading it in the baking dish. This ensures even coverage and prevents dry edges during baking.
Cheese placement
Leave the tips of the hot dogs exposed before baking so the cheese can caramelize and form a delicious crust. This also makes serving easier-no cheese strings to pull apart.
Blister the buns
If you want extra crunch, lightly toast the buns for 2-3 minutes in the oven before adding the hot dogs and chili. This prevents them from getting soggy.
Low-and-slow simmer
Let the chili simmer for at least 20 minutes after adding the tomato paste. This step deepens the flavor and removes any raw taste from the spices.
Cheese blend
Mix in 1/4 cup of grated Parmesan with the cheddar for a nutty, umami boost. The Parmesan melts beautifully and adds another layer of richness.
Smart Swaps & Variations
Spicy Southwest
Add 1 diced jalapeño and 1/2 teaspoon cayenne pepper to the chili. Top with pepper jack cheese and serve with pickled red onions for a tangy kick.
Vegetarian
Replace ground beef with crumbled tempeh or a plant-based ground meat substitute. Use vegetable broth in place of beef broth for the chili base.
Breakfast Style
Swap the chili for sausage gravy and top with scrambled eggs and shredded cheddar for a morning twist. Serve with a side of hash browns.
BBQ Pulled Pork
Use pulled pork instead of beef chili, and swap cheddar for smoked Gouda. Drizzle with BBQ sauce before baking for a sweet and smoky version.
What to Serve With This
- Crispy tater tots or shoestring fries for scooping up extra chili and cheese.
- A cold glass of Mexican-style lager or a frosty root beer to balance the richness.
- Simple side salad with a tangy lime vinaigrette to cut through the heaviness.
- Pickled jalapeños or sliced radishes for a bright, crunchy contrast on top.
Storage & Reheating
Storage
Store leftovers in an airtight container in the fridge for up to 3 days. The chili and cheese reheat beautifully, making it a great meal prep option.
Reheating
Reheat in the oven at 350°F (175°C) for 10-15 minutes, covered with foil, to prevent the cheese from drying out. Avoid microwaving, as it can make the hot dogs rubbery.
Expert Chef Tips
- Toast your chili powder in a dry skillet for 30 seconds before adding it to the beef. This awakens the spices and intensifies their flavor.
- Use a bench scraper to spread the chili evenly in the baking dish-it ensures every hot dog gets an equal share of sauce and cheese.
- For extra browning, broil the dish for the last 2 minutes of baking. Keep a close eye to avoid burning the cheese.
Equipment You’ll Need
- 9×13-inch baking dish
- Large skillet or Dutch oven for browning beef
- Wooden spoon or bench scraper for spreading chili
- Meat thermometer (optional but helpful for checking doneness)
Nutritional Benefits
- Each serving (1 chili cheese dog) provides approximately 580 calories, primarily from protein and healthy fats in the beef and cheese.
- The dish is high in protein (~25g per serving) thanks to the ground beef and hot dogs, making it a filling and satisfying meal.
- Sharp cheddar contributes calcium and vitamin D, while the kidney beans add fiber and plant-based protein for a balanced dish.
- Opt for lean ground beef and turkey hot dogs to reduce saturated fat while keeping the dish flavorful and hearty.
Reviews
No written reviews yet — be the first to cook this and share how it turned out!
Leave a Review
Frequently Asked Questions
Can I make the chili ahead of time?
Absolutely! The chili tastes even better after resting overnight in the fridge. Make it a day ahead, then assemble and bake when ready to serve. This also saves time on busy days.
What's the best way to prevent hot dogs from bulging in the chili?
Make a small slit in each hot dog before arranging them in the dish. This allows steam to escape and prevents unsightly splits, keeping them intact for serving.
Can I use pre-cooked hot dogs?
Yes! If using pre-cooked hot dogs, reduce the baking time to 15-20 minutes. They'll heat through without over-browning. Skip the vertical arrangement if they're already cooked-they won't soak up the chili as well.
How can I make this dish gluten-free?
Use gluten-free hot dogs and check that your chili powder and tomato paste are certified gluten-free. The rest of the ingredients are naturally gluten-free, so no other adjustments are needed.
Can I freeze this dish?
Yes, but assemble the dish without baking. Wrap tightly in foil and freeze for up to 3 months. Thaw overnight in the fridge, then bake as directed. The texture may be slightly softer after freezing, so this is best for reheating rather than fresh serving.
Why is my cheese not melting evenly?
This can happen if the cheese is too cold or the chili is too hot. Let the shredded cheese sit at room temperature for 10 minutes before sprinkling. Also, ensure the chili is hot but not bubbling when you add the cheese.
Can I add other vegetables to the chili?
Yes! Finely diced bell peppers, onions, or carrots work well. Sauté them with the beef before adding the spices to build flavor. Mushrooms add a meaty texture if you're going vegetarian.
How do I know when the hot dogs are fully cooked?
Insert a meat thermometer into the center of a hot dog-it should read 160°F (71°C). If you don't have a thermometer, cut into a hot dog to check for a uniform gray color with no pink remaining.
More Dinner Victories




🔒 From the Vault — 43,000+ premium recipes




Cook This Next