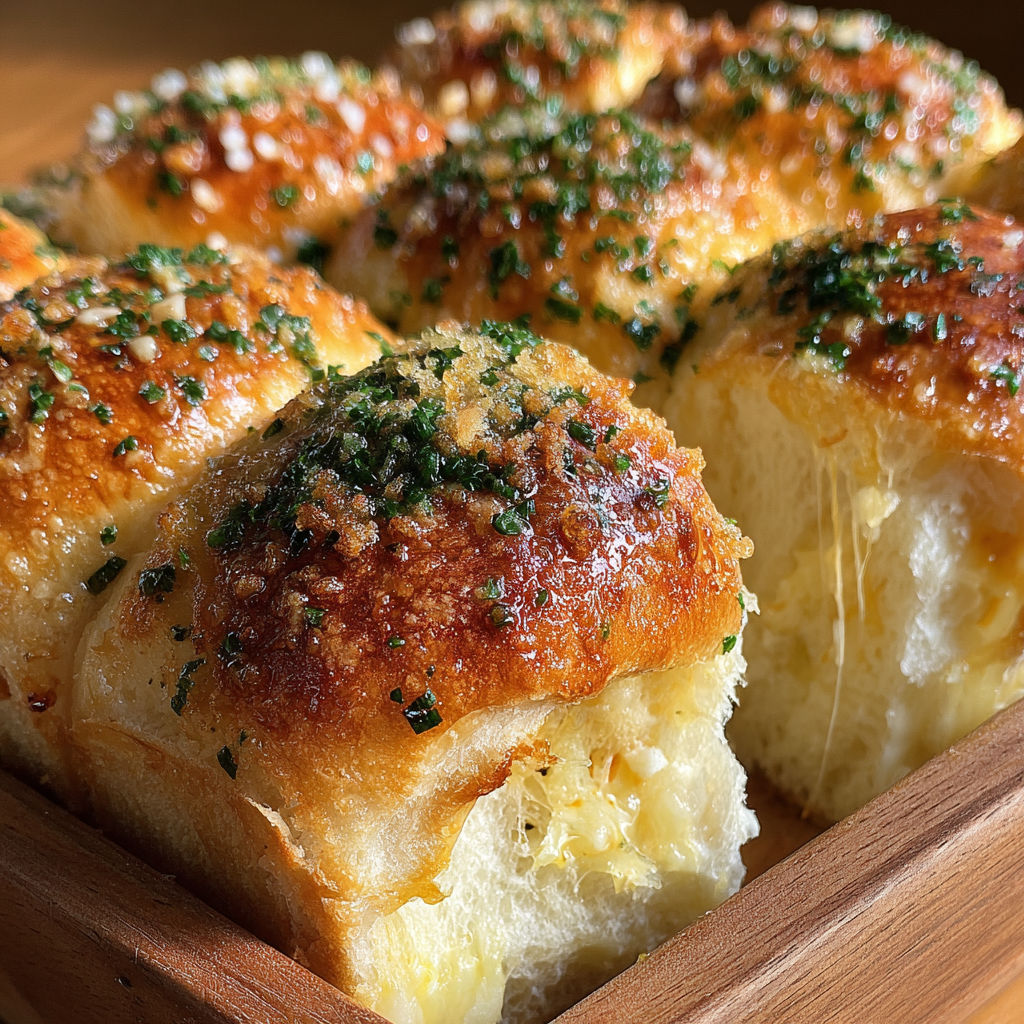
Hawaiian Roll Garlic Bread
There's something magical about pulling apart soft, pillowy rolls that have been kissed with garlic butter and melted cheese. This Hawaiian Roll Garlic Bread transforms store-bought sweet rolls into a showstopper side dish that disappears faster than you can say 'dinner time.' Perfect for game day gatherings, potlucks, or even a cozy family movie night, it's the kind of dish that makes everyone at the table groan with delight. The sweetness of the rolls balances the savory garlic and cheese beautifully, creating a flavor combo that's impossible to resist.
What Makes This Recipe Special
- Uses whole undisturbed rolls sliced horizontally for easy pull-apart servings without the hassle of separating each roll.
- Layered cheese strategy-mozzarella for stretchy melt and Parmesan for sharp umami depth.
- Double garlic application: minced fresh garlic in the butter and garlic powder dusted between layers for layered flavor.
- Baking in two stages (covered then uncovered) ensures the rolls heat through without drying out while achieving perfect golden tops.
Ingredients
1 package(12-count) Hawaiian sweet rolls
1/2 cup(1 stick) salted butter, melted
1 cupshredded mozzarella cheese
1/4 cupgrated Parmesan cheese
3 clovesgarlic, minced
1 tablespoonchopped fresh parsley or 1 teaspoon dried parsley
1/2 teaspoongarlic powder
Nutrition
200 caloriesCalories
Per serving · Values are estimates
Instructions
1
Set the oven to 350°F and line a baking sheet with foil or parchment paper.
2
Without separating the rolls, slice the entire package horizontally to create a top and bottom layer.
3
Position the bottom half of the rolls on the prepared baking sheet.
4
In a small bowl, thoroughly mix melted butter, minced garlic, garlic powder, and parsley.
5
Brush half the garlic butter mixture evenly over the bottom layer of the rolls.
6
Distribute shredded mozzarella and grated Parmesan over the buttered rolls.
7
Replace the top half of the rolls and brush with the remaining garlic butter.
8
Cover loosely with foil and bake for 15 minutes.
9
Remove foil and continue baking for 5 minutes or until rolls are golden and cheese is melted.
10
Allow to cool slightly before pulling apart and serving warm.
Essential Tips
Butter temperature
Make sure your melted butter is warm but not hot when mixing with garlic to prevent cooking the garlic and making it bitter. Let the garlic infuse in the butter for 5 minutes before brushing for maximum flavor.
Cheese placement
Press the shredded mozzarella gently into the butter so it adheres to the rolls rather than scattering across the baking sheet. The Parmesan can go on top since it won't melt as dramatically.
Foil tent timing
Don't skip the foil tent during the first 15 minutes of baking-this creates steam that keeps the rolls soft and prevents the edges from drying out before the cheese has a chance to set.
Pull-apart prep
Let the bread cool for exactly 3-4 minutes after baking; this sets the cheese slightly so the layers separate cleanly without turning into a cheesy blob when served.
Make ahead
Assemble the rolls up to the baking step (through step 7) and refrigerate uncovered for up to 4 hours. Add 5 minutes to baking time when starting from cold.
Smart Swaps & Variations
Spicy kick
Add 1/4 teaspoon red pepper flakes or a dash of hot sauce to the garlic butter mixture for a subtle heat that cuts through the richness.
Herb garden
Swap parsley for 1 tablespoon fresh rosemary or thyme for an aromatic twist that pairs beautifully with the garlic.
Meat lovers
Layer 4 slices of cooked bacon or 6 slices of pepperoni between the rolls before adding cheese for a carnivorous delight.
What to Serve With This
- A crisp arugula salad with lemon vinaigrette to cut through the richness.
- Grilled Italian sausage or meatball subs for an ultimate sandwich spread.
- A cold glass of sparkling apple cider or dry white wine like Pinot Grigio.
- As a side for barbecue ribs or pulled pork sliders at summer cookouts.
Storage & Reheating
Storage
Store leftovers in an airtight container at room temperature for up to 2 days. The rolls will absorb moisture over time, so keep them in their original form rather than pulling apart.
Reheating
Wrap individual portions in foil and warm in a 300°F oven for 8-10 minutes to restore moisture and crispness. Avoid microwaving, which turns the rolls gummy and separates the cheese layers.
Expert Chef Tips
- For extra flavor, toast the garlic in the melted butter over low heat for 2 minutes before adding the other ingredients-this mellows the sharpness and deepens the flavor without burning.
- Use a serrated bread knife to slice the rolls horizontally; it prevents squishing the rolls and gives you cleaner cuts for even butter distribution.
- Sprinkle a pinch of sugar over the cheese layer before baking-it caramelizes slightly and enhances the buttery garlic flavor, especially with the Hawaiian rolls' natural sweetness.
Equipment You’ll Need
- 9x13-inch baking dish or rimmed baking sheet
- Serated bread knife
- Pastry brush
- Small mixing bowl
- Aluminum foil
Nutritional Benefits
- Each serving (1 roll) provides approximately 200 calories, primarily from carbohydrates and fats, with minimal protein.
- The garlic in this dish offers anti-inflammatory benefits and may support immune function, thanks to its allicin content.
- Using Hawaiian rolls adds natural sweetness, reducing the need for added sugar while providing a quick energy source.
- Portion control is key-this dish is rich, so 1-2 rolls per serving are plenty to satisfy without overindulging.
Reviews
No written reviews yet — be the first to cook this and share how it turned out!
Leave a Review
Frequently Asked Questions
Can I use unsalted butter?
Yes, but increase the salt to 1/4 teaspoon in the garlic butter mixture to balance the flavors. The original recipe relies on salted butter for seasoning, so this adjustment is necessary for unsalted versions.
What if I don't have Hawaiian rolls?
Substitute with any soft dinner rolls or brioche buns-they'll work, though the sweetness balance might shift slightly. Avoid crusty bread like baguettes, as they won't hold up to the garlic butter.
Can I make this ahead for a party?
Absolutely! Assemble the rolls up to step 7, cover tightly with plastic wrap, and refrigerate for up to 24 hours. Bake straight from the fridge, adding 5-7 minutes to the covered baking time.
How do I prevent the cheese from burning?
The foil tent during the first 15 minutes is key. Also, use shredded mozzarella rather than sliced, as it melts more evenly. If the top browns too quickly, tent with foil again during the uncovered bake.
Can I freeze this dish?
Yes, but only after baking. Cool completely, wrap tightly in foil and plastic, then freeze for up to 3 months. Reheat from frozen in a 300°F oven for 20-25 minutes, wrapped in foil.
What's the best way to pull apart the rolls neatly?
Let the bread cool for 3-4 minutes after baking, then use a fork or butter knife to gently separate the layers along the pre-sliced lines. Avoid pulling too hard, which can tear the rolls.
Can I add other cheeses?
Cheddar or provolone would work well-mix them with the mozzarella for a more complex flavor. Avoid hard cheeses like Gouda, as they won't melt smoothly.
Why does my garlic butter separate?
This happens if the butter is too hot or if you overmix. Let the garlic butter cool to room temperature before brushing, and use a gentle hand when mixing to keep the emulsion stable.
More Gathering Stars
🔒 From the Vault — 43,000+ premium recipes

Cook This Next