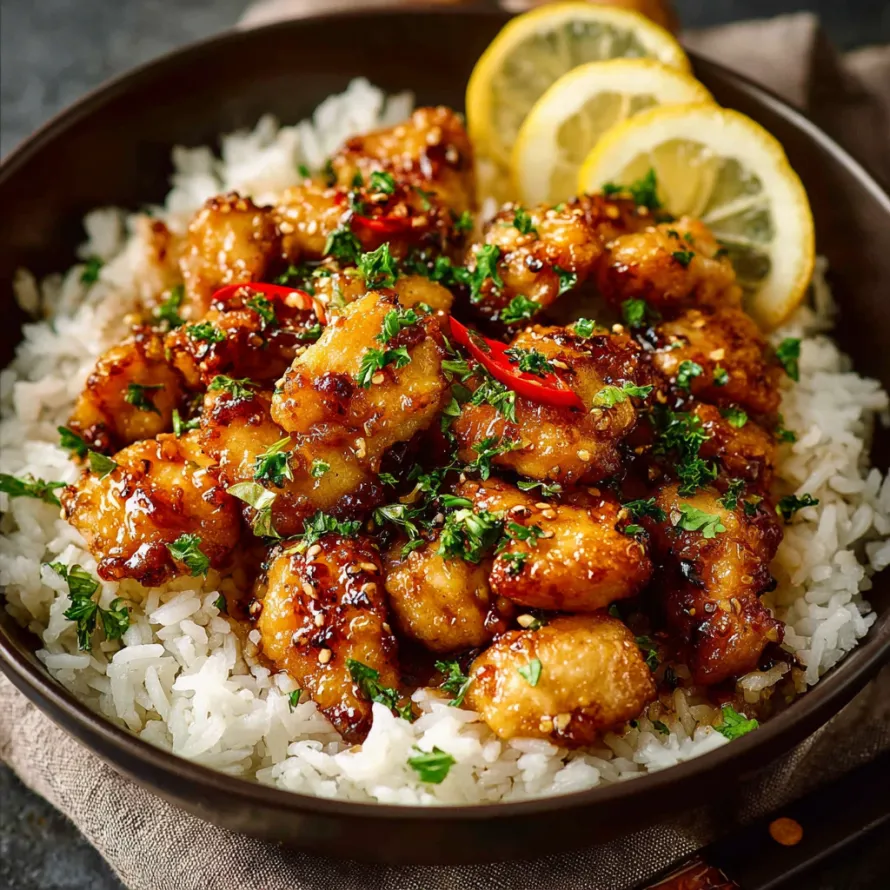
Honey Garlic Lemon Chicken
There's something about sticky, glossy honey garlic lemon chicken that turns an ordinary weeknight into a celebration. The balance of sweet honey, tangy lemon, and savory garlic creates a harmony that lingers on the palate, making every bite feel like a treat. Home cooks love it because it's quick to make yet tastes like it came from a restaurant kitchen. Perfect for family dinners, meal prep, or even a last-minute date night when you want to impress without stressing.
What Makes This Recipe Special
- The cornstarch double-coat ensures ultra-crispy edges while keeping the chicken tender inside-no dry, chewy bites here.
- Fresh lemon juice and zest are added twice: once in the marinade-like seasoning step, and again in the sauce, layering brightness throughout the dish.
- The sauce is built in stages: first a golden fond from searing the chicken, then enriched with butter for body, and finally thickened with a gentle simmer to create a restaurant-quality glaze.
- This recipe balances five key flavor notes-sweet, salty, sour, umami, and aromatic-without overwhelming your taste buds, making it universally craveable.
Ingredients
1.5 lbsChicken Breast, cut into bite-sized pieces
1 teaspoonSalt
1 teaspoonPepper
0.5 teaspoonGarlic Powder
0.25 cupCornstarch
2 TablespoonsOlive Oil
4 TablespoonsButter
3 GarlicCloves, minced
0.33 cupHoney
2 TablespoonsFresh Lemon Juice
1 TablespoonSoy Sauce
Fresh Oregano or Italian Parsley, chopped for garnish
Nutrition
420 caloriesCalories
Per serving · Values are estimates
Instructions
1
Cut the chicken into bite-size pieces and pat dry with a paper towel. Sprinkle with salt, pepper, and garlic powder. Toss the chicken in cornstarch in a bowl and coat evenly.
2
Heat a large skillet over medium-high heat. Add olive oil and cook the chicken for 8-10 minutes until golden and cooked through.
3
Add butter, minced garlic, honey, fresh lemon juice, and soy sauce to the skillet. Cook and allow the mixture to thicken for about 5 minutes.
4
If you prefer a thicker sauce, remove the chicken and cook the sauce for an additional 5 minutes. Add the chicken back to the skillet and coat well with the sauce. Garnish with fresh oregano or parsley and serve. Optionally, drizzle with more honey when serving.
Essential Tips
Pat chicken dry
Thoroughly pat the chicken pieces with paper towels before seasoning-this removes excess moisture so the cornstarch coating adheres better and crisps up beautifully in the skillet.
Medium-high heat only
Cook the chicken on medium-high heat to develop a golden crust without burning the garlic later. Lower heat would steam the chicken and prevent proper browning.
Stir the sauce
Frequently stir the sauce as it simmers in the last step-this prevents the honey from sticking to the pan and ensures even thickening without scorching.
Taste before serving
Adjust the sauce flavor at the end by adding a splash of water if too thick, or a squeeze of lemon if too sweet. The sauce should coat the back of a spoon but still be pourable.
Use fresh herbs
Fresh oregano or parsley adds a bright, aromatic finish that dried herbs can't match. Sprinkle just before serving for maximum vibrancy.
Smart Swaps & Variations
Spicy Kick
Add 1 teaspoon red pepper flakes or 1 minced jalapeño to the sauce while simmering for a subtle heat that complements the sweetness.
Asian Fusion
Swap soy sauce for coconut aminos and add 1 teaspoon grated ginger to the sauce for a tropical twist on the classic.
Family-Friendly
Use chicken thighs instead of breasts for a juicier, more forgiving option that stays tender even if slightly overcooked.
What to Serve With This
- Steamed jasmine rice or cauliflower rice to soak up the sticky sauce
- Quick-pickled cucumbers or a simple arugula salad dressed with lemon vinaigrette for fresh contrast
- Garlic naan or crusty sourdough bread to mop up every last bit of the glossy sauce
- Iced hibiscus tea or a crisp white wine like Pinot Grigio to balance the sweetness and enhance the citrus notes
Storage & Reheating
Storage
Store leftovers in an airtight container in the refrigerator for up to 3 days. The sauce may thicken upon cooling-simmer with a splash of water when reheating to restore its silky texture.
Reheating
Reheat gently in a skillet over medium-low heat, stirring often, to preserve the chicken's tenderness and prevent the sauce from separating. Avoid microwaving-it can make the sauce grainy and the chicken rubbery.
Expert Chef Tips
- Toast the cornstarch lightly before tossing with chicken: heat it in a dry skillet for 30 seconds until it smells nutty-this elevates the crispiness to next-level status.
- Use a silicone spatula when combining the sauce ingredients in the pan-it scrapes the fond off the bottom without damaging the nonstick surface or scraping off seasoning.
- For extra gloss, whisk ½ teaspoon of xanthan gum into the sauce during the final simmer-it binds the sauce beautifully without altering the flavor and gives a professional sheen.
Equipment You’ll Need
- Large heavy-bottomed skillet (12-inch) for even heat distribution
- Tongs for turning chicken without piercing it
- Small saucepan for reheating sauce separately if prepping ahead
- Instant-read thermometer to confirm chicken reaches 165°F internally
Nutritional Benefits
- High in lean protein (35g per serving) from chicken breast, supporting muscle repair and satiety
- Contains heart-healthy monounsaturated fats from olive oil and butter in moderate amounts
- Provides vitamin C and antioxidants from fresh lemon juice, aiding immune function
- Moderate natural sugars from honey, offering quick energy without added refined sugars
Reviews
No written reviews yet — be the first to cook this and share how it turned out!
Leave a Review
Frequently Asked Questions
Can I use chicken tenders instead of breast pieces? How does the timing change?
Yes-chicken tenders are thinner and cook faster. Cut them into even 1-inch pieces and reduce cooking time to 5-6 minutes total. They'll be ready just as the sauce finishes simmering.
Why does my sauce separate or look greasy after storage? How can I fix it?
Separation happens when the emulsifiers (butter and honey) cool and solidify. To fix, warm the sauce gently over low heat and whisk vigorously until smooth. If needed, whisk in 1 tsp cornstarch mixed with 1 tbsp water to re-emulsify.
Can I make the sauce ahead of time? How do I store it separately?
Absolutely. Simmer the sauce as directed, then cool and store in a jar in the fridge for up to 4 days. Reheat it gently in a saucepan before adding the pre-cooked chicken to warm through-this prevents overcooking.
What's a good substitute for honey if I want a vegan option?
Agave nectar or pure maple syrup work beautifully, though they'll add a slightly different depth of flavor. Use the same quantity and reduce simmering time by 1 minute since these syrups caramelize faster.
Why does the chicken sometimes taste chalky from the cornstarch?
Chalkiness occurs when the cornstarch isn't evenly coated or if it's overcooked. Ensure the chicken is fully dried before tossing in cornstarch, and avoid high heat while cooking the sauce-medium-low is ideal for the final stage.
Can I double the recipe and freeze it? How do I reheat properly?
Yes-cook the full batch but hold the sauce until ready to serve. Freeze cooked chicken and sauce separately for up to 3 months. Thaw overnight in the fridge, then reheat in a skillet with a splash of water, stirring until glossy and hot.
What kind of soy sauce works best here? Can I use coconut aminos?
Low-sodium soy sauce is ideal-it gives depth without overpowering saltiness. Coconut aminos are a great substitute, but they're milder, so you may want to add a pinch more salt to the chicken seasoning.
Why does the garlic burn sometimes even when the heat is medium?
Garlic burns quickly once the butter is added because the milk solids in butter brown fast. Add the garlic during the last 3 minutes of sauce simmering, and stir constantly to prevent it from catching.
More Dinner Victories
🔒 From the Vault — 43,000+ premium recipes
Cook This Next