No-Bake Peanut Butter Cheesecake Balls
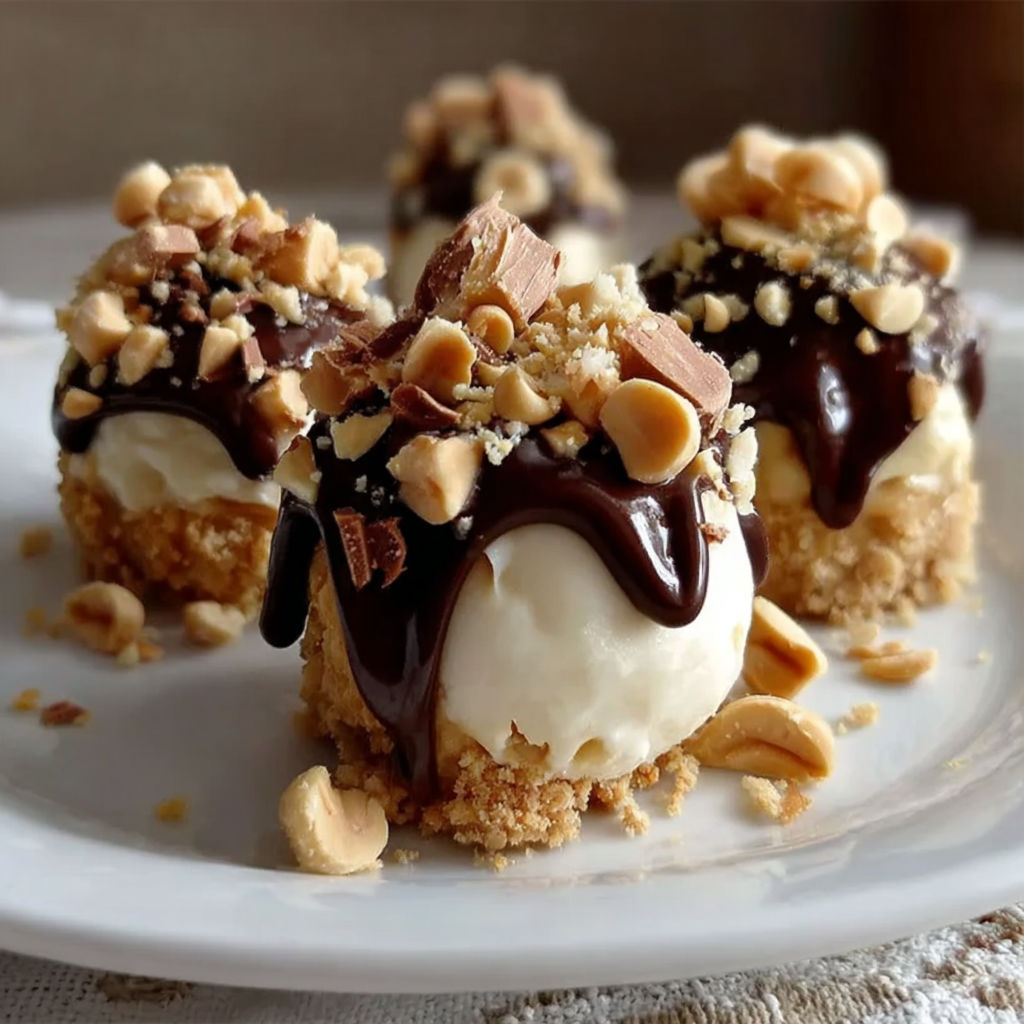
There's something magical about no-bake treats that taste like they came from a fancy patisserie but take just an hour to make at home. These Peanut Butter Cheesecake Balls are that perfect blend of creamy, crunchy, and chocolatey bliss that home cooks adore for summer potlucks, bake sales, or last-minute gifts. The cool, bite-sized bites with their rich peanut butter center and chocolate shell are irresistibly addictive, making them a must-have for any occasion where you want to impress without the fuss.
What Makes This Recipe Special
- The layered texture comes from pressing a graham cracker-pie crust base into each mold before adding the creamy filling, creating a delightful contrast with every bite.
- A clever two-part filling process combines a tangy cream cheese layer with a sweet peanut butter layer, ensuring balanced flavor in every marble-sized ball.
- The chocolate shell is tempered naturally by cooling slightly before dipping, which prevents the coating from melting the delicate peanut butter filling.
- A final drizzle of melted peanut butter on top adds visual appeal and an extra hit of nutty flavor that ties all the components together beautifully.
Ingredients
1 1/2 cupsfinely crushed graham cracker crumbs
6 tablespoonsunsalted butter, melted
2 tablespoonsgranulated sugar
8 ouncescream cheese, softened
1/4 cupgranulated sugar
1/2 teaspoonvanilla extract
1/3 cupheavy cream
1/2 cupcreamy peanut butter
2 tablespoonspowdered sugar
1 pinchsalt
1 cupsemi-sweet chocolate chips
1 tablespoonvegetable oil
1/4 cuptoasted chopped peanuts
Melted peanut butter for drizzling
Nutrition
5230 caloriesCalories
Per serving · Values are estimates
Instructions
1
Mix graham cracker crumbs, granulated sugar, and melted butter in a medium bowl until the texture resembles wet sand. Press enough mixture into silicone molds or mini muffin cups to form an even base layer. Refrigerate until set.
2
In a large bowl, beat softened cream cheese with granulated sugar until smooth. Add vanilla extract and mix until incorporated. In a separate bowl, whip heavy cream until it forms soft peaks, then gently fold into the cream cheese mixture. Spoon filling onto the prepared crusts, leaving a cavity for the peanut butter core. Chill to firm.
3
Combine peanut butter, powdered sugar, and a pinch of salt in a small bowl until smooth. Roll mixture into marble-sized balls. Press one ball into the center cavity of each cheesecake, smoothing the top surface for an even finish. Chill for 30 minutes or freeze until firm.
4
Carefully remove the set pieces from molds and arrange on a parchment-lined tray. Freeze for 15 minutes to ensure stability before dipping.
5
Melt chocolate chips and vegetable oil together in a microwave-safe bowl, stirring every 30 seconds until smooth. Let chocolate cool slightly until thickened but still pourable. Dip each chilled cheesecake ball fully in chocolate, coating evenly. Place on the tray and immediately sprinkle with toasted chopped peanuts and drizzle with melted peanut butter if desired. Chill until the chocolate is set.
Essential Tips
Chill your tools
Place your mixing bowls and beaters in the freezer for 5 minutes before starting. Cold cream cheese whips up fluffier, and the mixture will hold its shape better when forming the balls.
Use fine crumbs
Pulse your graham crackers in a food processor until you have superfine crumbs. Coarse crumbs won't pack tightly into the molds and may leave gaps in your crust layer.
Peanut butter consistency matters
Make sure your peanut butter is creamy and not too thick. If it's separated, stir it well before measuring, or thin it slightly with 1 teaspoon of heavy cream.
Dip at the right temp
Test your chocolate by dipping a toothpick. If it sets within 2 minutes but doesn't crack, it's at the perfect temperature for dipping. Too hot and it will melt the balls; too cold and it will seize.
Double-dip for extra shine
For a professional-looking finish, dip each ball twice. The first coat sets quickly, so you can do a second coat for a thicker, glossier shell that's less likely to chip.
Smart Swaps & Variations
Nut-Free
Replace the chopped peanuts with toasted coconut flakes or sprinkle crushed pretzels on top for a salty-sweet variation that keeps the crunch without the nuts.
Vegan
Use vegan cream cheese and swap the heavy cream for coconut cream. Replace honey in the peanut butter drizzle with maple syrup or agave.
White Chocolate
Use white chocolate chips for the coating and add a pinch of turmeric to the chocolate for a pale golden color that looks stunning against the peanut butter.
Spiced
Add 1/4 teaspoon each of cinnamon and cardamom to the graham cracker mixture for a warm, autumnal twist that pairs wonderfully with the peanut butter.
What to Serve With This
- A cold glass of milk or a rich espresso to cut through the sweetness and highlight the peanut butter flavors.
- Fresh berries like raspberries or strawberries arranged around the balls on a platter for a pop of color and light contrast.
- Warm caramel sauce drizzled over the balls for serving at holiday parties or cozy winter gatherings.
- Mini pretzel sticks or chocolate-covered espresso beans as a playful side for adults-only events.
Storage & Reheating
Storage
Store the cheesecake balls in an airtight container in the refrigerator for up to 5 days. The chocolate shell will stay firm, and the filling will remain creamy.
Reheating
These balls are best enjoyed cold or at room temperature. If you must reheat, place them in the fridge for 10 minutes before serving to restore their cool, creamy texture.
Expert Chef Tips
- For ultra-smooth cream cheese filling, press it through a fine-mesh sieve after beating to eliminate any tiny lumps that could disrupt the texture of your balls.
- Use a melon baller or small cookie scoop to portion the peanut butter filling evenly. This ensures each ball has the same delicious ratio of crust, filling, and coating.
- Add 1/8 teaspoon of cream of tartar to the chocolate mixture while melting. This stabilizes the chocolate and gives it a professional sheen without affecting the flavor.
Equipment You’ll Need
- Food processor or rolling pin (for crushing graham crackers)
- Silicone mini muffin molds or mini loaf pan lined with plastic wrap
- Electric mixer (hand or stand)
- Fine-mesh sieve (for smoothing cream cheese)
- Microwave-safe bowl (for melting chocolate)
Nutritional Benefits
- Each ball contains approximately 145 calories, mostly from healthy fats in the peanut butter and chocolate, making them a satisfying treat in moderation.
- The recipe is a good source of protein (3g per ball) thanks to the peanut butter and cream cheese, which helps balance the sugar content.
- Using reduced-fat cream cheese can cut calories by about 20 per ball, but the texture may be slightly less creamy.
- The graham cracker crust adds fiber (1g per ball), while the peanut topping provides vitamin E and magnesium for a nutrient-dense indulgence.
Reviews
No written reviews yet — be the first to cook this and share how it turned out!
Leave a Review
Frequently Asked Questions
Can I use natural peanut butter in this recipe?
Natural peanut butter often separates and can be too thick for this recipe. If using it, stir it well and thin it slightly with 1 teaspoon of heavy cream to match the consistency of creamy peanut butter. Avoid brands with added oils that can make the mixture greasy.
My chocolate coating is seizing or clumping. What went wrong?
This happens if the chocolate gets too hot or if any water or moisture touches it. Always use a clean, dry bowl and utensils when melting chocolate. If it starts to seize, add 1 teaspoon of coconut oil to help smooth it out, but this may affect the final texture.
Can I make these ahead of time?
Absolutely! Assemble the balls up to 48 hours ahead and store them in the fridge. Dip them in chocolate and add the peanut topping no more than 2 hours before serving to keep the coating crisp and the filling cool.
How do I prevent the balls from sticking to the mold?
Lightly grease your silicone molds with neutral oil or non-stick spray before adding the graham cracker mixture. If using a mini muffin tin, line it with parchment paper to ensure easy removal.
What's the best way to portion the peanut butter filling?
Use a small cookie scoop or melon baller to portion the filling into 1-tablespoon balls. For even sizes, weigh the filling mixture and divide it evenly by the number of balls you want to make.
Can I use a different nut butter, like almond or cashew?
Yes, but the texture and flavor will change. Almond butter can be thinner and may need extra powdered sugar, while cashew butter has a milder taste. Adjust the sweetness to taste and add 1 teaspoon of cream to thin if needed.
Why do my balls look matte instead of glossy?
Chocolate needs a brief cooling period after melting to reach the right dipping consistency. Let it cool for 2-3 minutes, stirring occasionally, until it thickens slightly but is still fluid. A glossy finish comes from properly tempered chocolate.
How do I get the peanut butter drizzle to look perfect?
Pipe the melted peanut butter into a small plastic bag, snip a tiny corner, and drizzle in thin, controlled lines over the balls. For a rustic look, simply spoon small dollops and let them drip naturally.
More Sweet Comfort
🔒 From the Vault — 43,000+ premium recipes



Cook This Next